
I’ve always been proud to avoid the typical headline clickbait of “Ultimate guide to pigeon care”, “All you need to know about the Great Vowel Shift”, “Did you know that you’ve been smoking peyote wrong your whole life?”. I’m ready to make an exception now by adding a BIG WHOPPING NUMBER to the title. You see, the amount of knowledge one can accumulate about anything they do on a daily basis is mind-blowing. It helps if you write a blog about the topic, since creative output is a great way to organize your thoughts. It also helps to be active in community support, since problem-solving is an excellent way to accumulate new skills and to hone the edge of your existing talent.

Now, I already have 50+ GTM Tips written, so it’s not like this is a novel idea, even on this blog. But this time I just wanted to write short, byte-sized things I’ve learned along the way, and I want to share them with you.
As you can read from the outrageously baiting title, there should be 100+ tips, but I only enumerated an even 100. That’s because I want YOU to add your ideas to the end of this post, and let’s see if we can keep it going. Yes, it’s my shameful attempt to delegate content creation to the community. I am guilty of that, too, now.
X
The Simmer Newsletter
Subscribe to the Simmer newsletter to get the latest news and content from Simo Ahava into your email inbox!
Container JavaScript Snippet
1. Initializes the dataLayer
The JavaScript snippet part of the GTM container has one very important function (among others). It initializes the window.dataLayer array. Thus, if you haven’t initialized a dataLayer object yourself, the container snippet will do this for you. This ensures that dataLayer.push() works within GTM.
2. Creates the script loader for the GTM library
Perhaps even more importantly, the JavaScript container snippet creates a element, which loads the Google Tag Manager container library for your GTM container ID from Google’s servers.

3. JavaScript snippet should be in but can be (almost) anywhere
The latest (and best) recommendation for placing the JavaScript snippet is to put it in the4. Pushes the initial event: 'gtm.js'
The JavaScript snippet also pushes the initial event: 'gtm.js' into dataLayer. This is an important GTM event. It is used by the All Pages and Page View triggers. Any Data Layer variables you want to use with these triggers must be added to dataLayer before the JavaScript container snippet is executed.

5. Multiple container snippets on a page are supported
You can add multiple JavaScript container snippets on a page. This is officially supported. The caveat is that they all need to use the samedataLayer name.
Container
6. The
At the time of writing, the block should be added to the very beginning of . This is the only way that Search Console Verification using the Google Tag Manager method will work. Naturally, if you don’t care about verifying the site using the GTM method, nor do you have any use for tracking non-JavaScript visits, you can leave the block out altogether. Just don’t place it in as that would result in HTML validation issues.
7. Only executed by browsers with JavaScript disabled
The snippet is only executed by browsers with JavaScript disabled. If you want to test it, you can disable JavaScript using your browser’s developer tools (e.g. Chrome).
8. Loads an HTML page in an
The block loads an element, which fetches its data as an HTML file from Google Tag Manager’s servers. In essence, this HTML file is your container. The HTML will contain the image elements you have configured to fire for JavaScript-disabled visitors.
9. Only the Page View trigger works
Because the JavaScript-less GTM can’t run JavaScript (d’oh), only the Page View trigger is at your disposal. Thus, there’s no dynamic triggers, and no way to wait for the page to load or anything like that. The Page View trigger is fired when the contents are fetched.
10. Use a function() { return true; } Custom JavaScript variable in the trigger
A very handy way to fire tags only when executed in the is to create a Custom JavaScript Variable with the following content:
function() {
  return true;
}
This variable will only return true if the browser executes it, i.e. executes JavaScript. By adding {{Variable}} does not equal true as a trigger condition fires the trigger only in browsers where JavaScript is disabled.
11. Only the Custom Image tag is useful
Since the JavaScript-less container can’t execute JavaScript, you are left with just the Custom Image tag. In other words, you can create image elements that are added directly into the container HTML. These image elements will then be rendered by the browser. In fact, you can even do some basic Google Analytics tracking using an image tag, since GA requests are basically image pixels. See this LunaMetric guide for inspiration.
12. Can utilize “Data Layer” parameters via query parameters
You can feed “Data Layer” values to the container HTML using query parameters in the src attribute value. The query parameters need to be added as key-value pairs, and the keys that you add can then be used in Data Layer variables. For further details, see the Bounteous guide linked to in the previous paragraph, or check the guide I’ve written.
The dataLayer structure
13. Global JavaScript array
The dataLayer structure is a global JavaScript array, and can thus be accessed in any site code that can also access the window object. It’s a good idea to always prefix the dataLayer name with window. to avoid conflicts with any locally scoped structures that use the same name.
14. You can use a different name than dataLayer
You can change the name of this global structure in the JavaScript container snippet. Just remember to always use this new name when adding messages to dataLayer!

15. Only the .push() method works with GTM
Google Tag Manager only reacts to the .push() method. You can .splice(), .slice(), .shift() and .pop() all you like. GTM only listens for .push() commands.
16. Typically only plain objects work with GTM
The most common way to feed data to Google Tag Manager is using plain objects. Each object contains one or more key-value pairs. These key-value pairs are then translated into Data Layer variables, which you can create in Google Tag Manager to fetch values from the Data Layer.
var plainObject = {
  someKey: 'someValue',
  someOtherKey: 'someOtherValue'
};
window.dataLayer.push(plainObject);
17. You can use any JavaScript type as a value of a key
All JavaScript types are supported as values when you push your dataLayer messages. When you create a Data Layer variable in GTM, it will contain a reference to whatever the value of the key is, regardless of type.
window.dataLayer.push({
  type_number: 5,
  type_string: 'hello',
  type_object: { someKey: 'someValue' },
  type_array: [1,2,3,4],
  type_function: function() { return 'hello'!; },
  type_boolean: true
});
18. Only event key can trigger tags
Only a message with an event: 'someValue' key-value pair can trigger tags. Any object without an 'event' key is treated as just a “message”, and has no triggering power of its own.
19. You can also .push() a command array
There’s a special command array you can .push() into dataLayer if you want to execute methods for values already in the data model. So technically it’s not just plain objects that dataLayer digests. There’s more about this in tip #26.
20. Never overwrite, always .push()
I usually hate to dole out best practices, so consider this a fact of life instead. Never, ever, ever, ever use this syntax:
It’s destructive. If this command is executed after the GTM container snippet or after you’ve already established a dataLayer object, you will end up overwriting the existing object with this newly initialized structure. Worst-case scenario (surprisingly common) is that you’ll end up breaking GTM, since you also overwrite the custom .push() listener added by the container library.
Prefer this syntax instead:
window.dataLayer = window.dataLayer || [];
window.dataLayer.push({...});
21. The array is capped at 300
This is perhaps more obscure, but in addition to adding a .push() listener, the GTM container library also caps the length of the dataLayer structure at 300. This means that when you .push() the 301st item into dataLayer, the first/oldest item in dataLayer is removed. As you will learn in the next section, this has no impact on GTM’s data model. It just caps the dataLayer structure itself.
GTM’s data model
22. Copies messages queued via dataLayer.push()
When you use the Data Layer Variable, Google Tag Manager doesn’t fetch the value from the dataLayer array. Instead, it polls its own internal data model to see if any value has been pushed to the given key (or variable name). If a value is found, GTM returns it. This means that GTM’s internal data model has access to the most recently pushed value for any given key.
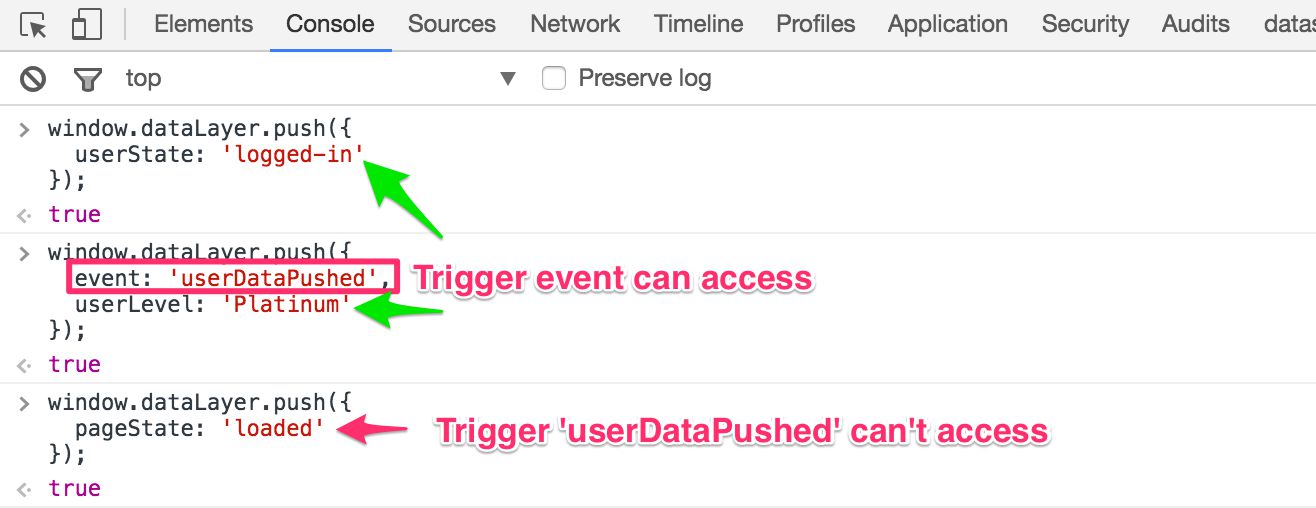
23. GTM freezes variable values when a trigger fires
Triggers only fire when the key 'event' is pushed into dataLayer. When this happens, GTM “freezes” the state of the container, and any tags that fire on this trigger will only have access to the current state of the internal data model. Thus, if you want to push values into dataLayer so that they become available to a tag that triggers on the site, these values need to be pushed before or in the same object as the 'event' that triggers the tag.

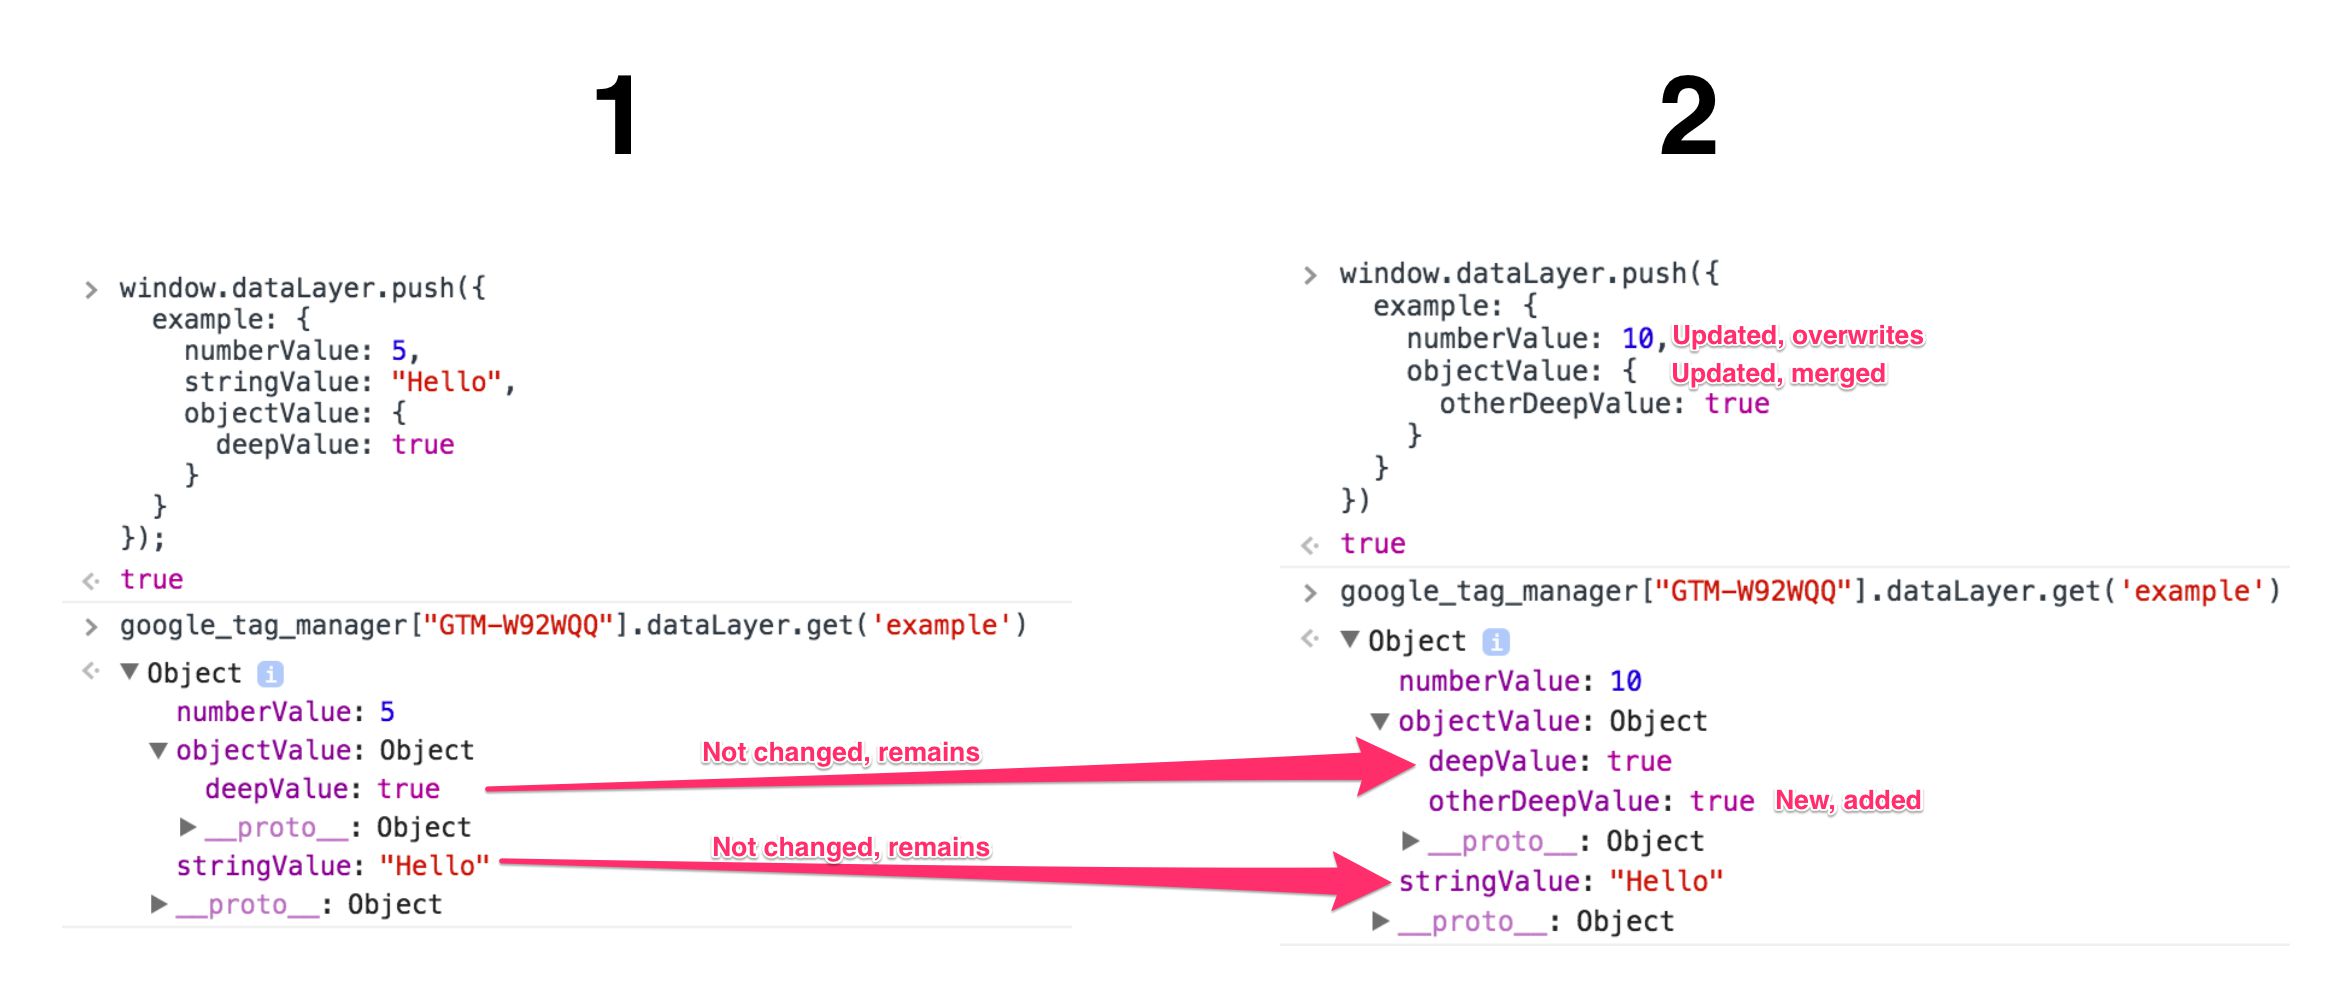
24. Objects are recursively merged
Recursive merge is one of the more complex concepts to understand. When you work with primitive values (strings, numbers, booleans, for example), the internal data model of GTM only has access to whatever was most recently pushed into a key whose value is one of these primitive types. However, when you work with structured objects and arrays, it’s more complicated.
When you push an object into dataLayer, GTM goes through each key in this object, and only overwrites those that have shared keys and primitive values (or where the type changes). New keys are simply added to the existing object value.

When pushing an object to a key that already contains an object with the same keys, only the keys that have primitive values or a different type are overwritten. All others are simply updated.
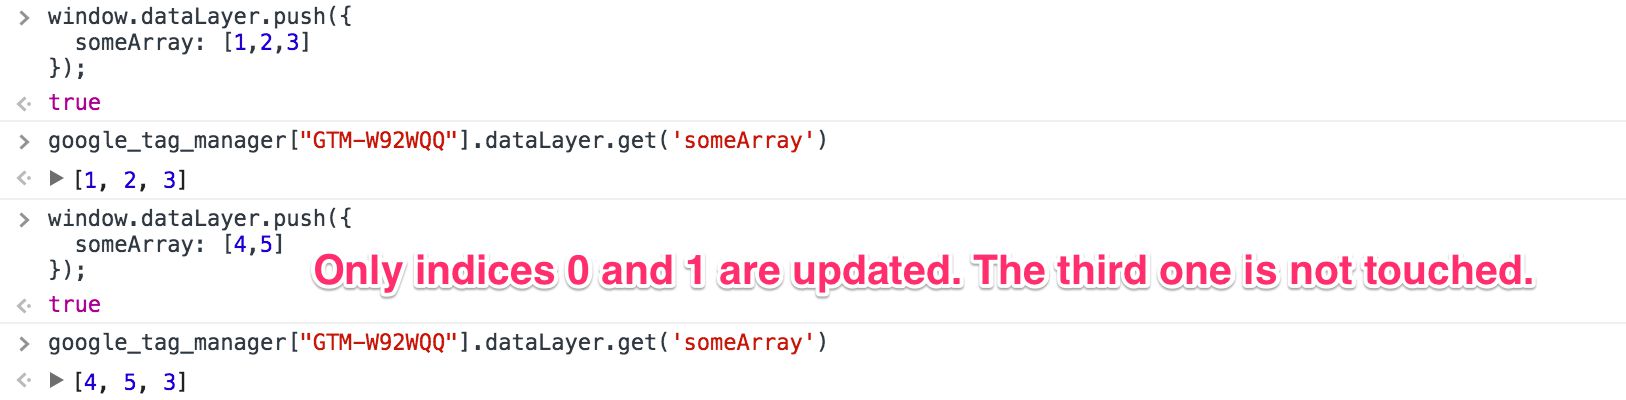
25. Arrays are recursively merged
In JavaScript, arrays are structured objects, too, where the keys are index numbers that start from 0. So when you push an array into a key that already had an array, these two arrays are recursively merged starting from index 0, and any indices that are not modified remain the same.

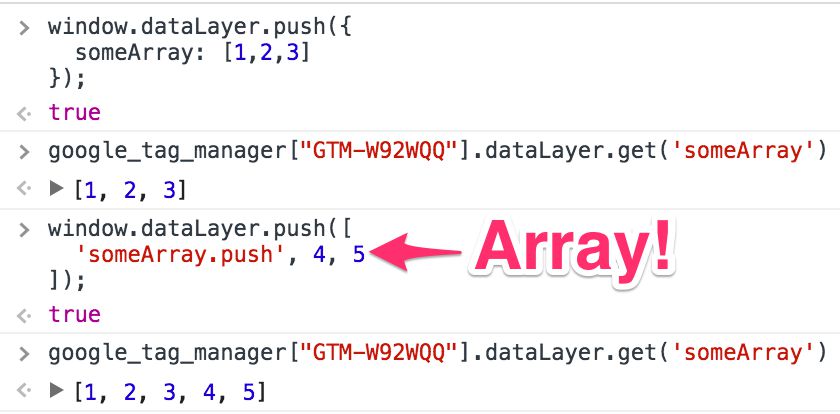
26. You can run JavaScript methods on existing Data Layer values with a command array
What if you already have an array in a key, but instead of merging or overwriting you want to add values to it, i.e. push items to the end of the array? You can use a special command array that you push into dataLayer. The first element in the array is a string that contains the key name and the command you want to execute, and all the other items are passed as arguments to the command.

27. Version 1 vs. Version 2 of the Data Layer Variable
You’ve probably noticed that you can choose a version when using the Data Layer Variable. There are some very important differences between the two.
Version 2 supports deep structures with dot notation. If you want to access array indices, you need to use dot notation too (products.0.name rather than products[0].name). Only Version 2 supports recursive merge.
Version 1 does not support dot notation, and it only fetches the most recently pushed value whether it’s an object or not. Thus there’s no recursive merge – what you push is what you get.
28. google_tag_manager['GTM-XXXX'].dataLayer methods
If you want to access values stored in Google Tag Manager’s data model from outside GTM or without using a Data Layer Variable, you can use the google_tag_manager interface.
google_tag_manager['GTM-XXXX'].dataLayer.get('keyName') fetches the value stored in GTM’s data model for variable name keyName.
google_tag_manager['GTM-XXXX'].dataLayer.set('keyName', 'someValue') sets the value of keyName to someValue in GTM’s data model. This is the equivalent to using dataLayer.push({keyName: 'someValue'});
google_tag_manager['GTM-XXXX'].dataLayer.reset() purges GTM’s data model, removing all stored keys.
Preview mode
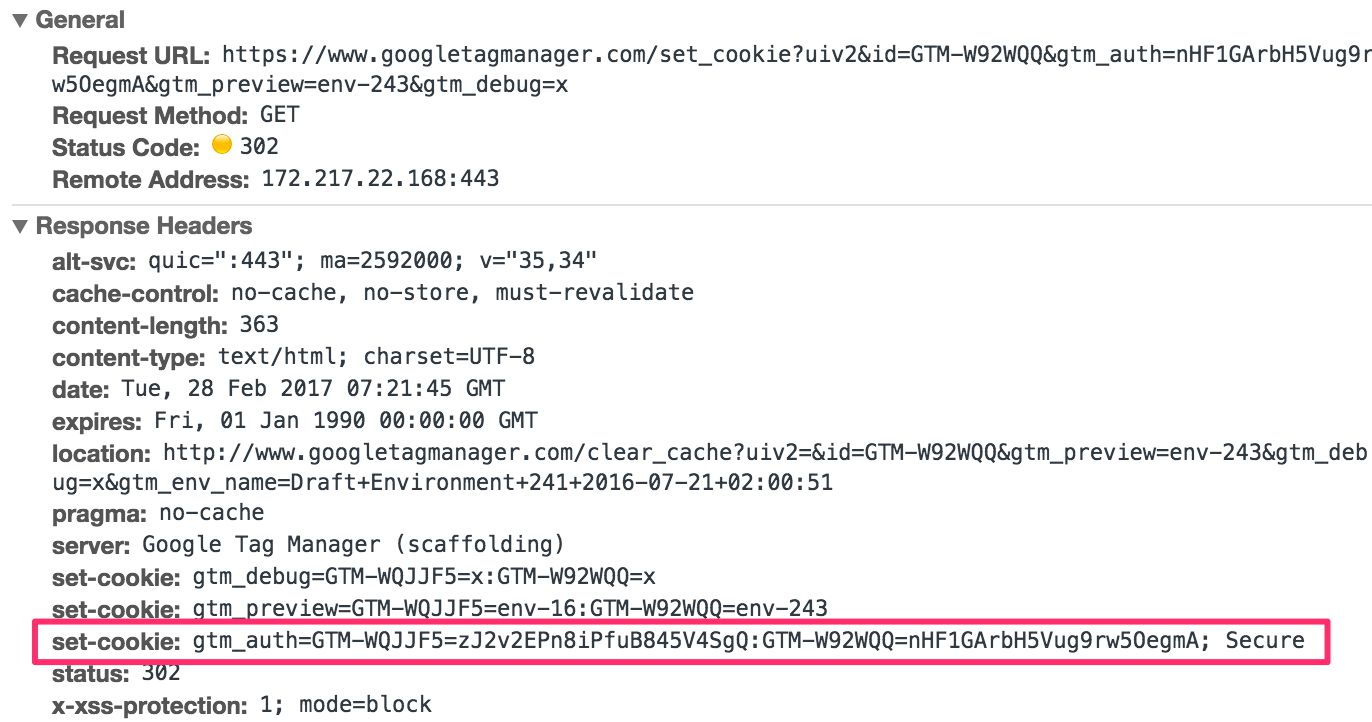
29. Preview mode works with a cookie on www.googletagmanager.com in the preview browser
When you enter GTM’s Preview Mode, you are transported through the domain www.googletagmanager.com (the same domain that serves the gtm.js library), during which a cookie is written in your browser for that domain.

When you then visit your website, the request for the gtm.js library identifies that you have the Preview mode cookie written on www.googletagmanager.com, and the preview container library is returned instead. So what you’re basically dealing with is a third-party cookie, even though the cookie isn’t set while browsing the site itself.
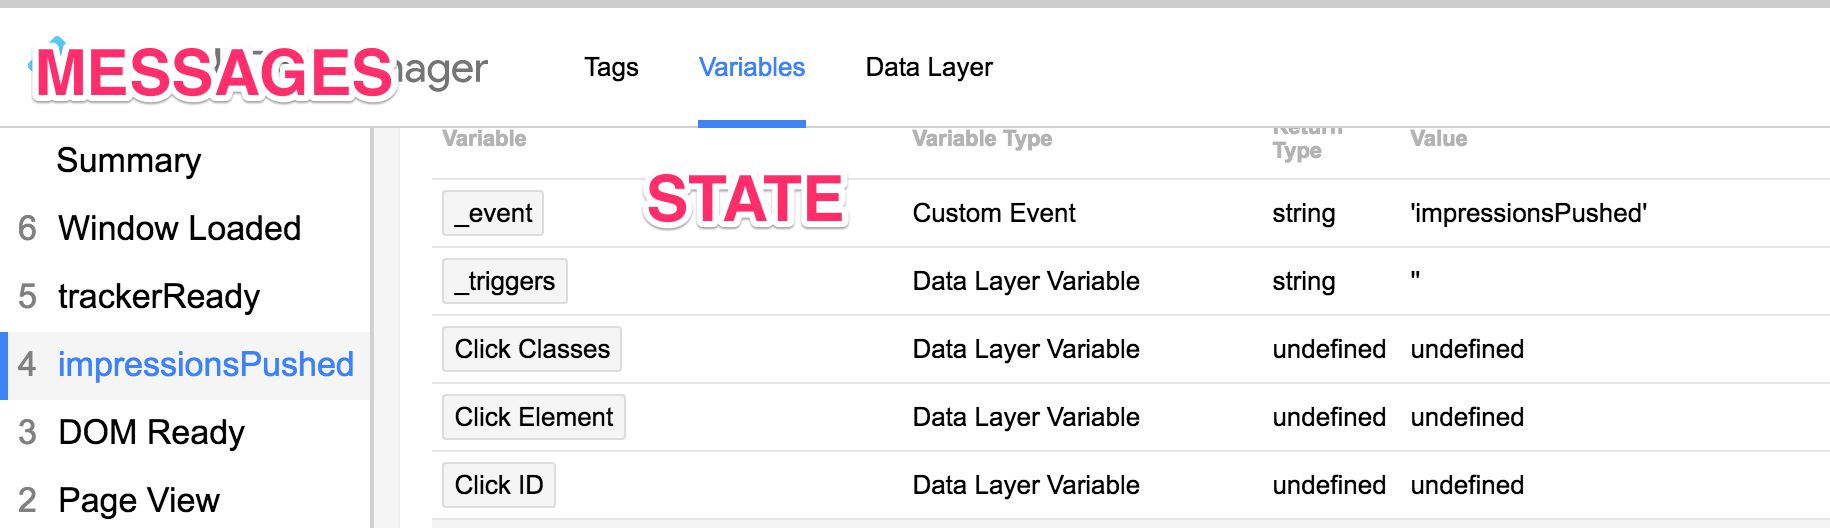
30. Shows the state of tags, triggers, variables, and Data Layer at each Data Layer message
Preview mode is a great way to understand how Google Tag Manager works. The navigation in the left column is a chronological (oldest at the bottom) list of messages that have been pushed into dataLayer. By selecting a message, you can see if any tags fired during that message, and you can see the state of tags, variables, and triggers at the time of the message.

What you see is what you get. If the variable does not have a value at the time of the message, it means that any tags that fire for that message will not have access to any value if using that variable. This is why it’s important to understand that if you want to use a variable, it must have a value when the message that triggers the tag is pushed into dataLayer.
31. Summary shows the state at the latest message
Summary is not a message itself. It’s a recap of what the state of the container is after the latest message has fired. Note that if you have Summary (or any other message, for that matter) selected, and you select a tag that fired in an earlier message, the tag might have different values than what you’d expect. That’s because when you select a message (or Summary), the variables reflect what their values are at the time of the selected message. This way tags can show different values from those that were actually used.
That’s why it’s really important to start debugging by selecting the message that fired the tag. Any other message and you might see confusing data.
32. Variables are resolved multiple times – at least once per message
If you’ve ever created a variable with side effects and then gone to preview mode, you might have been surprised at what happens. For example, create a Custom JavaScript Variable with this:
function() {
  window._testCount = window._testCount || 1;
  return window.alert(window._testCount++);
}
Now when you go to Preview mode, you’ll see a bunch of alerts with a number that increments with each alert. Depending on how many messages are pushed into dataLayer and how many tags use this variable, you might see a huge number in the last alert box.
This is because GTM resolves variables in Preview mode multiple times. Preview mode needs to resolve the variables at least once per message pushed into dataLayer. Why? Because Preview mode must be able to tell you the value of each variable in each tag, trigger, variable, and message.
In a live container, variables won’t be resolve this many times. Most likely they are only resolved when they are directly invoked, e.g. in triggers and tags upon injection.
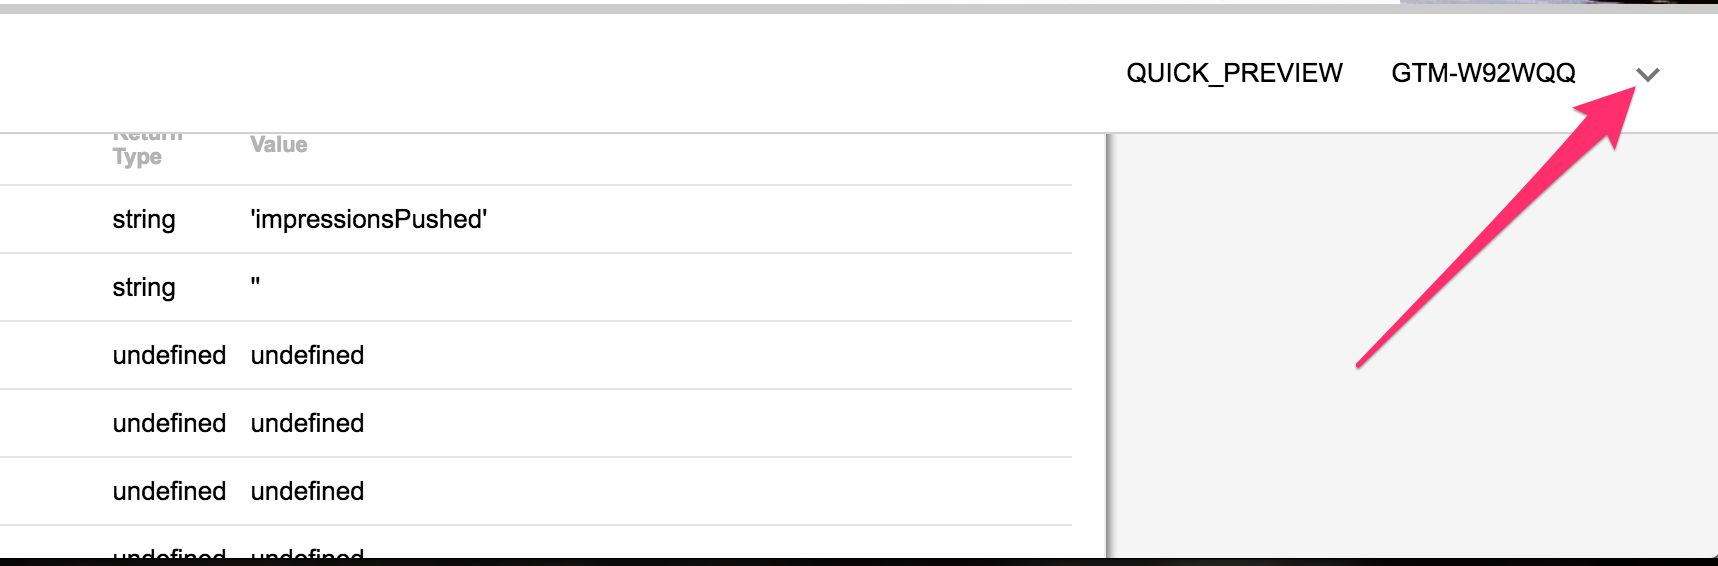
33. Preview can be minimized
The Preview mode panel can be visually obstructive, so it’s a good thing the developers added a minimize button some time ago:

After clicking it, you can bring the panel back up by clicking the small DEBUG ^ icon in the lower right corner of the window.
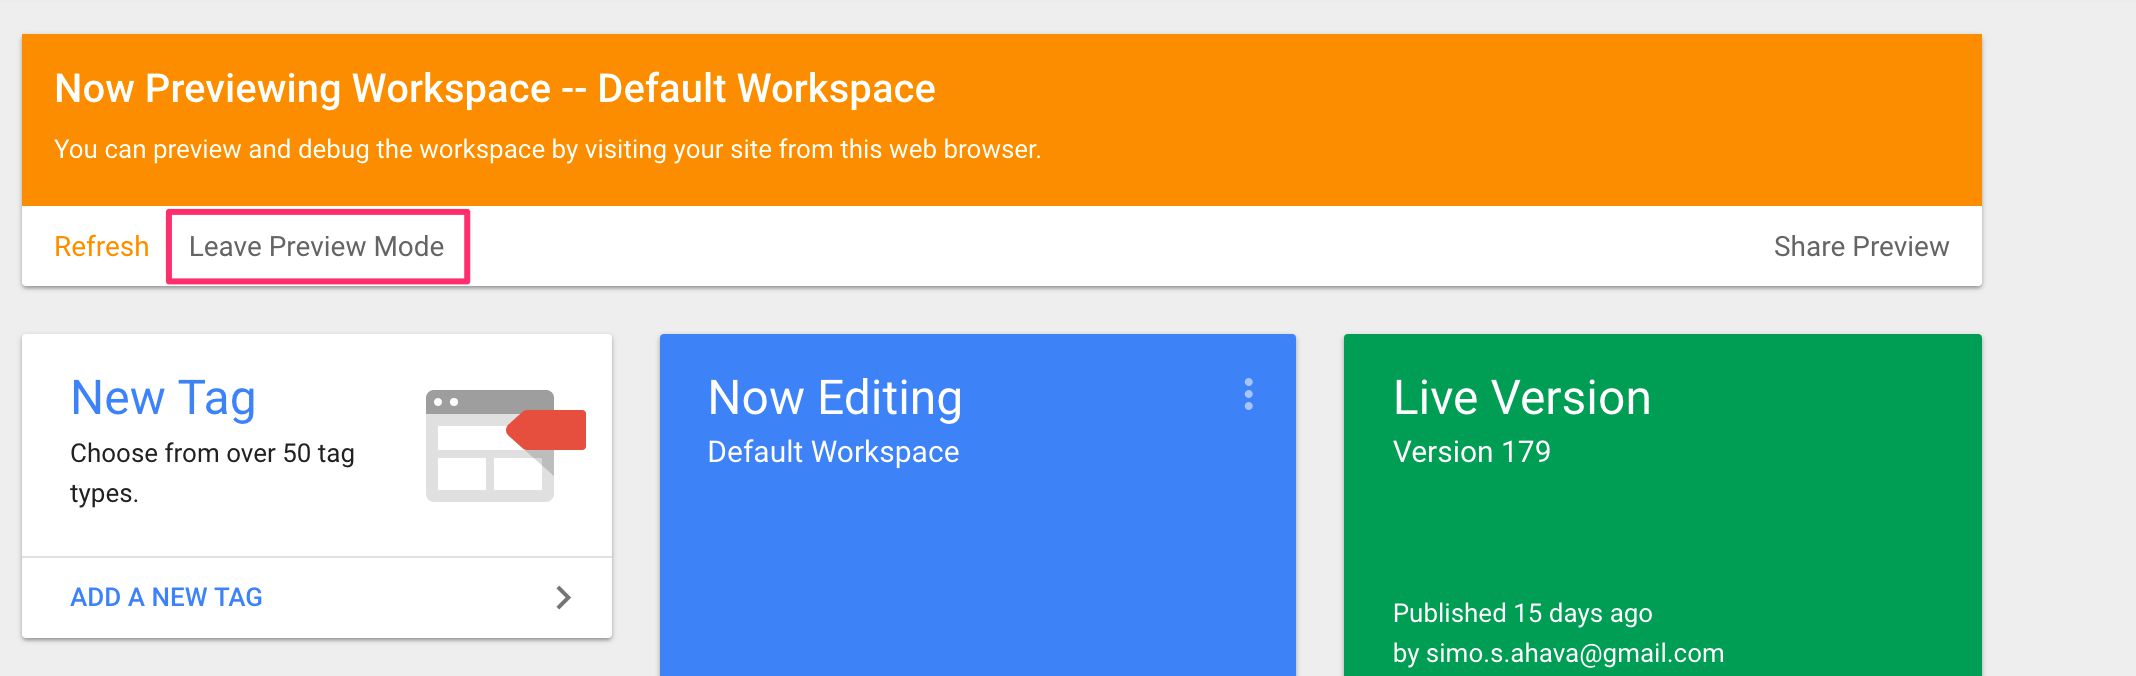
34. To quit preview, you need to exit preview mode via the GTM UI
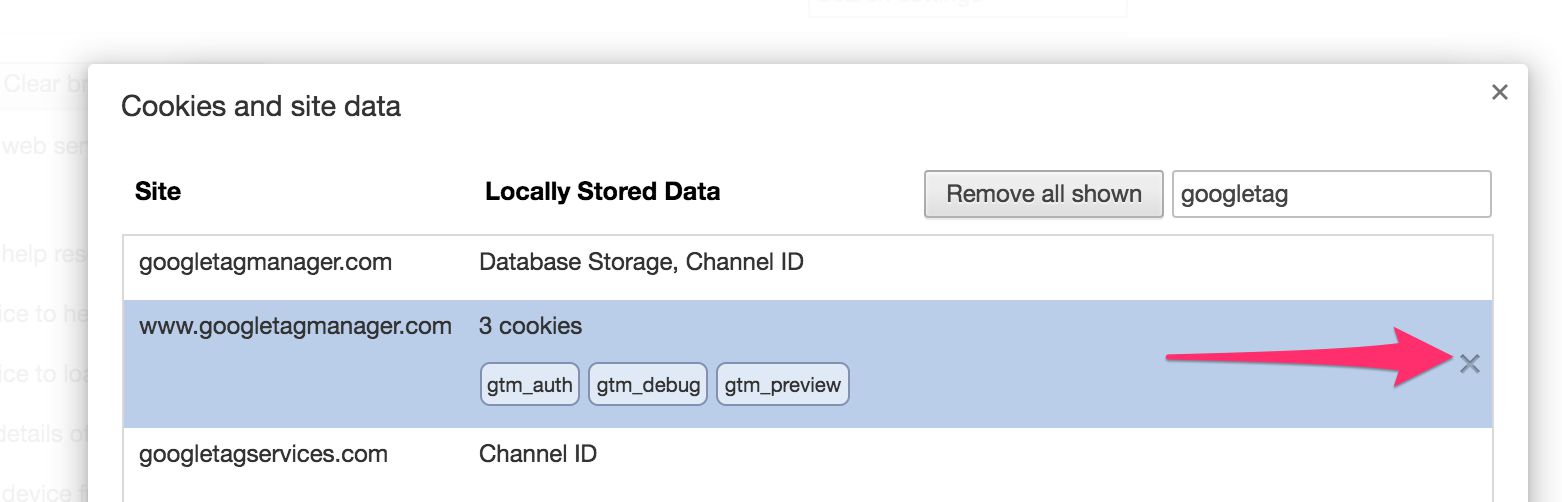
The easiest way to quit Preview mode is to go to the Google Tag Manager user interface and click the “Leave preview mode” link:

You can also go to your browser’s content settings, and delete all cookies written on the www.googletagmanager.com domain. This works with Shared Preview, too.

Wouldn’t it be handy if you could just quit Preview mode from the panel itself on the site? Yes, I think so too.
35. To quit a shared preview, you need to follow the original link
If you want to quit Preview mode that has been shared with you, you should follow the original Share Preview link and click “Exit preview and debug mode”.

Note that you can also delete the cookies as described in the previous tip.
36. Problems with the preview mode not showing correctly are most typically due to CSS conflicts
Sometimes you might not see a Preview mode on a website at all. Other times the panel might be buggy, such as being partly transparent or completely white.
In these cases, it’s most often a CSS conflict with the site code. GTM loads the panel on the website itself, so style conflicts can arise if they share the same namespace.
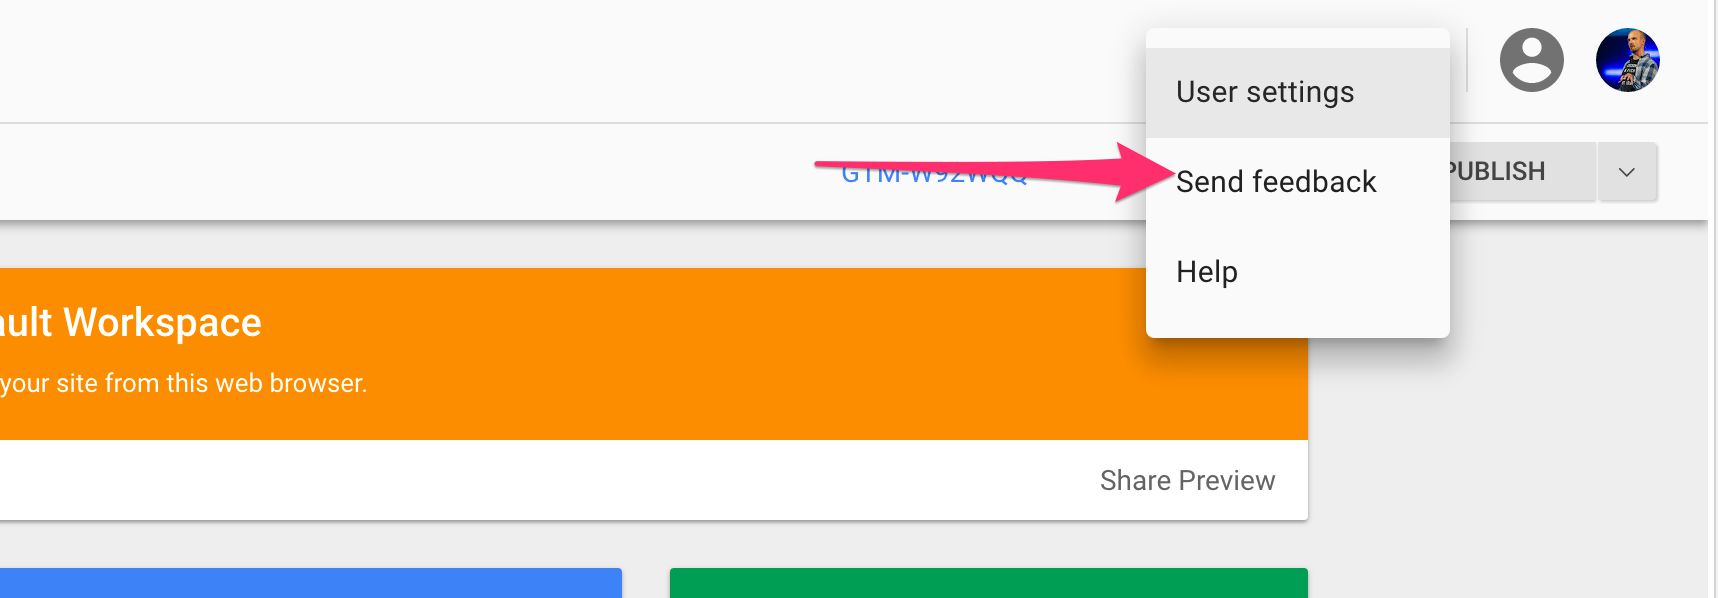
If this happens, your best bet is to contact the developer team via the Send Feedback link in the UI, or by posting the issue in the Product Forums.

37. You can also preview without the debug panel
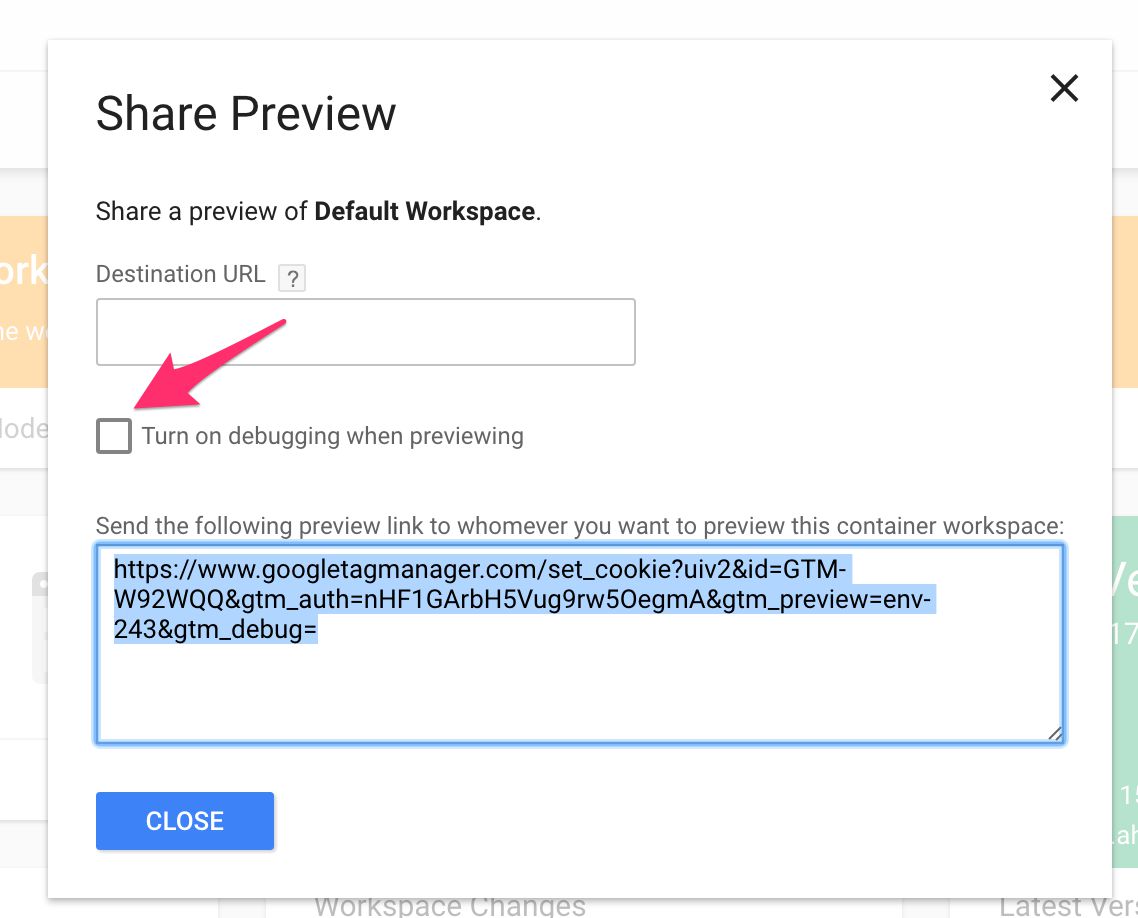
Note that you can also preview a container on the site without the benefit of the debug panel. Why you’d want to do this when you can minimize the debug panel escapes me, but to do so you need to click the Share Preview link in the GTM UI, uncheck “Turn on debugging when previewing”, and then follow the link in your browser. This sets your browser into Preview mode without showing the debug panel.

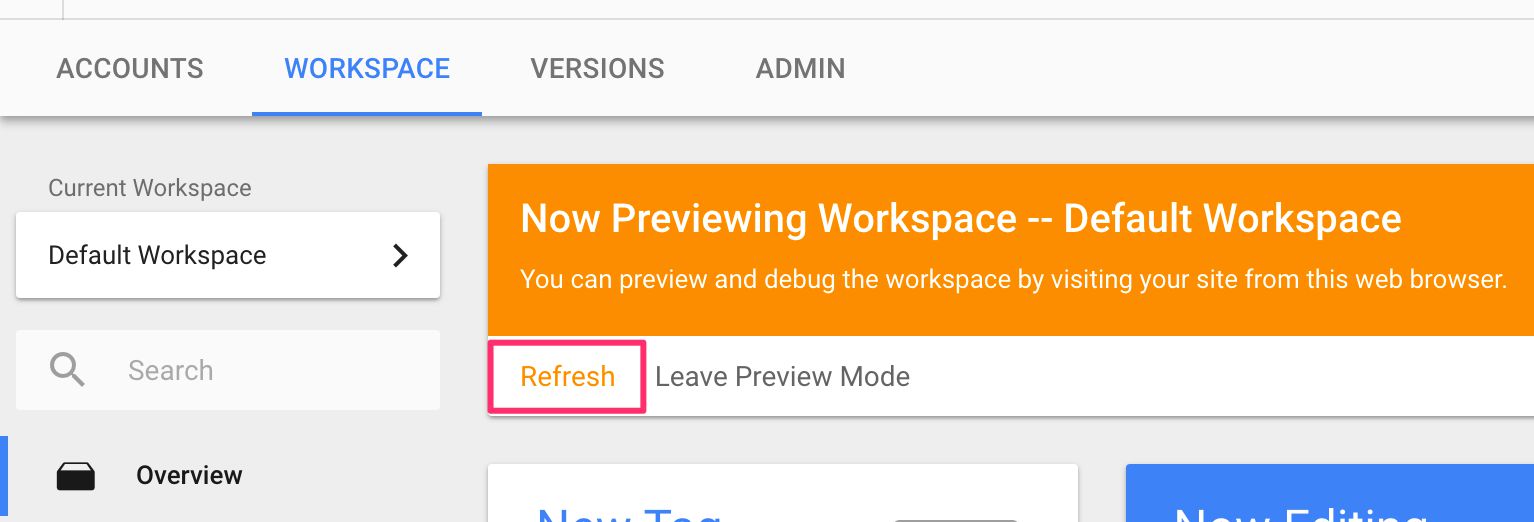
38. Preview must be refreshed after every change
GTM doesn’t auto-refresh the Preview mode when you save changes in your container. You need to click the “Refresh” link to update the preview mode for yourself and anyone with the preview link.

Universal Analytics
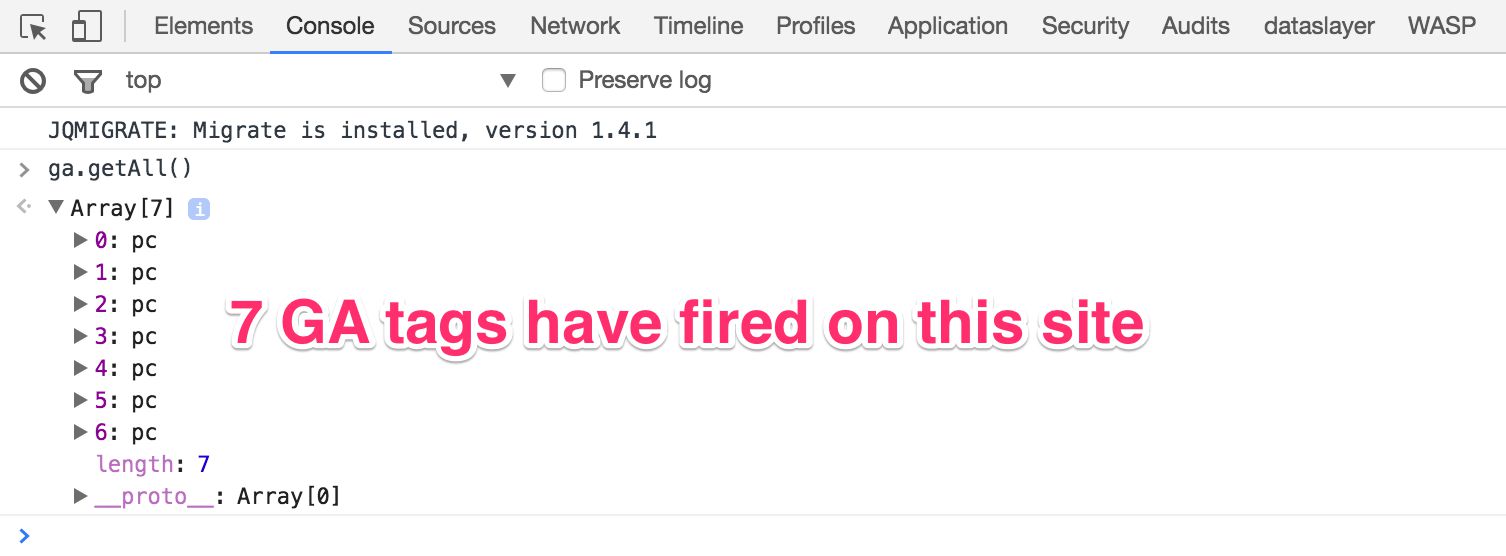
39. GTM creates a new tracker with every tag instance
Unlike on-page Universal Analytics (analytics.js), Google Tag Manager creates a new, unique tracker object with every single tag that fires, even if they use the same template.
This might not be the most elegant technical design ever, but it’s necessary in how GTM structures Universal Analytics tags. Basically each tag is its own sandbox, and settings are not shared from tag to tag.
40. Settings are not shared across tags
Because each tag has a unique tracker, no settings are shared from tag to tag. This is very much unlike on-page Universal Analytics, where you create a single tracker and then invoke that tracker in commands like ga('trackerName.send', 'pageview');.
If you want to share settings of a single tag with other tags, currently you need to set the Tracker Name field in the tag settings. But before you do, read the next tip.
41. You can set a tracker name, but most often this is risky and unnecessary
If you do set the Tracker Name, you are likely to run into a host of problems. First of all – ALL settings are shared across the two tags. This is because GTM sets all fields and Custom Dimension / Metrics on the tracker object itself rather than just the hit. So you’ll need to take great care to reset any fields that you don’t want values to leak into.
Until GTM introduces some type of shared tag settings feature, I suggest avoiding the tracker name setting and working with GTM variables instead. If you want a setting to apply across two or more tags, just replicate the setting in each tag and use a variable to populate the same value in all the tags.
42. Use Fields to Set for setting any analytics.js fields
You can use Fields to Set to set any analytics.js fields. These fields are set on the tracker object itself (see previous tip), but will work as if set on the hit itself.
You can also add Measurement Protocol parameters to Fields to Set, but this is, in most cases, unnecessary.
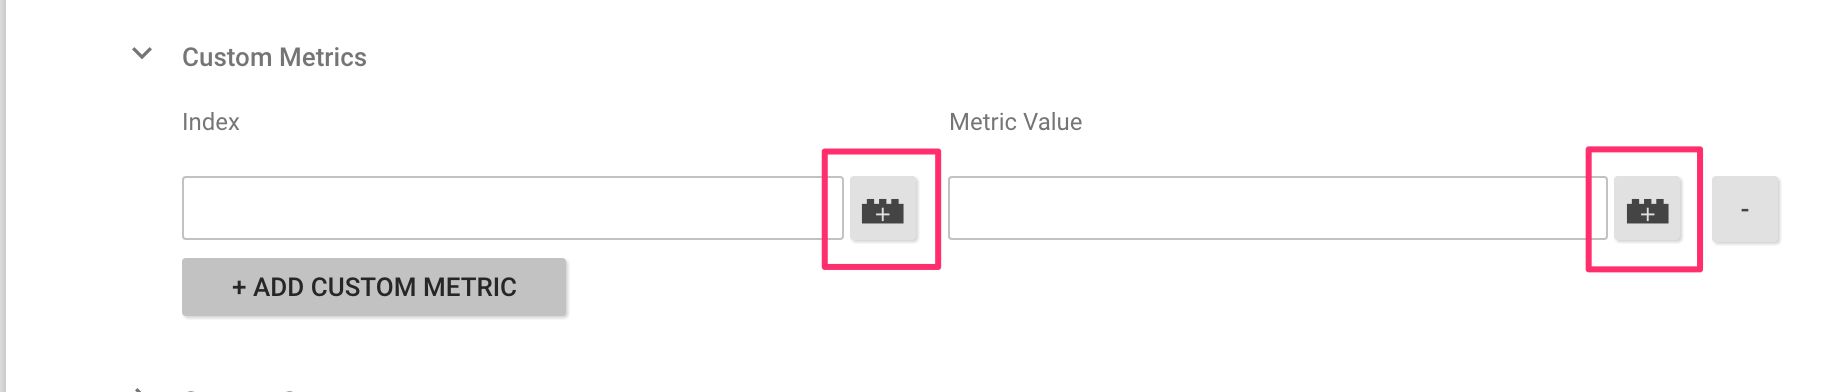
43. If a field has the variable icon, you can use variables in it
Fields in Google Tag Manager support adding a variable if the field has the variable icon next to it.
By clicking the icon, a list of all available variables pops up. You can also use the auto-complete feature by typing {{ into the field, after which an auto-complete menu shows, and you can continue typing to find the variable you’re looking for.
Enhanced Ecommerce
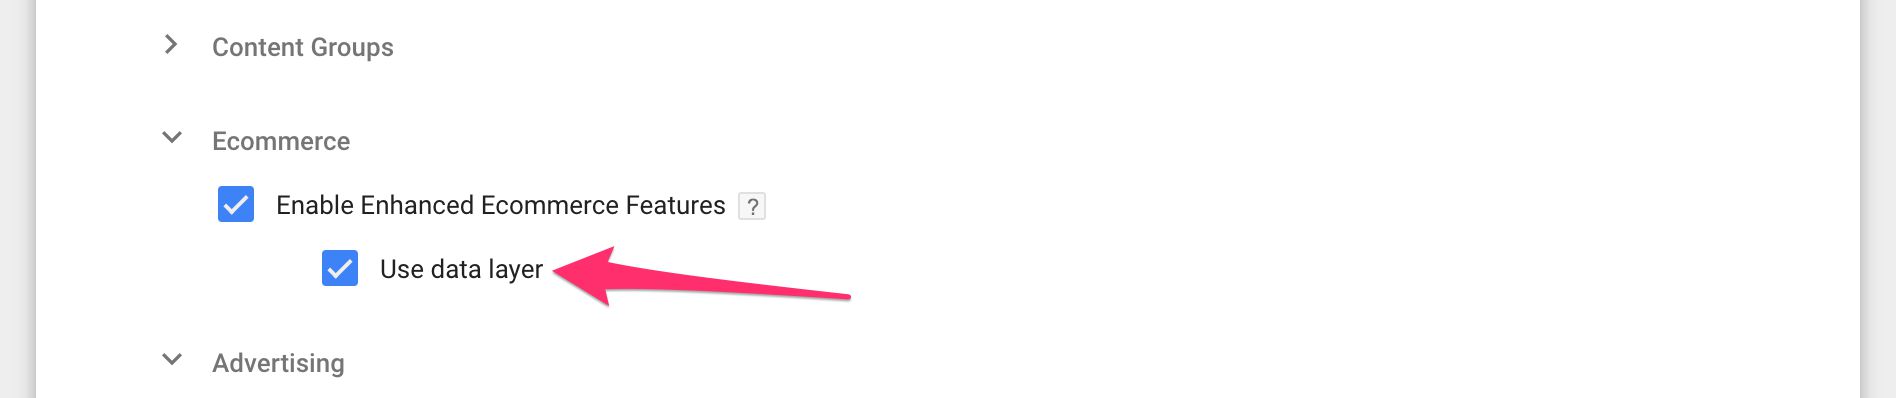
44. Use Data Layer option uses Version 1 of the Data Layer Variable
When you select the Use Data Layer option in your Enhanced Ecommerce enabled Universal Analytics tags, GTM uses the Version 1 of the Data Layer Variable to locate the most recently pushed ecommerce key from the Data Layer.

Read that again. GTM only has access to the most recently pushed Enhanced Ecommerce payload in dataLayer. This means that if you first push impressions, for example, but don’t fire a tag, and then you push a Product Detail View which does fire a tag, that tag will only access the Product Detail View data. The impressions data is lost in cyberspace, due to no tag firing when it was pushed to dataLayer. To avert this, either make sure you always add an event to all your Enhanced Ecommerce pushes, and always use a Custom Event Trigger to fire an Enhanced Ecommerce enable tag.
Alternatively, you can use the far more flexible Custom JavaScript variable method.
45. Requires Data Layer object to be syntactically flawless
Enhanced Ecommerce is a bit different from how Data Layer typically works. Generally, you can push any key-value pairs into Data Layer, because you can always transform and mutate them in the GTM UI later on. However, when working with Enhanced Ecommerce, either via “Use Data Layer” or the Custom JavaScript Variable method, the payload must be syntactically accurate. It must have all the required keys, it must be structured correctly, and it must obey certain limitations to the structure (more details about structure).
You should always make sure you’re following the official developer guide to the letter.
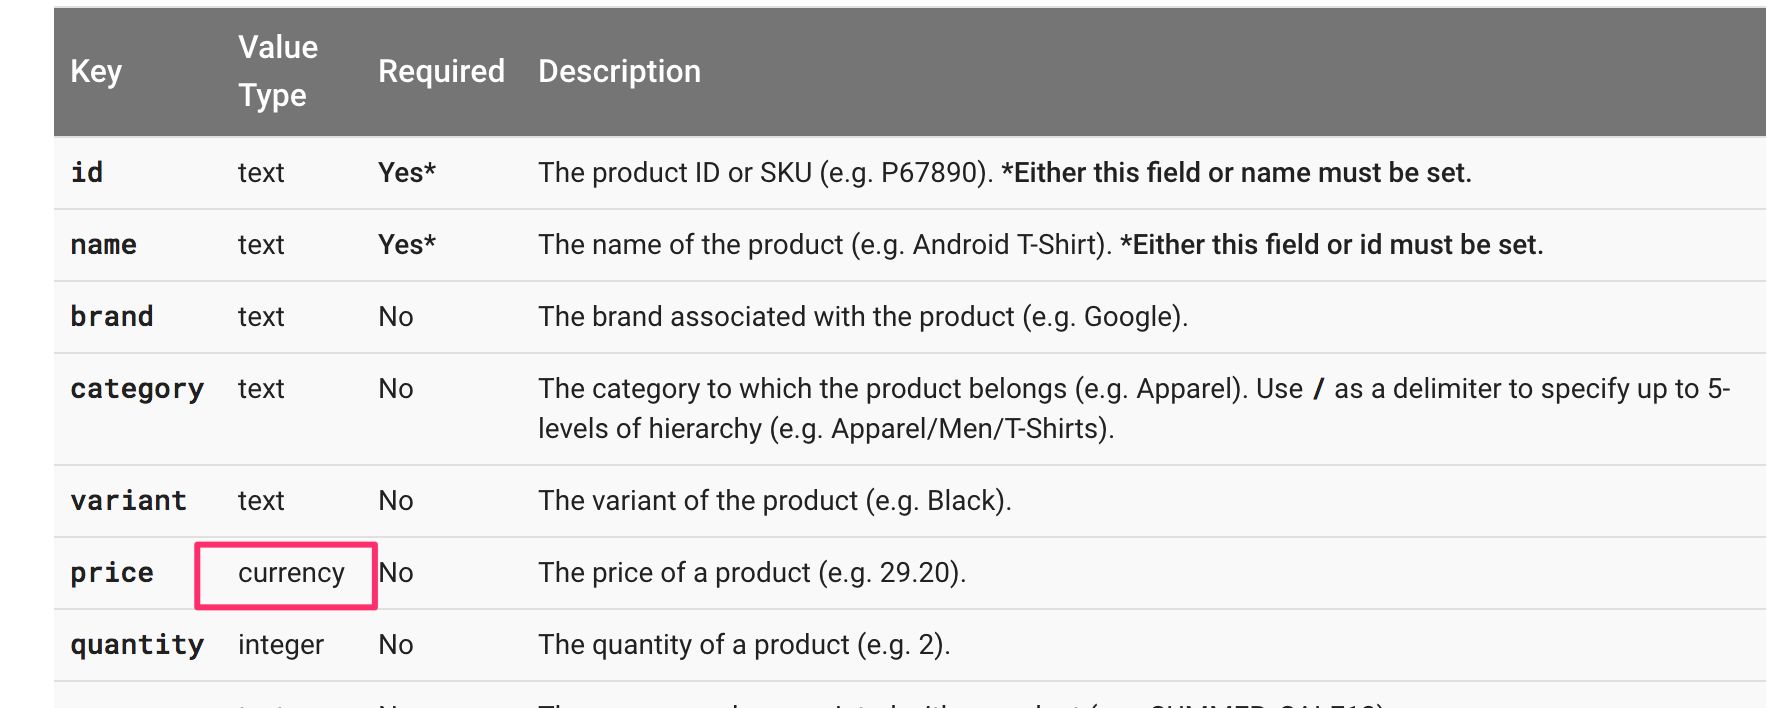
46. The Currency type is just a string with a monetary value
If you read the official Enhanced Ecommerce developer guide, you might have noticed references to a type called “currency”.

Well, there’s no such data type in JavaScript. What the guide means is a string that has a monetary value (without currency symbol). Don’t use a thousand separator (e.g. “1 045.99”), and use the period as the decimal character.
A valid “currency” type would be "1045.99". Invalid types would be "1 045.99" and "1045,99". Due to loose typing in JavaScript, you could just as well pass it as a number 1045.99, but that will definitely lead to problems if the number is incorrectly formatted.
47. Product-scoped Custom Dimensions and Metrics need to be formatted correctly
Product-scoped Custom Dimensions and Metrics need to be formatted in a certain way to work. With regular Custom Dimensions and Metrics, all you need to do is add them to the tags under the respective tag settings.
However, in Enhanced Ecommerce, all the information must be in the payload. With Product-scoped Custom Dimensions and Metrics, this data must be in the products array, under each individual product you want to add the dimensions and metrics to. The dimensions and metrics must be named dimensionX and metricX where X is the index number for the given custom variable.
{
  ecommerce: {
    purchase: {
      actionField: {
        ...
      },
      products: [{
        id: '1',
        name: 'Shirt',
        dimension1: 'Red',
        metric1: 132,
        quantity: 1,
        price: '10.99'
      },{
        id: '2',
        name: 'Pants',
        dimension1: 'Black',
        dimension2: 'Adidas',
        metric1: 133,
        quantity: 1,
        price: '13.99'
      }]
    }
  }
}
48. Custom JavaScript variable method is more flexible than Use Data Layer
I always implement Enhanced Ecommerce using the Custom JavaScript variable method. It gives me so much more flexibility, as I can simply create the original dataLayer object as semantically unambiguous as possible, and then use the Custom JavaScript variable to mutate the object into the state the Enhanced Ecommerce requires. Why? Because I have plenty of other platforms that need the ecommerce data, too, and they might not be happy with the way that Google Tag Manager enforces a specific structure.
function() {
  var order = {{DLV - Order}};
  return {
    ecommerce: {
      purchase: {
        actionField: {
          id: order.orderId,
          revenue: order.price.totalWithTax,
          tax: order.price.taxValue,
          affiliation: order.store.name
        },
        products: [order.productsForGTM]
      }
    }
  };
}

The Custom JavaScript variable itself is simple. All you need to do is make sure it returns a valid Enhanced Ecommerce object as required by Google Tag Manager.
Triggers
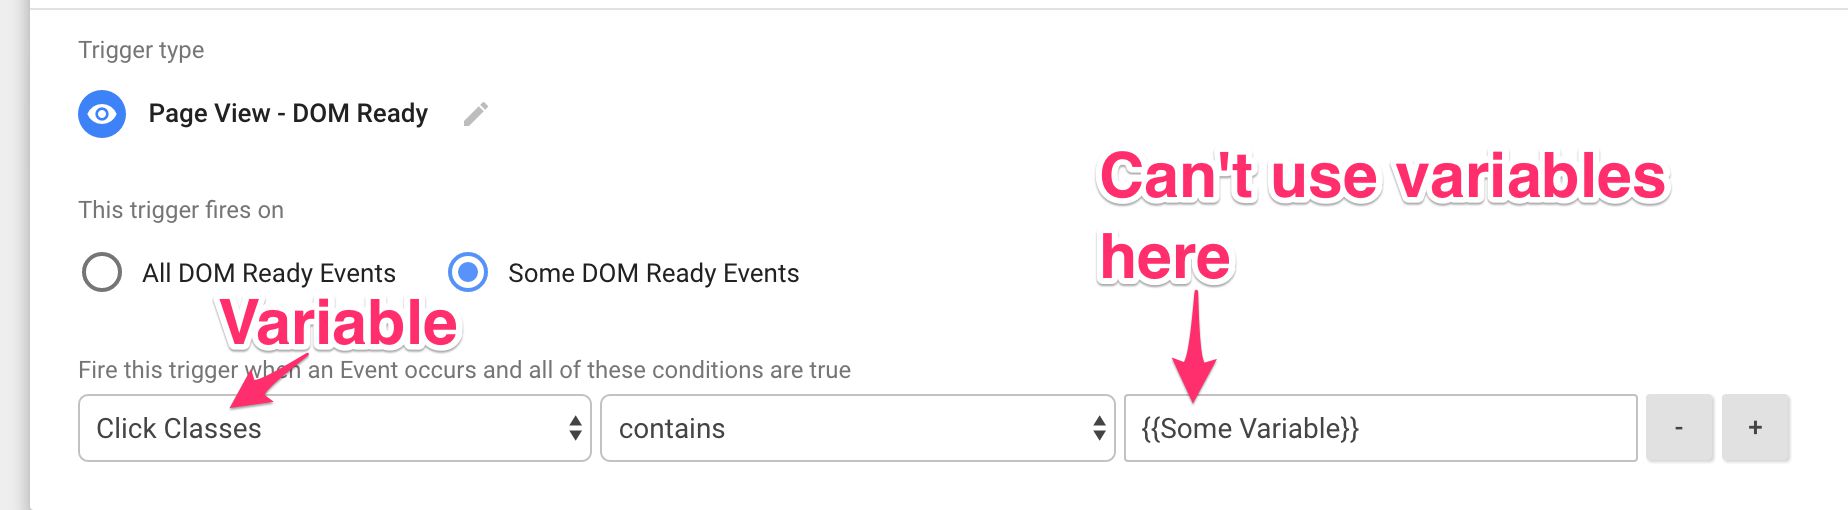
49. Variables can only be used to check against
This is perhaps slightly oddly worded, but what I mean is that you can only use a variable as the thing in the trigger whose value you are checking. You can’t use a variable as the condition value itself.

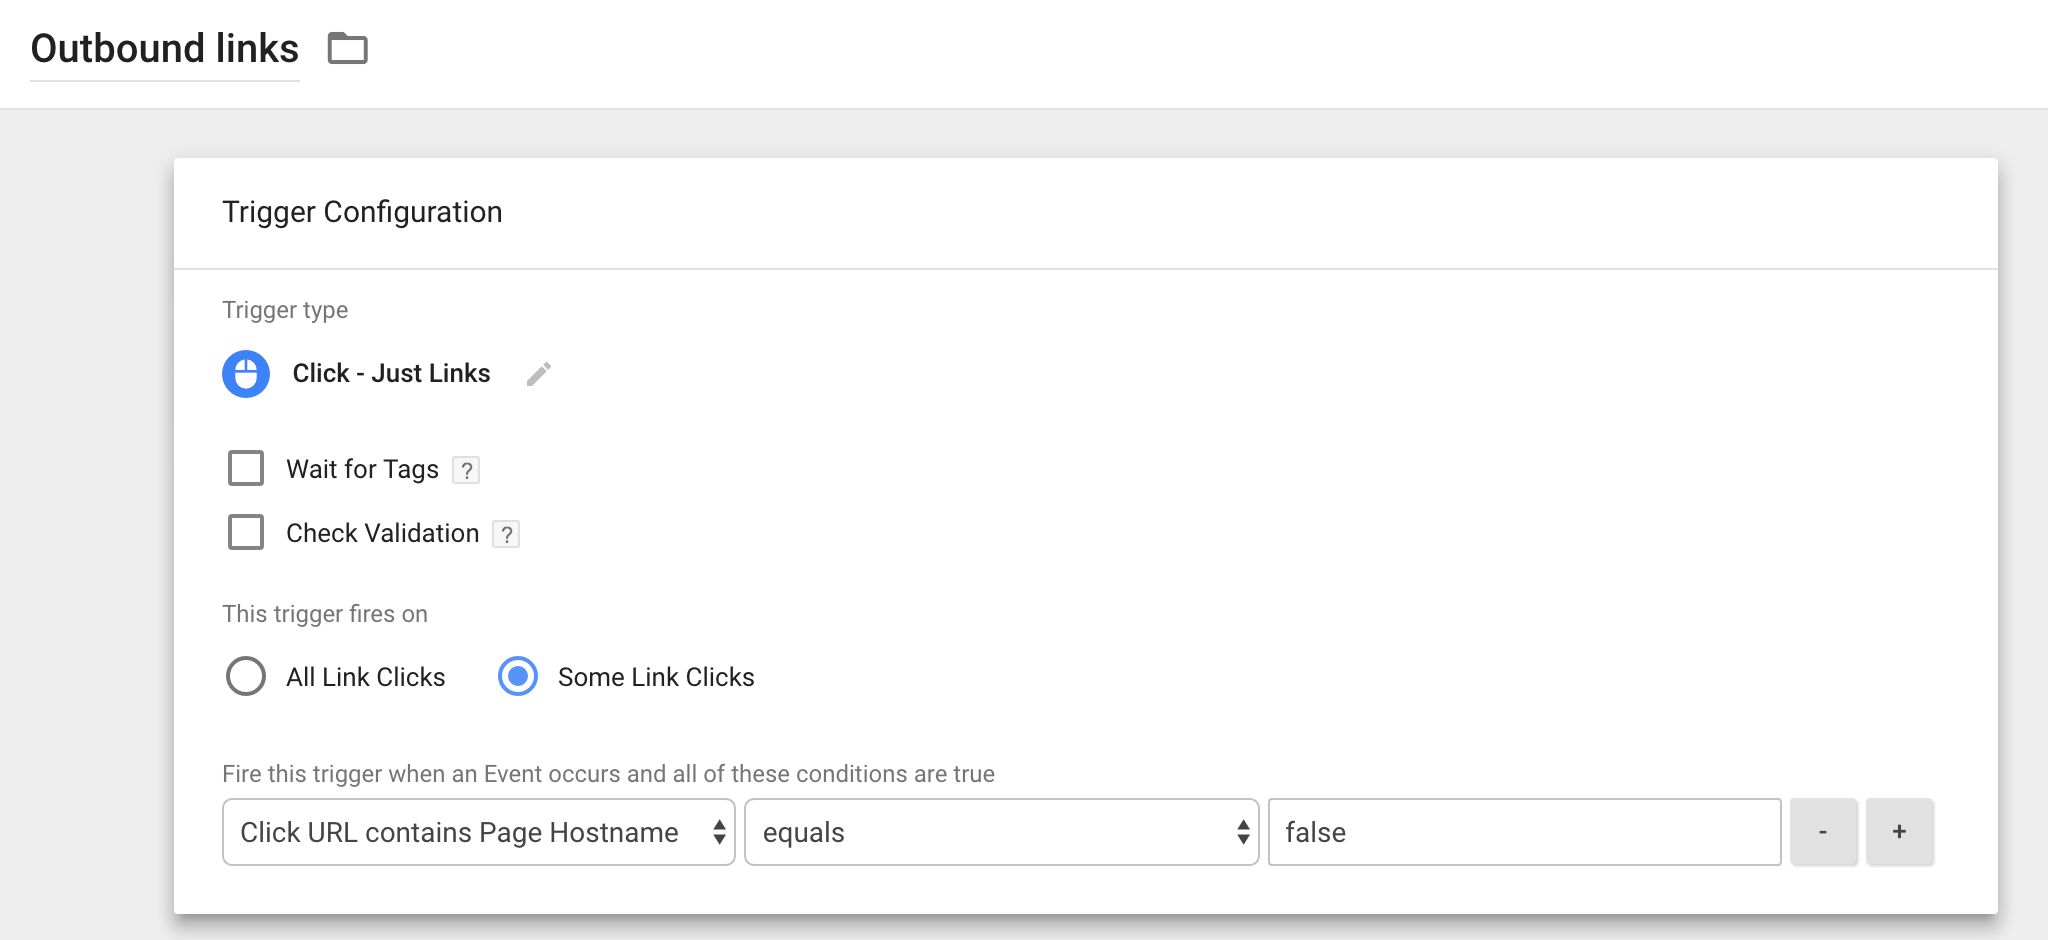
50. Use a Custom JavaScript variable to check for dynamic values
If you DO want to check against dynamic values in your triggers, you can always use a Custom JavaScript variable. Let’s say you want to check if the clicked URL contains the current page hostname. Why? Because you want a trigger that fires only for clicks on links that take the user away from the website. This is what the Custom JavaScript variable might look like:
function() {
  return {{Click URL}}.indexOf({{Page Hostname}}) > -1;
}
This variable returns true if the clicked URL contains the current page hostname, and false otherwise. Now you can use a trigger like this:

51. 'event' is implicit in all but the Custom Event trigger
All triggers require an event key in dataLayer to fire. Thus, when you create a trigger, they check for the value of event, and if there’s a match the trigger fires. Only the Custom Event trigger requires you to explicitly state the value of event you want to fire against. Here are the basic trigger types and their implicit event values:
-
DOM Ready – gtm.dom
-
Page View – gtm.js
-
Window Loaded – gtm.load
-
Click / All Elements – gtm.click
-
Click / Just Links – gtm.linkClick
-
Form submission – gtm.formSubmit
-
History Change – gtm.historyChange
-
JavaScript Error – gtm.pageError
-
Timer – gtm.timer
-
Scroll Depth – gtm.scrollDepth
-
YouTube Video – gtm.video
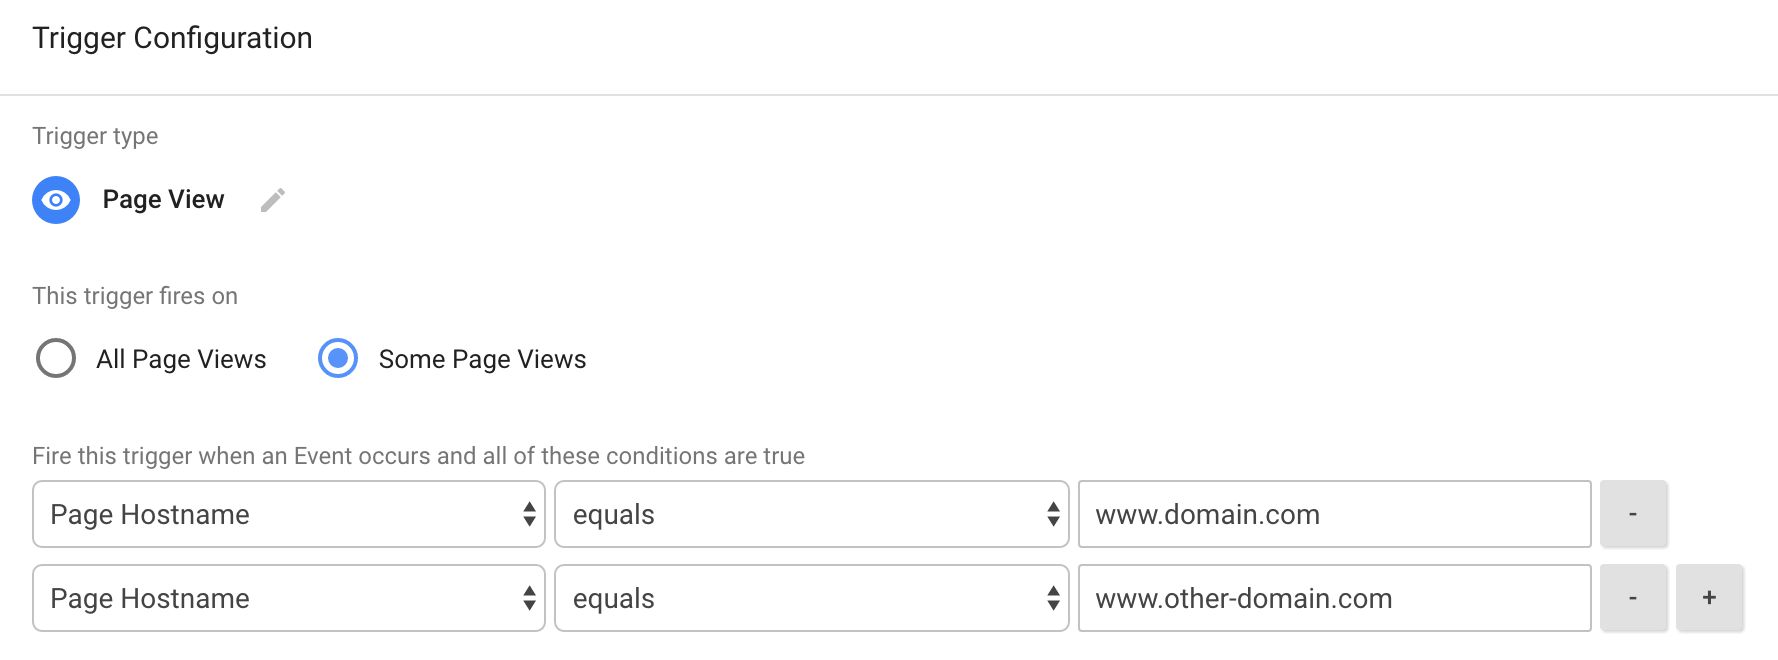
52. Multiple trigger conditions are AND, multiple triggers are OR
Multiple conditions in a single trigger must ALL match for the trigger to fire. Thus a trigger like this should never work:

Why won’t it work? Because the hostname of the current page can’t be two things at once.
If you add multiple triggers to a tag, then any one of these will fire the tag. So, if you want your tag to fire when the page hostname is either www.domain.com or www.other-domain.com, you can create two triggers, one for each hostname, and add both to the tag.
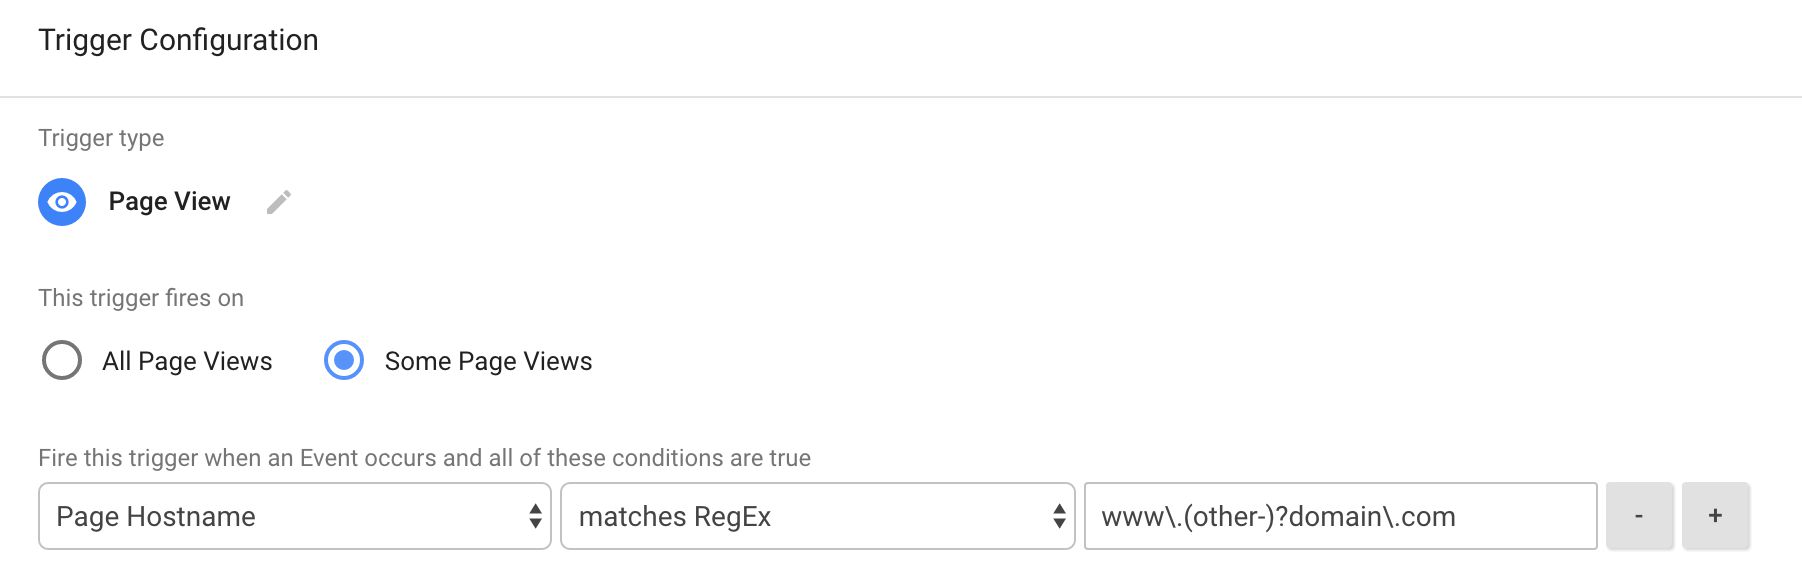
53. Use regular expressions or Custom JavaScript variables to add optionality in a single trigger
There’s an easier way to introduce optionality, though. First, if it’s a simple string check, you can always use regular expressions.

If you have more complex logic, a Custom JavaScript variable is your best friend, again.
function() {
  var hn = {{Page Hostname}},
      ut = {{DLV - userType}};
  if (hn === 'www.mydomain.com' && ut === 'visitor') {
    return 'visitor';
  }
  if (hn === 'www.mydomain.com' && ut === 'member') {
    return 'member';
  }
  if (hn === 'www.other-domain.com' && ut === 'loyal') {
    return 'loyal';
  }
  return 'other';
}
Auto-event trigger
54. Just Links listens to clicks on elements and their descendants
When you create a Just Links trigger, it listens to clicks on elements and their descendants. When a click is registered, Google Tag Manager checks if there is a link node wrapping the clicked element, and if there is, GTM stores a reference to the link in the dataLayer.
For example, say the page HTML looks like this:
<div id="content">
  <a href="https://www.google.com/">
    <span>Googlespan>
  a>
div>
If someone clicks on the link, the click actually falls on the element, but the Just Links trigger propagates the click to the element, and returns that for you to leverage with Auto-event variables.
55. All Elements listens to all clicks
All Elements, on the other hand, listens to all clicks and returns the element that was actually clicked. In the HTML example above, the All Elements trigger would return the element because that’s the element that was actually clicked.