
I hadn’t heard of Dan Guido until a few months ago, when I came across the video of a talk he gave at [un]prompted, an AI security practitioners’ conference. Dan is the CEO and cofounder of Trail of Bits, a software security research and development firm that works with companies in tech, defense, and finance. But Dan wasn’t talking about security. He was talking about what it takes to make a company AI native, which is close to the center of the bullseye for many of us right now.
We’ve been trying to figure out how to do that at O’Reilly, but until I came across Dan’s talk, we didn’t have a structured process. We’ve been building along the lines he laid out ever since. So for this episode of Live with Tim I asked Dan to reprise the talk before we got to the conversation. He was supposed to take twenty minutes, like his original conference talk, but he took thirty-five, and I had to cut him off slightly before the end to make room for questions. That was a tough choice, since everything he had to say was golden.
Dan opened by reminding us of the current state of play in enterprise AI adoption. In February, Fortune reported on a National Bureau of Economic Research study in which nearly 90% of some 6,000 executives said AI had produced no measurable change in employment or productivity at their firms over three years. People started calling it the new Solow paradox, after Robert Solow’s 1987 line that “you can see the computer age everywhere except in the productivity statistics.”
Dan’s belief is that this isn’t evidence that AI doesn’t work. It’s evidence that most companies are deploying AI wrong. They hand out ChatGPT and Claude licenses, and then leadership waits for the magic to happen. It doesn’t.
Dan started out by describing three levels of AI adoption.
- AI assisted is where everyone starts: “You give people access to ChatGPT, it drafts emails, it summarizes documents. It’s just a productivity tool, and your organization doesn’t change. Your workflows are the exact same as they were before. You just have a little buddy that helps you with a couple of tasks.”
- AI augmented is where you start redesigning workflows, so that AI does the first pass on a code review and a human does the second.
- AI native is structural: “That’s where you’ve redesigned the company and its workflows from the ground up, assuming the AI is going to be there and that it’s a core participant. That’s not really a tool. That’s more thinking about AI as teammates.”
In his framing, the first of the three is a tool and the last is an operating system. For Trail of Bits, he said that “operating system” has a specific purpose:
“I want our security expertise to compound as code. Every engagement we do, all the skills, the workflows, everything that we build makes the next engagement faster and better.”
Employee resistance is the first problem
Dan confessed how hard it was to get started on the ladder from AI Assisted to AI Native:
“When I announced last year that we were all in on AI, that we were going to be using it across all of our workflows and redesigning the way the company operates, I’d say only about 5% of the company was with me. 95% was resistant.” About 20% was actively resisting. The other 75% were resisting more passively. “They’ll go along with it in public, but in process they’ll sabotage it. They’ll hope that if they keep their head low, this will pass over them, and that three months from now management’s focus will change and it won’t be a problem anymore, and we can get back to doing what we were doing. That’s where the majority of people land when these initiatives happen.”
Rather than argue with his employees, Dan studied the literature on why people reject new technology and decided he needed to address four biases against AI: self-enhancing bias, identity threat, opacity, and intolerance for imperfection.
Self-enhancing bias is the habit of crediting your wins to your own judgment and your losses to circumstance, which is a particular problem for senior people who are strongly attached to the years of experience and intuition that got them to their present position. Opacity is not being able to see how a decision got made. Dan’s observation is that you don’t understand your doctor’s reasoning either, but somehow you trust the doctor but get suspicious of the machine. Dan didn’t mention this work specifically, but intolerance for imperfection seems to refer to Dietvorst, Simmons, and Massey’s work on algorithm aversion, which found that people abandon an algorithm after watching it err once, even when it outperforms the human alternative. Their follow-up paper found that giving people even a slight ability to modify the algorithm’s output is enough to overcome the aversion.
Dan spent the most time on identity threat. He described a study in which the same kitchen appliance was advertised in two ways: “On one hand, it does the cooking for you. On the other hand, it helps you cook better. It’s the same device. The people who identified as cooks rejected the first version and accepted the second.”
Most knowledge work, Dan argued, and security auditing in particular, is what he called symbolic rather than instrumental. That is, it carries meaning about who you are. “So I have to frame AI as something that makes you a more dangerous auditor,” he said. “Not that it does the audit for you.”
In his work at Trail of Bits, he deliberately built a countermeasure for each bias.
- Self-enhancing bias is addressed by “an AI maturity matrix” with visible levels, because you can’t claim you’re already good enough when there’s a published ladder that identifies a different set of skills as critical.
- Identity threat gets skills repositories, where an engineer who writes a hard plugin gets credit for encoding their expertise. Hackathons also change the dynamic from resistance to exploration. I’m putting words in Dan’s mouth here, but I think he’d agree that when experienced developers are called on as mentors in a hackathon, that also reduces their experience of AI as an identity threat.
- Intolerance for imperfection gets a curated marketplace, sandboxing, and hardened defaults, so everyone’s first experience of AI isn’t a disaster.
- Opacity gets a written AI handbook that clarifies the usage policy and the risk model rather than just saying “trust us.”
Here’s Dan’s slide on “the remedies that actually worked”:
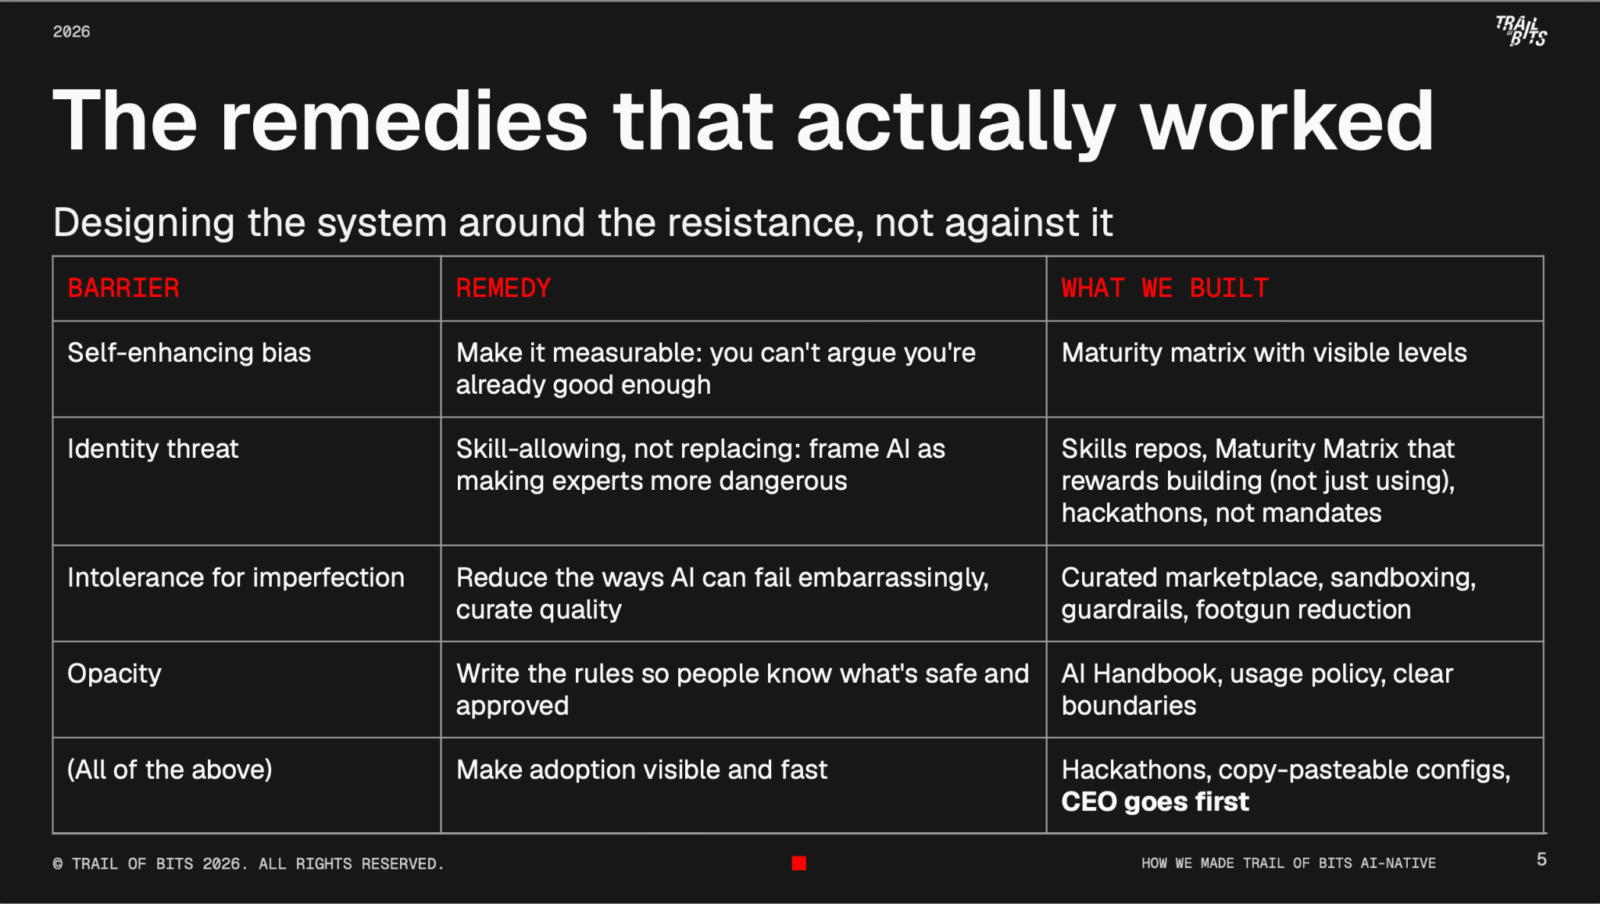
Returning to one of my hobby horses, this is a kind of mechanism design. In my recent piece on the missing mechanisms of the agentic economy, I argued that we need to start with desired outcomes and ask ourselves what mechanisms will help to produce them. Dan’s approach seems to be really good at this. Most enterprises are treating AI adoption as a procurement problem or a communications problem. Dan treated it as a question of what incentives, defaults, and status ladders produce the behavior you want, given how people actually respond.
The last remedy on Dan’s list is that the CEO has to lead by example. He noted, “I was the first person through the door. My voice as the CEO matters a lot more than people think. The passive 50% of the company that isn’t sure if this initiative is going to be successful, they’re watching to see what leadership actually does, not what it says.”
A ladder, not a mandate
Trail of Bits already tracked about 50 engineering skills for performance review, things like Python, git, Rust, and various security auditing capabilities. Dan pulled AI skills out into their own matrix, with four levels, from not engaged through capable and adoptive to transformative. Each of these levels is detailed separately and more specifically for assurance, engineering, sales, and project management.
He noted that “The highest level of the maturity matrix is not somebody who uses AI the most. It’s somebody who invents new ways to work and builds tools with AI. So the identity of the expert shifts from ‘I don’t need AI’ to ‘I’m the one who makes AI useful for the company.’” This was his first important design choice.
The second is what level zero means. He said “If you’re at level zero, if you’re not engaged, that means you’re fighting back against the company. If you dismiss AI as hype, if you refuse to use AI for security work, this is a disagreement on principles, not on skills. For people who were stuck in the not engaged category, we had hard conversations, and there were people who left the company.” Levels one through three are a skill issue, and the remedy is time with the tools.
While the slide describing the capability matrix is shown in the preceding video clip, here’s where you can find the full deck so you can study it in more detail.
Driving adoption and skills with hackathons
One of the best ways Trail of Bits developed to move people up the ladder was to hold a hackathon every two months. Dan runs them with clear goals rather than as a free-for-all. The focus area and learning objectives are defined in advance and announced a week ahead, with separate instructions for engineers and non-engineers. People work in pairs so everything gets reviewed. There’s a demo session at the end, and then follow-through. (It’s an important part of Dan’s big idea, that you have to build a system by which, in his words, organizational knowledge and capability compounds.) He noted that “In the days afterward we keep one or two people around, and they collect all the reusable artifacts, structure them, and put them into the places they need to be.”
I asked what people outside of product and engineering actually work on, since the answer for an accountant at a hackathon was not obvious. Dan’s response is that the hackathon isn’t measured in artifacts shipped but in where people sit on the capability ladder the following week. Essentially, he’s running a training program that happens to produce useful output, rather than a production sprint that happens to teach people something.
The first hackathon, he told me, was the equivalent of a beach cleanup: “It’s like those companies that send everybody to the beach with a big stick and say, let’s go pick up a bunch of trash and put it away, and then you get the big team photo after with all the contractor bags of garbage. That’s what we did with our public source code repositories.”
He picked it because open source maintenance is the part of the job that feels like a grind. No new features, just closing issues and stale dependencies on public code where nothing was at risk. “As an open source maintainer, you just get beaten down by the public. This doesn’t work, I can’t use it, this thing sucks. Dozens of issues pointing out flaws you already knew about. It feels burdensome. We wanted people to see that adopting AI would relieve burden.”
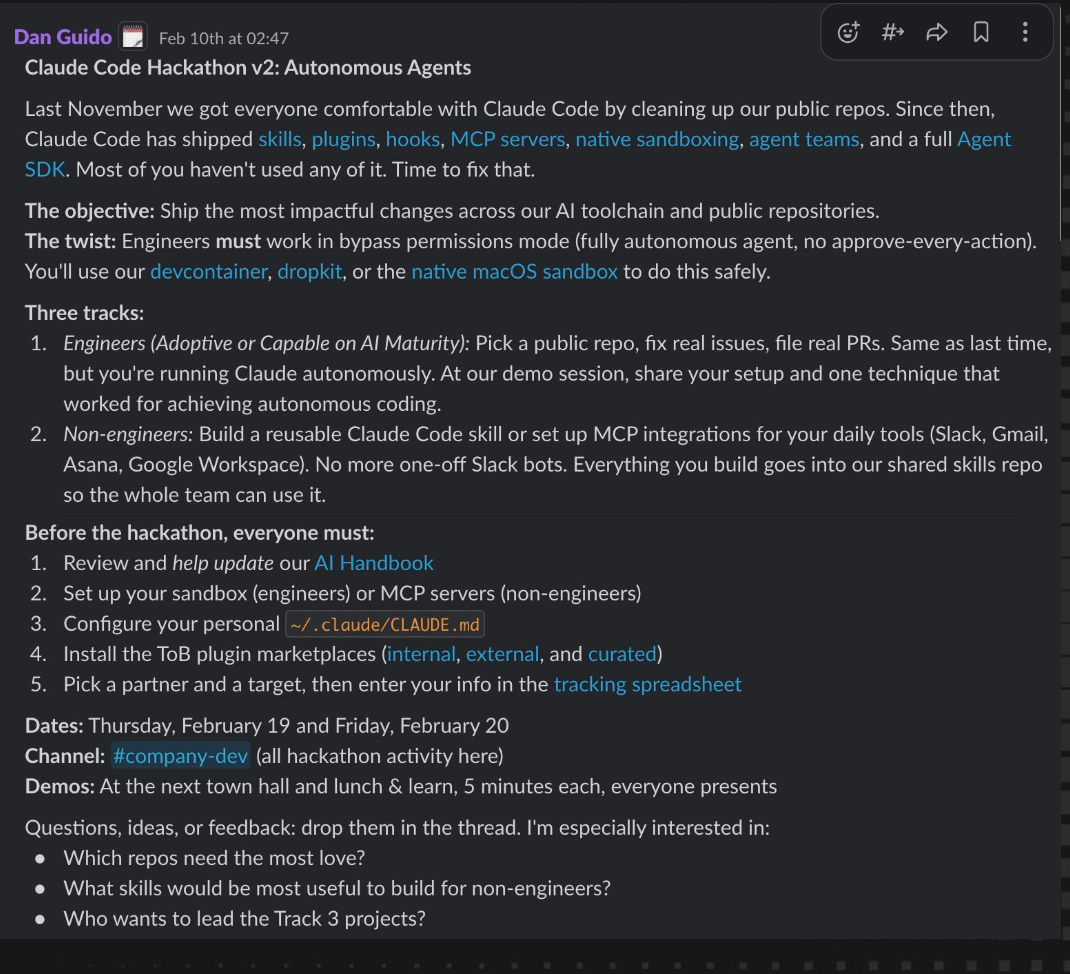
The second hackathon was about shipping impactful product updates, but it was also designed to move everyone up the capability ladder by giving up control. Engineers had to run Claude Code in bypass permissions mode, fully autonomous, on public repositories, inside sandboxes the company had prepared in advance. The one they’re running now is about persistent background agents that can be handed a task during an audit and come back with a proof of concept exploit or a draft finding.
Here’s a look at Dan’s slack message announcing the hackathon:
Everything the hackathons produce gets harvested into artifacts.
Trail of Bits runs three skills repositories: an internal one for company workflows, a public one that anyone can use, and a curated one that vets third-party skills before they’re allowed in.
Publishing skills to the public repository is not just a marketing exercise. “It keeps us honest, and it forces us to write things that other people can use, not just people outside the company but inside too,” Dan said. “It really helps us think about the tribal knowledge that’s baked into the tool.”
The curated repository exists because Trail of Bits knows how bad the supply chain is. They’ve published research on how to write malicious skills, and so Dan is not going to tell 130 employees to start downloading code from strangers and running it on their laptops. “If you want adoption, you need a safe supply chain.”
Turning scar tissue into infrastructure
Perhaps even more important than the skills repository is, as Dan put it, “turning scar tissue into infrastructure.”
“Every single time Claude Code didn’t do something we wanted, we would bake it into a set of global, copy-pasteable defaults. Known good settings, recommended patterns. I call it scar tissue. If I hire somebody new tomorrow, I don’t want them to have to go through the entire discovery process of the last year of Trail of Bits to figure out how to use the tool.”
The configuration repository, claude-code-config, is where the accumulated lessons live.
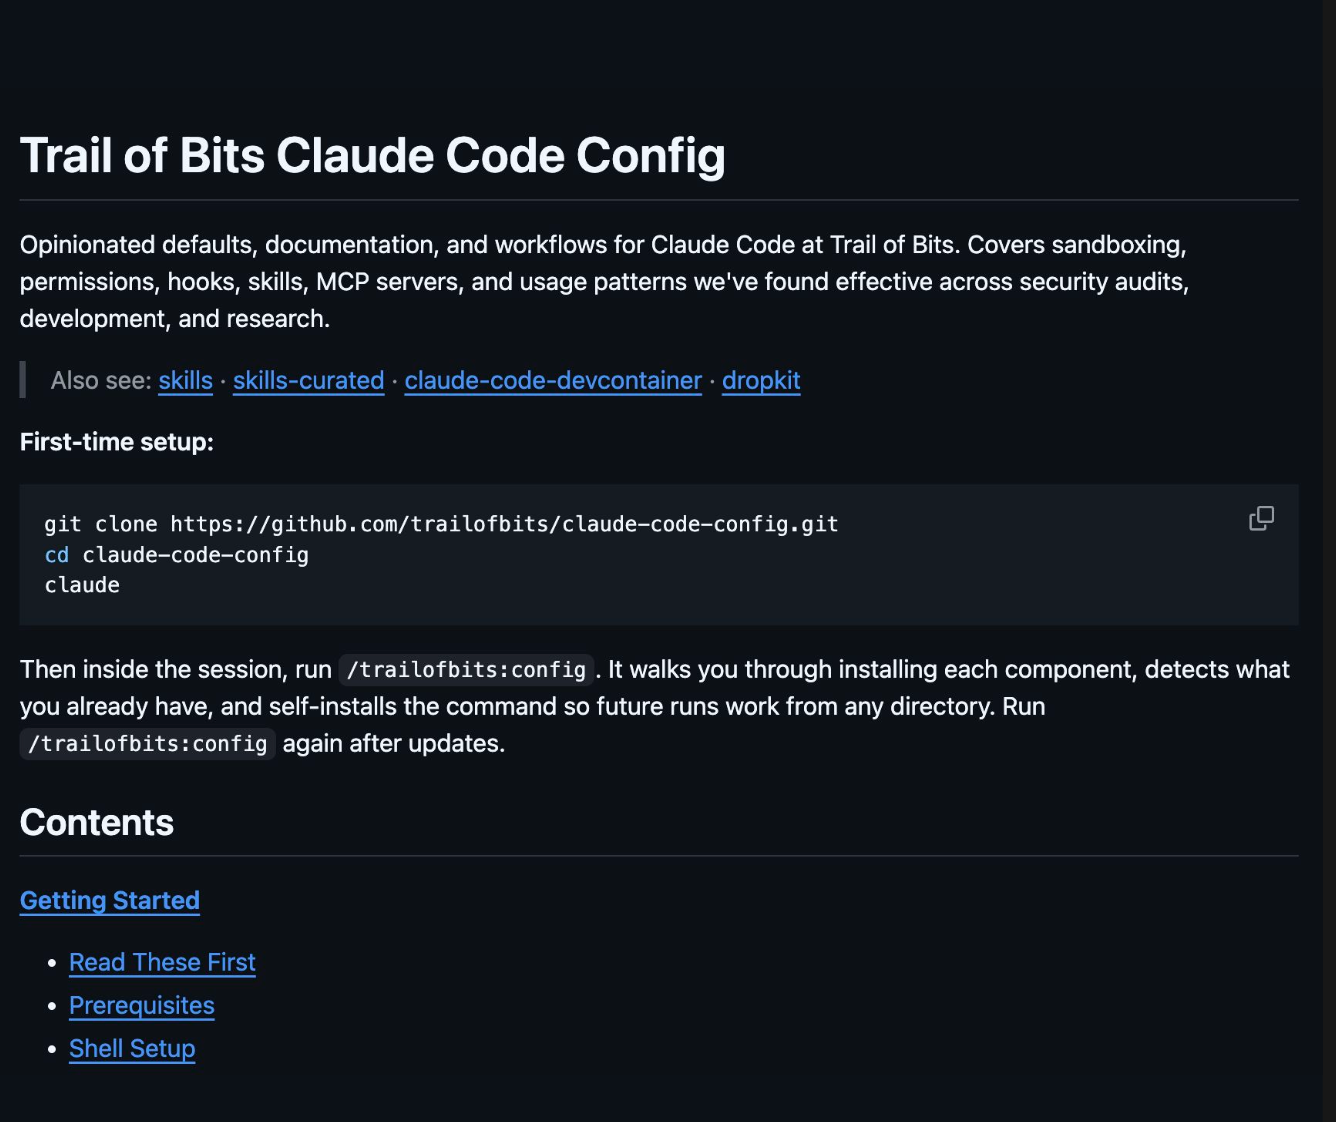
Dan built the first version himself and then opened it to pull requests from the whole company, assigning someone after each hackathon to go collect what people hadn’t contributed on their own. “It’s easier to put out something that’s unpolished than it is to get it perfect on the first try.”
In short, a big part of the Trail of Bits “enterprise AI operating system” approach is a set of standardized tools and hardened defaults. Standardization isn’t a straitjacket. It’s a foundation.
On sandboxing, Trail of Bits deliberately didn’t pick a single preferred solution. There’s a devcontainer for developers, dropkit for disposable DigitalOcean droplets, COOP for isolated VMs, and the sandboxing now built into Claude Code for casual users. “The point isn’t that everybody uses the same sandbox,” Dan said. “The point is that everyone has a safe sandbox to use, and that it’s easy for them to do it.”
Another of the hardened defaults is procedural. Trail of Bits enforces a seven day cooldown on every package their developers install:
“There are dozens of security companies scanning the internet trying to find a new cool blog post they can write about malicious code hiding on PyPI or npm, and they usually figure out there’s a supply chain issue within hours. So we just delay all the packages that Trail of Bits uses. Generally the malicious stuff gets picked up before we ever get a chance to run it.”
That’s free-riding on a competitive market for security research, and given the speed of today’s market, it’s an elegant solution. There’s a whole class of defenses like this waiting to be found, where the mechanism is not a technical system but a well-chosen delay.
Data, and DJ Patil’s “Tidy House”
The problem we run into most often as we build AI workflows at O’Reilly isn’t the model or the tooling. It’s data. Who has access to which system, which system does that data live in, and who do I ask? In a 500 person company that’s annoying. I wonder what it’s like at a company with 50,000 employees.
I told Dan about DJ Patil’s Tidy House framing. He agreed that data access for AI is a big problem. His answer starts with permissions:
“The permissions debt is invisible until an agent hits it. Making data agent legible is a forced permission audit. You have to actually go through and figure out who can access what…. It also raises the stakes for permissions errors. If you overshare information, now an agent inside your company is going to find it instantly. There are a lot of these technical debt sort of things where, with agents, all of it’s becoming due at the same time.”
Every shortcut an organization took with its data over the past twenty years is being called at once, and the companies that can run the audit, make fast decisions about boundaries, and then actually share their data are the ones that will get a force multiplier.
Dan is against letting a thousand flowers bloom, because uncoordinated teams create overlap rather than compounding. He’d rather have one centralized foundation, with innovation happening on top of that. He suggested a useful metric for making that work across team boundaries is what fraction of your team’s data did you make reusable for everyone else, and how much of it is being used by teams outside your own.
What post-AI jobs look like
Before the first hackathon, Trail of Bits ran hands-on sessions to teach its operations and go-to-market staff the basics of git and the command line. Not mastery, just enough to be a consumer of the thing. Here we are fifty years into my career and the Unix command line still matters. Dan’s non-technical staff mostly work inside Claude Cowork or Codex Desktop now, but he thinks the command line experience was worth it because they know what’s happening under the hood.
What happens to a job when the tool can do a lot of what humans used to do? Dan gave the example of his own technical editors. His editors used the hackathons to build the tools that got them out of line editing, including one that turns a public presentation into a blog post in the company’s voice. What the writers do now is consult on how to frame a story so it is effective with a particular audience.
I agree. Human jobs aren’t going away any time soon. This gets heard as optimism when it’s really just observation. AI is going to replace a lot of what we used to do, but it is also going to hand us a large amount of new work, and much of that work hasn’t been understood yet. Quality assurance for agent systems is one of the new jobs. So is skills product management, which is a role that didn’t exist eighteen months ago and now has a headcount at a 130 person security firm.
I asked a question towards the end about how we’re going to know which skills and agents are any good. What Dan has so far is telemetry pulled from developers’ dot files through the company’s device management system, which tells him what gets used and what breaks, plus one AI systems engineer whose job is product management for the skills repository, reviewing incoming pull requests and deprecating overlapping skills.
What Dan thinks comes next is evaluation. He says: “Once you invest a lot into these agent systems, you need proof that they do the job. The way you do that is you give everybody a performance review. You give them an evaluation data set, a benchmark.”
Trail of Bits is now building benchmarks for its core skills. How well can we find bugs in this language? How well can we write a statement of work? Constructing those datasets is real work, with positive and negative cases, and comparisons against the algorithmic tools that already exist.
Put the reps in
I asked Dan for the top five mistakes he made. He said there was only one. “You need to allocate an appropriate amount of FAFO time. (That’s F Around and Find Out.) A product comes out on Friday. There’s no documentation for it. There’s no training guidance for it. There’s no course on it. You can’t wait until somebody systematizes the knowledge. You just need to do it.”
Then he gave an analogy to going to the gym.
The recipe for success
Dan has a replicable recipe, which he summarized as follows:
- Standardize on one agent workflow that you can support.
- Write an AI handbook so that risk decisions aren’t ad hoc, and that everyone is playing the same game.
- Create a capability ladder that makes clear that improvement is expected.
- Run short adoption sprints that force hands-on usage.
- Capture everything as reusable artifacts: skills + configs + a curated supply chain.
- Make autonomous agents safe with sandboxing + guardrails + hardened defaults.
The Trail of Bits skills repository is public. So is the curated marketplace, the configuration repository, the devcontainer, dropkit, and COOP (Continuity of Operations planning). He wrote up the whole playbook on The Trail of Bits Blog and gave a version of it to tl;dr sec. He thinks publishing makes the work better because it forces the tribal knowledge out into the open where it can be checked.
Which brings me back to the Solow paradox, which seemed to disappear by the late 90s, when US aggregate productivity did finally go up. That didn’t happen because computers got faster. It disappeared because companies figured out how to reorganize themselves around what computers could do, and eventually those organizational recipes spread widely enough to show up in aggregate statistics. The same has to happen today. The current AI discourse is obsessed with model capability and largely uninterested in diffusion. The problem is not that the models are oversold. It’s that almost nobody has done the necessary organizational work, and the few who have are mostly keeping it to themselves.
If you want to go beyond the highlight videos shown above, watch Dan’s entire talk here. His slide deck is here. And be sure to check out the Trail of Bits Github repository.