
Hello gardeners, today we are back with a topic of how to care for indoor coconut plants. Bringing a touch of the tropics into your home with an indoor coconut plant requires dedication to its care to mimic its natural habitat. Growing coconut trees (Chocofera) indoors is a pleasant challenge due to their preference for warm, humid, and sunny conditions. Knowing the plant’s needs—including its light, water, soil, and humidity levels—is crucial for success. Indoors, you can begin with a healthy seedling or dwarf coconut plant; these varieties thrive in cramped spaces. Put the plant somewhere light, ideally near a south-facing window, to ensure it gets plenty of sunshine. Our goal is to recreate the ideal coastal environment for coconuts, which involves keeping the temperature and humidity at a constant level.
Coconut plants require a tropical environment with temperatures between 70 and 85 degrees Fahrenheit and humidity levels exceeding 60%. For optimal moisture levels, elevate the pot from the ground with a tray of pebbles and water, and keep your coconut plant well-watered with the help of a humidifier or humidity trays. Occasionally, but not excessively, spray the leaves to avoid fungal issues. After you bring the coconut plant inside, it will need a week to adjust to its new environment. Begin in a dark place and gradually increase the amount of light it gets. This will ensure that the plant adapts to its new environment without any problems and will keep it from experiencing stress.
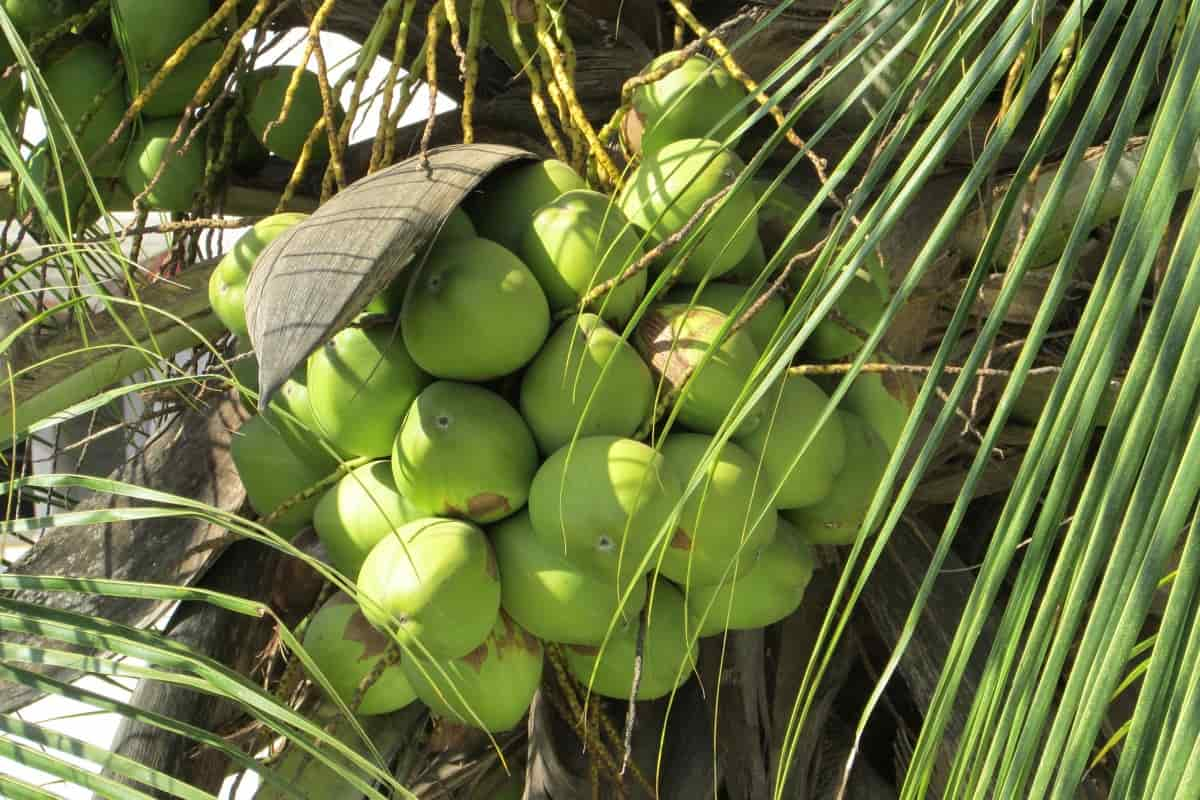
When starting a coconut plant with a coconut found in a grocery shop, it’s best to choose a young coconut that still has water inside. Soak the coconut in water for a few days before planting it in a well-drained pot with the pointed end facing up. Make sure the top third of the plant is exposed. Be patient, because it can take months for seeds to germinate. Indoor coconut plants require a large pot once they have sprouted to accommodate their extensive root systems. A coconut plant grown indoors needs a container with a diameter of 12–15 inches so that its roots have room to grow. Compaction of the soil might stunt development, so it’s important to check it often.
| Aspects | Details |
|---|---|
| Coconut Type | Young, with water inside |
| Soaking Duration | Few days |
| Pot Diameter | 12–15 inches |
| Germination Time | Months |
| Soil Check Frequency | Often |
Houseplant Hacks: Keeping Your Coconut Palm Alive and Well
Optimal Soil Mix to Support Healthy Indoor Coconut Plant Growth
If you want your coconut tree to thrive, you need good soil. This soil combination is perfect for indoor coconut palms since it drains well and retains nutrients. If you want to make sure your coconut plants have appropriate drainage and air circulation, mix equal parts potting soil, sand, and perlite. Coconut roots are susceptible to rot; thus, it’s important to use the lightweight volcanic rock perlite to keep them wet. A small amount of peat moss will keep the mixture moist without making it too heavy.
Choose a container with drainage holes if you’re repotting an indoor coconut plant to avoid water pooling. When roots begin to crowd, or every year or two, repotting promotes healthy development. Gently remove the coconut plant from its pot to inspect the roots for damage or circling. Use sterile scissors to remove diseased or otherwise unhealthy roots to encourage new growth. After repotting, water thoroughly to prevent root burn, but wait one month before fertilizing.

Coconut plants thrive in soil with a pH between 5.5 and 7.0, which is considered neutral or slightly acidic. If you want to elevate the soil’s pH, you can use a pH meter; if you want to lower it, you can apply sulfur. Compost tea, when added to coconut plant care throughout the growing season, provides organic nutrients that boost soil fertility. Making this nutrient-rich liquid from compost by steeping it in water speeds up the growth process. Stay away from thick clay soils since they retain a lot of water. If the drainage isn’t good, it can be challenging to treat root rot in coconut plants grown indoors.
| Soil Components | Proportion | Purpose |
|---|---|---|
| Potting Soil | 1/3 | Nutrient retention |
| Sand | 1/3 | Drainage |
| Perlite | 1/3 | Aeration prevents rot |
| Peat Moss | Small amount | Moisture retention |
| Soil pH Range | 5.5–7.0 | Optimal growth |
| Repotting Frequency | Every 1–2 years | Promote development |
Providing Adequate Light to Ensure Your Indoor Coconut Plant Flourishes
Light is crucial to the survival of coconut plants because they are tropical plants that thrive in sunny locations. If you’re growing your coconut plant inside, give it at least six to eight hours of sunshine per day. Coconut plants thrive in full sun, so if you can’t find a window that faces south, try using LED grow lights. Set the lights 12–18 inches above the plant and turn them on for 12 to 14 hours daily to mimic tropical daylight.
If your indoor coconut plant isn’t growing properly or has pale foliage, try moving it to a brighter spot or increasing the amount of artificial light it receives. While nighttime grow lights can help expose coconut trees to more light, it’s still important to give them some darkness so they can maintain their natural cycle. If you want your indoor coconut plants to develop evenly and not lean toward the light, you should turn them every few weeks.
When growing coconut palms indoors in places with limited light, such as apartments, special attention is required. Choose a dwarf kind that can tolerate somewhat less light and make use of reflective surfaces like mirrors to make the most of the light that is available. Coconut leaves that droop could be a sign of overwatering, inadequate lighting, or poor drainage. Constantly monitor the light levels, but especially in the winter when fewer days in the week could stunt growth.
| Light Requirements | Details |
|---|---|
| Daily Sunlight | 6–8 hours |
| LED Grow Light Distance | 12–18 inches |
| LED Light Duration | 12–14 hours daily |
| Rotation Frequency | Every few weeks |
| Dwarf Variety Light | Tolerates less light |
Watering Your Indoor Coconut Plant Correctly to Promote Strong Development
There has to be a delicate equilibrium while watering coconut plants so that they stay hydrated all the time without wilting in soggy soil. Indoor coconut plants typically need watering every five to seven days, or anytime the top inch of soil is dry. Because coconut plants are susceptible to brown tip disease, it is best to water them with filtered water instead of tap water, which contains chlorine and fluoride. Filtered or rainwater watering mimics the plant’s actual watering needs, which in turn promotes healthier leaves.

To tell if a coconut plant needs more water, check for dry, curling leaves or a container that is too light in color, which means it is underwatering. Coconut plants can develop mushy roots from excessive watering, and signs of indoor flooding include withering or browning foliage. After taking an overwatered coconut plant from its pot and removing any damaged roots, repot it in new, well-draining soil. You should wait until the soil is somewhat dry before watering it again.
Using self-watering pots to tend to coconut plants can simplify maintenance because they provide consistent hydration. To avoid issues with treating stem rot in indoor coconut plants, be careful not to overfill the reservoir. Lightly misting coconut plants indoors will raise the humidity level in dry areas, but soil wetness should be the primary source of watering. Reduce the frequency of watering while the plant enters its winter indoor hibernation.
| Watering Aspects | Details |
|---|---|
| Watering Frequency | Every 5–7 days |
| Soil Check | Top inch dry |
| Water Type | Filtered or rainwater |
| Misting | Light, in dry areas |
| Winter Watering | Reduced frequency |
Fertilizing Your Indoor Coconut Plant for Robust Growth and Vibrancy
Fertilization provides coconut plants with essential nutrients because they are voracious feeders in their tropical habitats. Indoor coconut plants need a balanced liquid fertilizer (10-10-10) every four to six weeks during the spring and summer for optimal growth. Fertilizers that include micronutrients, such as magnesium and iron, are ideal for indoor coconut palms because they prevent shortages. Fertilizer can burn roots if not diluted to half strength.
Epsom salt helps with magnesium shortage, which causes foliage to yellow, in indoor coconut plants. Every week, saturate the soil with a mixture of one gallon of water and one spoonful of Epsom salt. The same holds true for indoor coconut plants: chopped banana peels, when buried in soil, slowly release potassium, improving plant health. Incorporating worm castings into coconut plant care improves soil structure and microbial activity through the provision of organic nutrients.
Find out if your coconut plants are lacking in potassium, nitrogen, or magnesium by looking for symptoms like stunted growth or yellowing fronds. Every two weeks, give your coconut plants a little nutritional boost by watering them with compost tea. The plant develops more slowly in the winter; therefore, it’s best not to fertilize it then. Before fertilizing, make sure the plant is wet to maximize nutrient uptake and prevent root damage.
| Fertilization Aspects | Details |
|---|---|
| Fertilizer Type | 10-10-10 liquid, half strength |
| Frequency | Every 4–6 weeks (spring/summer) |
| Epsom Salt Mix | 1 tbsp/gallon water, weekly |
| Compost Tea Frequency | Every 2 weeks |
| Winter Fertilization | None |
Maintaining Ideal Humidity Levels for Your Indoor Coconut Plant’s Health
Coconuts, like their coastal forebears, do best in damp, tropical climates. To achieve a humidity level of 60-80% for indoor coconut plants, you can use a humidifier or humidity trays. Submerge the pot in a shallow tray of water and pebbles to keep it from sitting directly in the water. Evaporation produces a microclimate surrounding the plant in this setup.
Keeping coconut trees alive and well in dry indoor environments requires extra effort. To take good care of a coconut palm, either put it in a bathroom with a lot of humidity or put several plants in a container to make a mini-humidity chamber. If you want to keep your indoor coconut plant free of leaf spots, spray it once or twice a day without soaking it too much. Fungal infections are a common cause of these patches, so reducing leaf moisture and improving air circulation will help.

Curling leaves on an indoor coconut plant could be an indication of low humidity, which could be harming the plant. Get a hygrometer so you can monitor the humidity and make necessary adjustments. Keeping a bowl of water nearby will help keep coconut trees from drying out in air-conditioned rooms. Humidity promotes lush foliage and prevents brown tips, which keeps coconut trees healthy year-round.
| Humidity Aspects | Details |
|---|---|
| Ideal Humidity Range | 60–80% |
| Misting Frequency | 1–2 times daily |
| Tools | Humidifier, hygrometer, pebble tray |
| Location Option | Bathroom or plant container |
Preventing and Treating Pests to Keep Your Indoor Coconut Plant Thriving
Indoor coconut plants are vulnerable to pests, even with prudent treatment that lessens risks. To keep pests away from indoor coconut trees, check the leaves often for signs of mealybugs, spider mites, or scale insects. Maintaining a high relative humidity prevents infestations because these pests thrive in dry conditions. Using a damp towel, you can remove dust and, perhaps, bug eggs from indoor coconut plant leaves.
When it comes to protecting coconut trees from pests, neem oil is your best bet. For weekly spraying, mix one teaspoon of neem oil with one gallon of water and a few drops of dish soap. Apply the mixture to the foliage. The use of neem oil to deter pests and disrupt their life cycles is completely safe for plants. If you notice that your indoor coconut plant is losing leaves, it is important to isolate the plant and treat it immediately to prevent the pests from spreading.
Fungi or insects could be to blame for spots on coconut plant leaves. Remove any affected leaves and make sure the plant gets enough air. A controlled indoor setting, such as a grow tent, can be used to organically control pests on coconut plants by introducing beneficial insects, such as ladybugs. Regular monitoring and quick response will keep your plant healthy and free of pests.
| Pest Control Aspects | Details |
|---|---|
| Common Pests | Mealybugs, spider mites, scale |
| Neem Oil Mix | 1 tsp/gallon water, weekly |
| Check Frequency | Often |
| Beneficial Insects | Ladybugs (in grow tent) |
Pruning and Training Your Indoor Coconut Plant for Optimal Shape and Growth
Pruning and training your coconut plant will keep it looking healthy and beautiful. When trimming an indoor coconut plant, be cautious not to cut through healthy tissue and instead remove any fronds that are dead or turning yellow using sterile shears. Pruning encourages new growth and prevents the plant from becoming leggy. Reduce stress on the plant by merely cutting back a couple of fronds at a time.
To train a coconut plant to grow upright in a pot, gently attach its stem to a stake using soft ties; make adjustments as the plant grows. If your plants are young or facing the light, this will be especially beneficial. When growing coconut plants indoors, it’s best to use bamboo pegs or trellises to support the plant stems, particularly in larger pots. By rotating them on a regular basis, you can ensure that your indoor coconut plants grow evenly and without imbalance.
The coconut plant’s sagging leaves can be due to a lack of light or weak stems. For stronger stems, make sure they get enough water and light. While tending to coconut plants in hanging baskets, train the fronds to cascade naturally by cutting off only the dead tips. After a little trimming and training, the plant will look much better and become a beautiful focal point in your home.
| Pruning/Training | Details |
|---|---|
| Pruning Tool | Sterile shears |
| Pruning Frequency | A few fronds at a time |
| Training Tools | Soft ties, bamboo pegs, trellises |
| Rotation Frequency | Regular |
Repotting and Transplanting Your Indoor Coconut Plant for Long-Term Success
It is essential to repot and transplant coconut plants when their roots exceed the capacity of their containers. To bring a coconut plant indoors, repot it into a container that is two or three inches larger than the old one and has holes for drainage. Use a soil mixture that is ideal for indoor coconut plants, and add perlite to keep the drainage system running smoothly. Fill the new container with soil and water thoroughly after delicately removing the root ball.
After repotting, coconut plants need to be placed in a shady area for a week to help them recover from transplant shock. Till new growth appears, which indicates recovery, water sparingly. To bring a coconut tree inside, use the same steps, being careful not to damage the roots. Take a look at the coconut plant’s roots while it’s indoors for signs of rot or crowding; if you find any, pull them out.
Coconut plants grown in terracotta containers require well-drained soil because the plant material absorbs water and can lead to soil drying out. When you bring your coconut plants inside, the first thing you need to do is monitor them for any symptoms of withering or yellowing. If you notice any, adjust the water and light levels accordingly. Repot the plant every year or two if it becomes root-bound, or if you see that it needs more space to thrive.
| Repotting Aspects | Details |
|---|---|
| New Pot Size Increase | 2–3 inches larger |
| Repotting Frequency | Every 1–2 years |
| Post-Report Shade Period | 1 week |
| Watering Post-Repot | Sparingly until new growth |
Diagnosing and Fixing Common Indoor Coconut Plant Problems
If you catch coconut plant diseases early on, you can keep them at bay. One way to tell if your indoor coconut plant is sick is if it turns yellow. This could be because of overwatering, poor drainage, or a lack of nutrients. Lower fronds often become yellow as plants age, but serious yellowing requires intervention. Inspect the soil for signs of compaction or root rot, and make any required adjustments to the watering schedule.
There are a few possible causes for brown tips on coconut palms, including low humidity, too much fertilizer, or salt buildup from tap water. To keep coconut plants healthy, water the soil with rain to increase humidity and wash away excess salts. If your coconut plant is outdoors, please ensure it receives adequate water, light, and nutrients. If the plant isn’t getting enough light or is in an inadequately sized container, move it or repot it as needed to encourage healthy growth.
Locate the root cause of a coconut plant’s demise; in most cases, it’s a combination of pests, insufficient light, and overwatering. Take out any fronds that have died, repot them in fresh soil, and double-check that everything is perfect. To prevent indoor withering caused by cold drafts, keep the coconut plant away from windows and air vents. Maintaining and carefully watching plants on a regular basis restores their vitality.
| Problems | Possible Causes |
|---|---|
| Yellowing | Overwatering, poor drainage, nutrient lack |
| Brown Tips | Low humidity, excess fertilizer, salt buildup |
| Plant Demise | Pests, insufficient light, overwatering |
Protecting Your Indoor Coconut Plant from Temperature Fluctuations
Because they are so vulnerable to temperature swings, coconut palms require a consistently warm environment. Keep indoor temperatures for coconut plants between 70 and 85 degrees Fahrenheit and away from temperatures below 60 degrees. Avoid placing the coconut plant near cold windows or vents in the air conditioner to protect it from cold drafts. If you want your coconut plant to survive the winter in excellent health, you can either bring it into a warmer area or use a space heater.

Watch out for temperature drops and dry air when tending to air-conditioned coconut plants; these can cause the leaves to droop. Using a thermometer, you can ensure that the area stays within the ideal range. Make sure there is adequate air circulation to keep the coconut plant from scorching its leaves on hot days if it is housed in a conservatory.
Coconut plants require constant attention throughout the year, so it’s best to shift them around to keep them from getting too hot or too cold. Moving coconut plants to a brighter spot and watering them less frequently throughout winter will help them adapt to the shorter days. Maintaining a constant temperature environment protects the plant from stress and ensures its lushness all year round.
| Temperature Aspects | Details |
|---|---|
| Ideal Range | 70–85°F |
| Minimum Temperature | Above 60°F |
| Tools | Thermometer, space heater |
| Winter Adjustment | Brighter spot, less watering |
Ensuring Pet Safety Around Your Indoor Coconut Plant
Pet owners should consider plant safety, even though coconut plants are often non-toxic. Keeping coconut plants indoors eliminates the risk of poisoning your dogs or cats. However, you should avoid chewing on the fronds or husk of the coconut because eating too much of either will make your stomach itch. Use a heavy pot or place the plant somewhere out of reach of curious pets to prevent them from knocking it over.
Make sure the environment is pet-friendly because dust from indoor coconut plants can attract pets. Check the indoor coconut plant often for signs of trouble, such as leaves dropping off or digging around in the soil, to make sure your pets aren’t causing any problems. Mulch your indoor coconut plants with pebbles or other coarse material to boost their aesthetics and deter pets from digging in the soil.
Keep your apartment dogs away from your coconut plant by placing it on a stand while you tend to it. Look for indicators of pet involvement, such as damage or stains, on the leaves of coconut plants. Through a combination of meticulous planting and regular maintenance, you can both enjoy your coconut plant and ensure the safety and comfort of your pets.
| Pet Safety Aspects | Details |
|---|---|
| Toxicity | Non-toxic, but avoid chewing |
| Pot Type | Heavy or elevated |
| Mulch Type | Pebbles or coarse material |
| Check Frequency | Often |
Controlling Coconut Plant Size for Indoor Spaces
Though they have the potential to reach considerable heights, coconut plants are manageable when kept inside. Choosing an indoor dwarf coconut plant will help you maintain its diminutive stature due to its inherent compactness. For indoor coconut plants, a pot size of 12–15 inches is best for limiting root growth. Smaller pots are less likely to experience root-binding, but they still need close attention.
One way to limit the height of an indoor coconut palm is to prune off the older fronds so the plant may focus its energy on growing new ones. When grown indoors, coconut plants typically reach a height of 1 to 2 feet each year, with dwarf varieties reaching even lower heights. Indoor coconut plants can reach a height of 4 to 6 feet with the right care; dwarf varieties are ideal for homes.
If you’re growing your coconut plants in glass containers, use see-through pots so you can monitor their root growth and manage their size with ease. Caring for coconut plants in hanging baskets has multiple benefits, including stunting their vertical growth and creating a cascading effect. Choosing the right species, controlling the pot size, and pruning will allow you to maintain an attractive, manageable houseplant that is also visually appealing.
| Size Control Aspects | Details |
|---|---|
| Pot Size | 12–15 inches |
| Annual Growth | 1–2 feet (dwarf: less) |
| Max Height (Indoor) | 4–6 feet |
| Pruning Focus | Older fronds |
Using Advanced Techniques to Boost Indoor Coconut Plant Growth
Coconut plants can be given more resistance and growth with the use of modern gardening techniques. If you want your coconut plants to grow faster inside, make sure they have the correct conditions, including enough light, humidity, and nutrition. Grow tents are ideal for apartment dwellers who want to cultivate coconut palms because they provide a controlled environment with consistent light and humidity. The precise regulation of the atmosphere is made possible by these tents, which promotes quick development.
Because they enrich the soil with organic matter and a touch of acidity, coffee grounds are good for coconut plants. Use coffee grounds sparingly throughout the base, mixing them with the dirt, to avoid mold. Similarly, coconut plants can benefit from aquarium water, which contains natural nutrients derived from fish waste, but it is important to take caution to prevent salt buildup and overfertilization.
Hydroponic coconut plant care allows for exact nutrient delivery for artistic displays, but it requires skill to maintain water pH and fertilizer levels. These techniques, when combined with consistent care, allow you to cultivate coconut plants indoors throughout the year, regardless of the weather. Experimenting with modern methods enhances your ability to care for plants and produces a healthy, flourishing coconut palm.
| Advanced Techniques | Details |
|---|---|
| Grow Tents | Controlled light/humidity |
| Coffee Grounds | Organic matter, use sparingly |
| Aquarium Water | Nutrient-rich, avoid salt buildup |
| Hydroponics | Precise nutrient delivery |
Caring for Your Indoor Coconut Plant During Winter Months
In the winter, when light levels drop and temperatures drop, coconut plants struggle even more. To ensure the continued health of your coconut plant during the winter, move it to the brightest spot in your home and, if needed, supplement with LED grow lights. Indoor dormancy can drastically slow growth; therefore, it’s important to maintain temperatures above 70°F (or use a space heater if necessary).
During the winter, you should water the plant less frequently because its development rate slows down. To avoid watering too much, check the soil’s moisture level. Although self-watering containers simplify winter plant care, root rot can still occur if the reservoir is not monitored. When caring for coconut plants, it’s best to use a humidifier or humidity trays to combat the dry air caused by heating systems.
After you notice that your coconut plant’s leaves have turned brown, it’s time to prune the affected areas and adjust the humidity and light levels. To protect coconut plants from cold drafts, you can use draft stoppers or window seals. By tending to the plant’s needs throughout the winter, you can ensure that it remains healthy and ready to grow vigorously and successfully in the spring.
| Winter Care Aspects | Details |
|---|---|
| Temperature | Above 70°F |
| Watering Frequency | Less frequent |
| Light Supplement | LED grow lights |
| Tools | Humidifier, draft stoppers |
Monitoring and Maintaining Your Indoor Coconut Plant’s Health Daily
Keeping a close eye on your coconut plant 24 hours a day can help you spot any issues before they become serious. To ensure the coconut plant is healthy, inspect the leaves daily for signs of pests, wilting, or discoloration. You may feel the soil’s moisture level with your finger, and the stiffness of the fronds can be felt by gently pulling on them. Make sure the coconut plant gets equal light by turning it every few days to prevent uneven growth.
If you notice that a coconut plant isn’t growing indoors, take a look at its care methods, making sure to pay close attention to the light, water, and nutrients. If you have an indoor coconut plant and see any symptoms like brown spots or tips on the leaves, you should apply neem oil or make soil adjustments right away. Keeping a care journal might help you keep track of changes and patterns.
To prevent fungal problems, make sure there is enough ventilation while caring for coconut plants in areas with high humidity, including toilets. To avoid chemical buildup and ensure the long-term health of your coconut plants, use filtered water instead of tap water. Maintaining a lovely indoor accent for your coconut plant is as simple as creating a healthy environment with daily inspections and adjustments.
| Monitoring Aspects | Details |
|---|---|
| Inspection Frequency | Daily |
| Rotation Frequency | Every few days |
| Water Type | Filtered |
| Tools | Care journal, neem oil |
Conclusion
Growing a coconut plant indoors requires patience, but the payoff is tropical beauty. If you know what the plant needs in terms of water, humidity, nutrients, and light, you can create an environment that is almost identical to its natural home and watch it thrive. When caring for coconut plants, it’s important to adapt to the seasons. This includes raising humidity in the winter and increasing light when the light level is low. Avoiding issues like coconut plants going yellow or not developing inside is possible with regular monitoring and small tweaks, which guarantee long-term health.
While modern techniques like compost tea or grow tents can expedite the growing process, nothing surpasses the benefits of healthy soil, consistent watering, and pest prevention. With some strategic placement, curious animals can’t harm a multipurpose houseplant like a coconut plant, making it ideal for indoor pets. Whether you have a spacious home or are working with a smaller one, it is essential to adjust the care of your coconut plants to fit their environment.


