

About Linhai Xu
My name is Linhai Xu, a 3D character artist specializing in game character modeling. I have worked on notable projects such as Call of Duty: Black Ops Cold War, NieR: Automata – The End of YoRHa Edition, and Ashfall. In this showcase, I will walk you through the complete workflow of my latest 3D character project, Burn the Darkness, from initial concept in Character Creator 4 (CC4) to final rendering, and share insights that may inspire fellow artists.
Check out Linhai Xu’s ArtStation
Concept and References
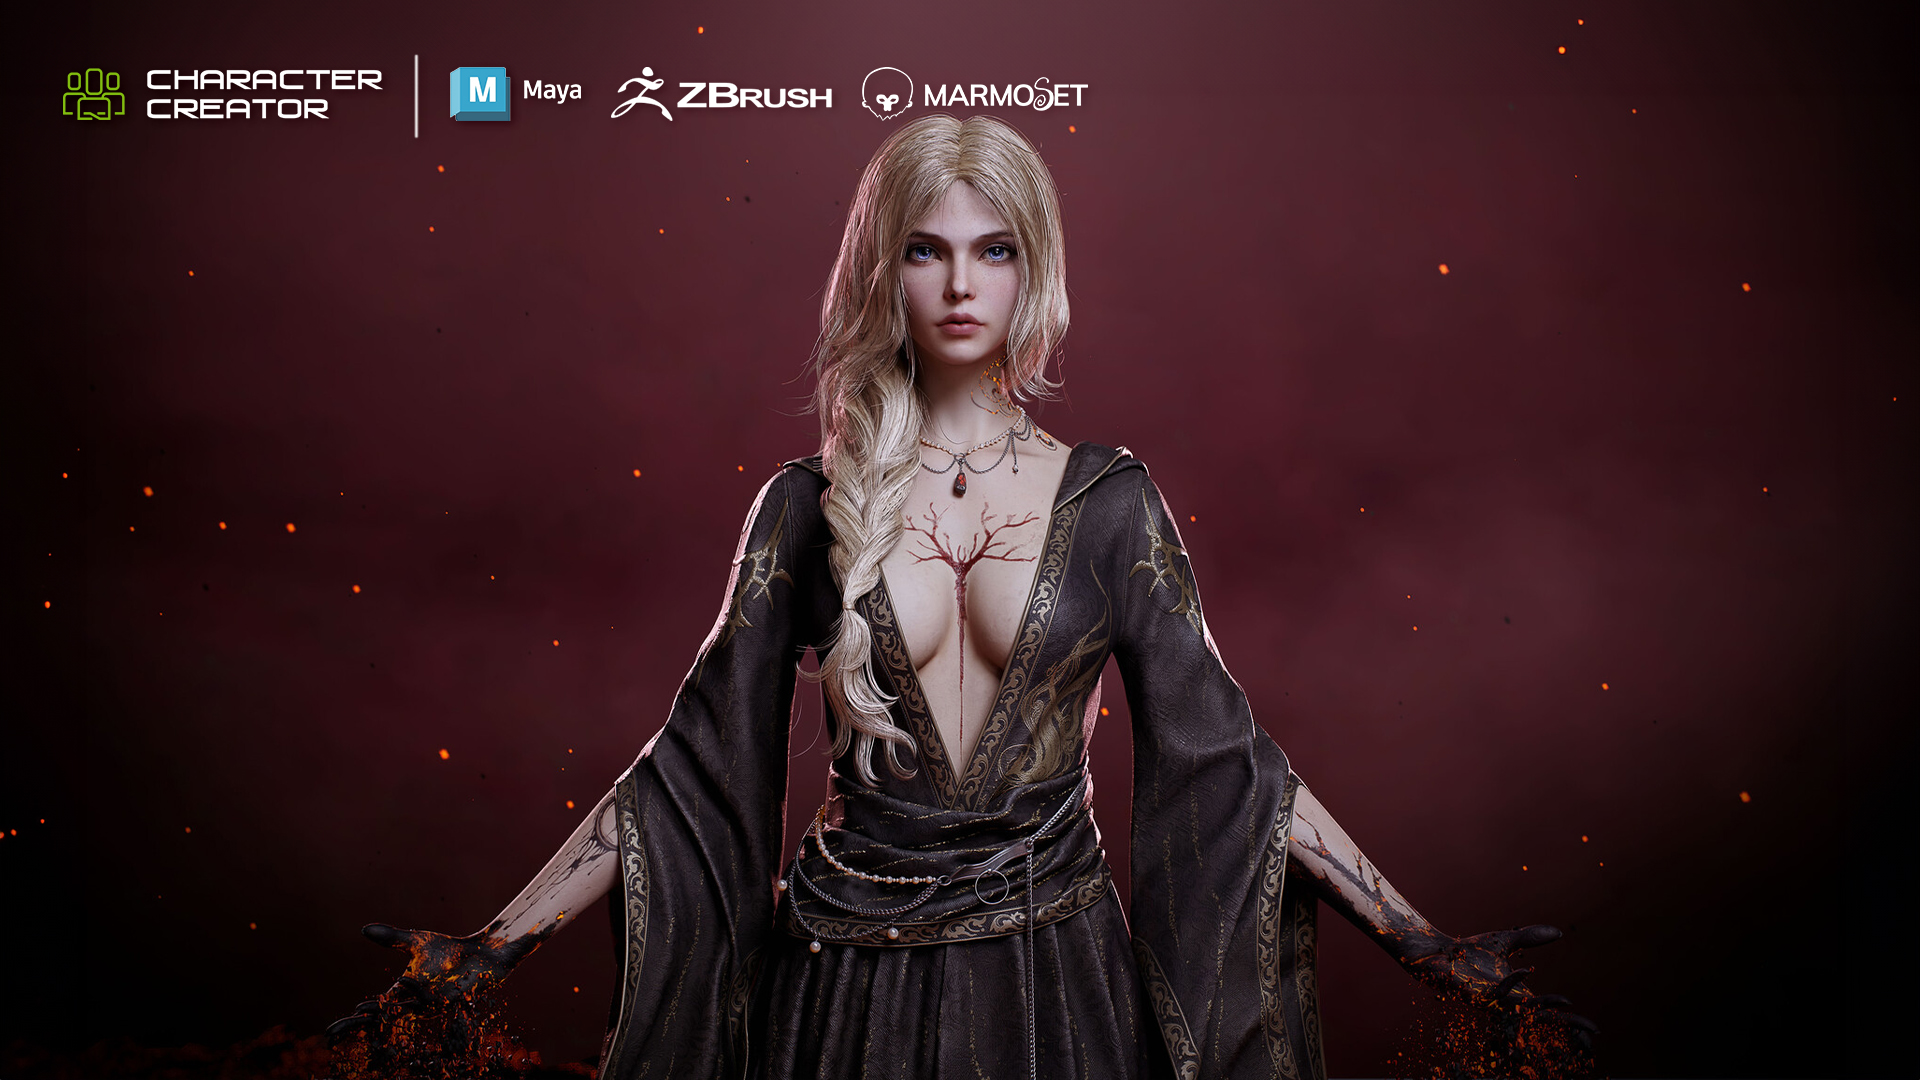
For this project, I wanted to portray a sorceress struggling against the impending darkness consuming her. She casts magic to resist the overwhelming force, captured in a dramatic pose and lighting setup within Toolbag 5. The entire process took approximately two and a half months.
A strong foundation in character design begins with well-defined concepts and references. I spent considerable time gathering images from platforms like ArtStation and Pinterest, ensuring a broad spectrum of inspiration covering character silhouettes, costumes, material details, and environmental mood.

Additionally, I frequently browse online shopping platforms to find real-world accessories and outfits similar to my envisioned character. Since product images are often clear and well-lit, they serve as excellent visual references, aiding in accurate modeling.
3D Modeling Workflow
Modeling is the most time-intensive phase of character creation. My process began with a base model in Character Creator 4 (CC4), where I adjusted the character’s proportions to match the concept. CC4’s intuitive tools allowed me to fine-tune the body shape before moving into ZBrush for detailed sculpting.


Using CC4’s motion features, I was able to preview animations directly on the character and refine its movements. This helped in determining the natural flow of fabric and accessories, ensuring they interacted correctly with the body.
High-poly details were sculpted in ZBrush, refining anatomy, clothing, and intricate accessories. For elements like armor and props, I used a combination of Blender and ZBrush to maximize flexibility in my workflow.


Once the high-poly modeling was complete, I optimized the mesh and created low-poly versions in Maya, where I also handled UV unwrapping, leveraging Toolbag 5 UDIM support for complex layouts.

Blender played a crucial role in creating the character’s hair. I utilized curve-bound planes for better control and flexibility, ensuring the hairstyle maintained a natural flow.


For the hand magma effect, I employed Blender’s FluidLab plugin, which allowed for realistic fluid simulations. The results were later enhanced in Toolbag by adding displacement maps to refine surface details.


Texturing and Material Details
Surface detailing is essential for bringing a character to life. Substance Painter was my primary tool for texturing skin details and fabric patterns, as well as generating metallic and leather materials.

I meticulously layered skin textures, using height and normal maps to enhance depth and realism. Clothing textures were developed using a mix of procedural maps and hand-painted details, ensuring a handcrafted look that matched the concept’s dark fantasy aesthetic. To bring out the character’s realism, I focused on intricate metal and leather materials, applying custom shaders and edge wear effects to simulate natural aging.

Since Toolbag 5 was used for final rendering, I continuously exported textures from Substance Painter to assess and refine their appearance. The pen tool in Substance Painter 9.0 proved invaluable for adding stitching and continuous pattern details, achieving a high level of polish.
Lighting and Rendering
I utilized Toolbag 5 to set up the final scene, focusing on dynamic lighting to enhance the character’s presence. The scene’s volcanic landscape was built using Bridge’s rock assets, which added depth and realism to the environment.

Lighting was key in emphasizing the character’s silhouette and emotional tension. The main light source was positioned at an overhead angle to create dramatic contrast, while a subtle rim light was used to define the edges and separate the character from the background.


One challenge I faced was achieving volumetric depth in the environment. Since Toolbag’s fog system lacked detailed controls, I simulated atmospheric fog using multiple layered mesh planes to replicate a smoky, immersive atmosphere.


Additionally, I integrated ambient particles, such as fire embers and dark burning fragments, to add realism and enhance the sense of movement in the scene.

For color grading, I switched from Linear mode to Hejl tone mapping, which provided better vibrancy and contrast to achieve a strong cinematic impact.


Reflections and Lessons Learned
Having used CC4 for three years, I have witnessed its remarkable growth, and it has become an invaluable tool in my workflow. It significantly optimizes character creation, making the process more efficient and enjoyable.
This project provided valuable insights into balancing technical execution with artistic storytelling. One of the most important lessons I learned was the value of concept clarity. Having a well-defined idea from the start streamlined the entire workflow and ensured all elements aligned cohesively.
Additionally, time management proved crucial; structuring each phase efficiently allowed me to maintain steady progress without unnecessary delays. Lastly, I gained a deeper appreciation for storytelling through character design, realizing that beyond visual aesthetics, the emotional and environmental context significantly enhances immersion.
This project pushed my skills further, especially in balancing character design with environmental storytelling. Moving forward, I aim to invest more time in refining concept phases and maintaining a strong narrative foundation in my works.

For more details, you can view my project on ArtStation and GGAC:
Related Posts


