

To keep your gas grill in top shape, clean grates after each use, inspect burners and gas lines seasonally, cover when not in use, and deep-clean twice a year. These gas grill maintenance tips prevent rust, flare-ups, and costly repairs – helping your BBQ last longer and cook better, year after year. Start small, stay consistent, and your BBQ will reward you with flawless performance for seasons to come.
Table of Contents
- Essential Gas Grill Maintenance Tips
- Pro Tips to Extend Gas Grill Lifespan Beyond Basics
- Final Thoughts: Keep Gas Grill in Top Shape for Years
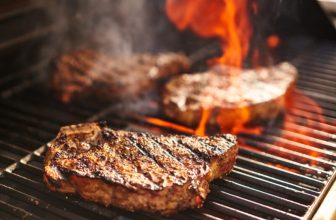
There’s nothing quite like the sizzle of a steak hitting a hot, perfectly seasoned grill grate – unless, of course, that sizzle is interrupted by a stubborn burner, a cloud of soot, or worse, a gas smell that sends everyone running. Not bad luck. Not cheap parts. Just skipped maintenance.
You don’t need to be a mechanic or a chef to keep your setup running like new. Whether you fire it up every weekend or just for the big holidays, a little attention goes a long way. And if you’re thinking about upgrading or starting fresh, view products designed with durability and ease of care in mind – because the best maintenance starts with the right foundation.
This isn’t about chores. It’s about protecting your investment, your safety, and yes – your bragging rights at the next backyard bash.
Essential Gas Grill Maintenance Tips
Gas grill maintenance tips turn theory into action. These aren’t optional suggestions – they’re the core habits that separate grills that die after three seasons from those that outlast their owners’ patio furniture.
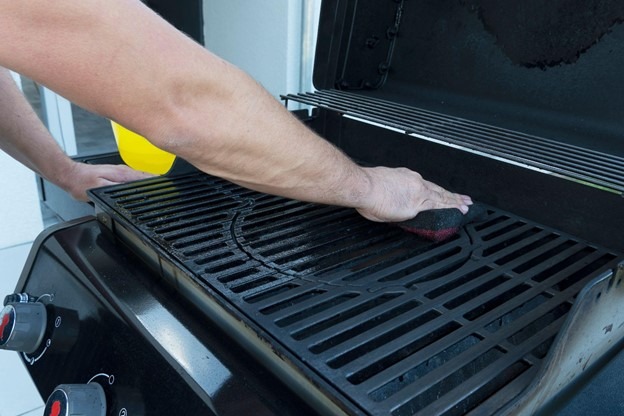
How to Clean a Gas Grill After Every Cookout
If you’ve ever wondered how to clean a gas grill properly, the key takeaway is this: timing matters. Clean while the grates are still warm – not scorching hot, but comfortably warm to the touch. This is when grease and residue are softest and easiest to remove.
- Turn off the gas and let the grill cool slightly, about 5 to 10 minutes after cooking.
- Use a brass-bristle brush (never wire on porcelain or ceramic) to scrub the grates lengthwise. Brush toward the front to avoid dropping debris onto burners.
- Pull out the drip tray or grease pan. Scrape it clean or replace the foil liner. Never let grease accumulate; it’s the number one cause of dangerous flare-ups.
- Wipe down exterior surfaces, including the control panel, lid, and side shelves, with a damp microfiber cloth and mild dish soap. Avoid using abrasive cleaners on stainless steel, as they can cause micro-scratches that trap grime.
- Close the lid and let any residual heat evaporate moisture inside.
Keep your brush and cleaning rag in a zippered pouch or bucket near the grill. Out of sight = out of mind. Visible tools = consistent habits.
Seasonal Burner & Gas Line Inspection Checklist
Do this in the spring (before the first use) and in the fall (before winter storage). Don’t skip fall – critters love to nest in dormant grills.
- Burner Tubes. Remove grates and flavorizer bars. Look for clogged ports – tiny holes along the burner. Use a pipe cleaner, toothpick, or compressed air to clear them. Never use a metal pick – it can enlarge holes and disrupt gas flow.
- Gas Hoses & Connections. Check for cracks, brittleness, or kinks. Run a soapy water solution over connections – if bubbles form, you’ve got a leak. Tighten gently or replace. Never force fittings.
- Ignition System. Press the igniter button. Look for a strong, consistent spark at each burner. Weak or no spark? Check battery (if electronic) or electrode alignment.
- Venturi Tubes. These connect burners to gas valves. Spiders love them. Shine a flashlight inside. If you see webbing or nests, use a bottle brush or vacuum attachment to clear them. Blocked venturis cause uneven flames or gas buildup.
- Flavorizer Bars / Heat Plates. Remove and inspect for warping or heavy carbon buildup. Soak in warm, soapy water, then scrub. Replace if cracked – they protect burners from drips.
Deep Cleaning Your Grill: Twice-a-Year Must-Do
Twice a year – ideally late spring and early fall – go beyond surface cleaning. This is your grill’s “spa day.”
- Disconnect the propane tank and move the grill to a well-ventilated area.
- Remove everything: grates, burners, flavorizer bars, heat shields, drip pans.
- Soak removable parts in warm, soapy water for 30 minutes. Scrub with a non-metallic pad.
- Use a putty knife or plastic scraper to remove carbon buildup from interior walls and under the cook box. Vacuum out debris.
- Inspect for rust. Light surface rust? Sand it gently and apply high-heat barbecue paint. Deep rust or holes? Consider part replacement.
- Reassemble carefully. Ensure all parts are seated correctly. Test ignition and flame pattern before reconnecting the gas.
Keep a small notebook or digital note with dates and what you cleaned. It’ll help you track wear and anticipate replacements.
Pro Tips to Extend Gas Grill Lifespan Beyond Basics
Routine cleaning and inspections form the backbone of gas grill maintenance, but truly maximizing your grill’s longevity requires a few strategic habits that go beyond the basics. These practices address environmental stressors, mechanical wear, and seasonal transitions – all common culprits behind premature grill failure in Canadian climates.
Prioritize Year-Round Protection
Even covered patios don’t shield your grill from humidity, temperature swings, or airborne debris. A high-quality, breathable cover designed specifically for your grill model is essential. Look for UV-resistant, water-repellent fabric with ventilation to prevent condensation buildup underneath – a hidden cause of interior rust.
Store Propane Tanks Correctly
Propane tanks should always remain upright and outdoors, even during winter. Never store them in garages, sheds, or basements, as leaking gas can accumulate in enclosed spaces. Keep tanks away from direct sunlight and heat sources to maintain pressure stability and valve integrity.
Avoid Thermal Shock During Cleaning
One of the primary BBQ grill care and cleaning tips is to never spray cold water on hot grill components. The sudden temperature change can warp metal grates, crack ceramic coatings, or damage ignition systems. Always allow the grill to cool to warm-to-the-touch before cleaning – ideally within 10 to 15 minutes after cooking.
Maintain Moving Parts Annually
Hinges, lid dampers, and caster wheels degrade over time due to exposure and friction. Once per year, apply a food-safe silicone lubricant to these parts. Avoid petroleum-based products, which attract dust and degrade rubber seals.
Track Maintenance with a Simple Log
A brief record of cleanings, part replacements, and seasonal checks helps you anticipate wear before it becomes failure. Note observations like “front burner flame uneven in July” or “drip tray full after 6 uses.” Over time, this reveals usage patterns and informs smarter care decisions.
Choose Grill Designs Built for Easy Upkeep
When purchasing a new unit, look for features that simplify maintenance: slide-out grease trays, tool-free burner access, and modular components. Some retailers even offer white-glove delivery services that include assembly, safety testing, and personalized setup guidance – ensuring your grill starts its life correctly and safely from day one.
These proactive measures won’t just keep your grill running – they’ll extend gas grill lifespan, preserve its performance, and appearance for many seasons to come.
Final Thoughts: Keep Gas Grill in Top Shape for Years
Your gas grill isn’t just a tool – it’s the centrepiece of summer nights, family gatherings, and quiet Sunday suppers. And like any centrepiece worth its salt, it deserves care that goes beyond the occasional wipe-down to keep gas grill in top shape.
Ultimately, keeping your gas grill in top shape is about respect – for the craft of cooking, for the safety of your home, and for the memories you’re yet to make. Start today. Clean that grate. Check that hose. Cover that lid. Your future self – and your hungry guests – will thank you, season after season.