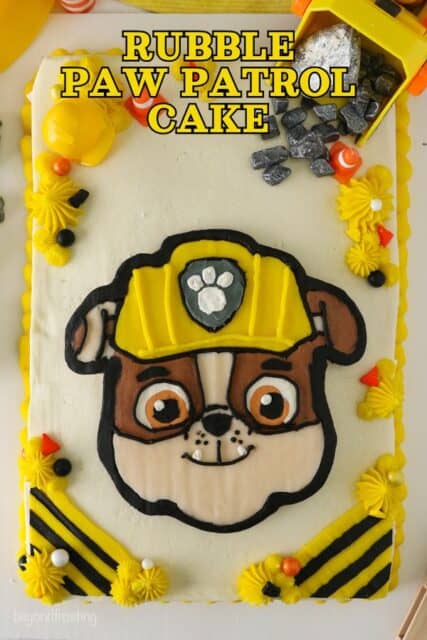
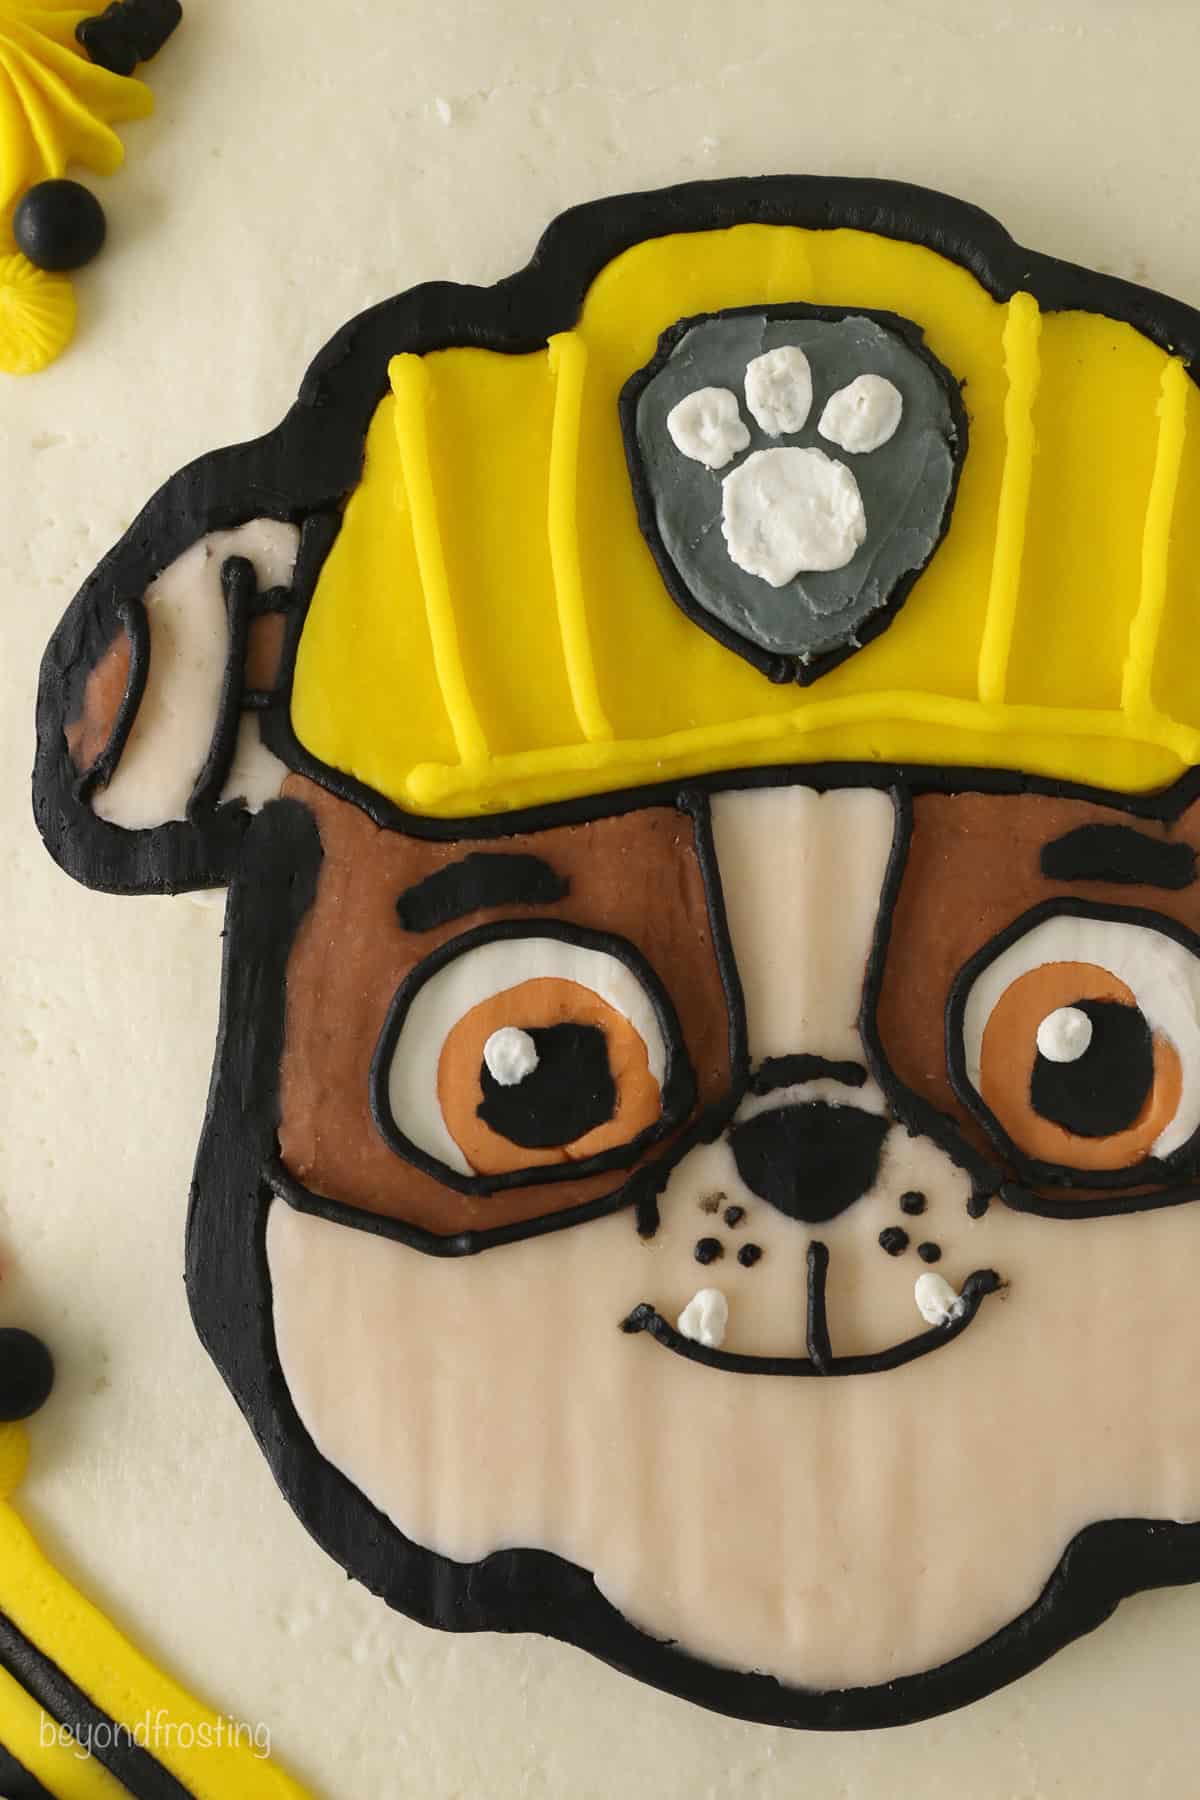
This Paw Patrol cake uses a buttercream transfer technique to create an adorable Rubble-themed design, based on the popular kid’s show! I’ll show you how to pipe buttercream frosting using a template and parchment paper and freeze it before transferring the finished design to the cake.
Looking for more ways to turn cherished TV show characters into fun birthday cake ideas? Try my Cookie Monster cake and Elmo cupcakes, next.
Adorable Rubble Paw Patrol Cake Tutorial
If you’ve landed here, I am guessing you have a child who LOVES Paw Patrol, and truthfully, I love it to. Today, we’re making the cutest Rubble Paw Patrol cake! This cake uses a buttercream transfer method, where the buttercream design is piped onto a piece of parchment paper, frozen, and then transferred to the finished cake.
The technique is easy enough and doesn’t require a lot of decorating skill. However, I won’t sugar-coat that it’s time-consuming, with layers of frosting that need freezing between each layer. Luckily, it’s easy to break up the process over a day or two, and the finished cake is totally worth it.
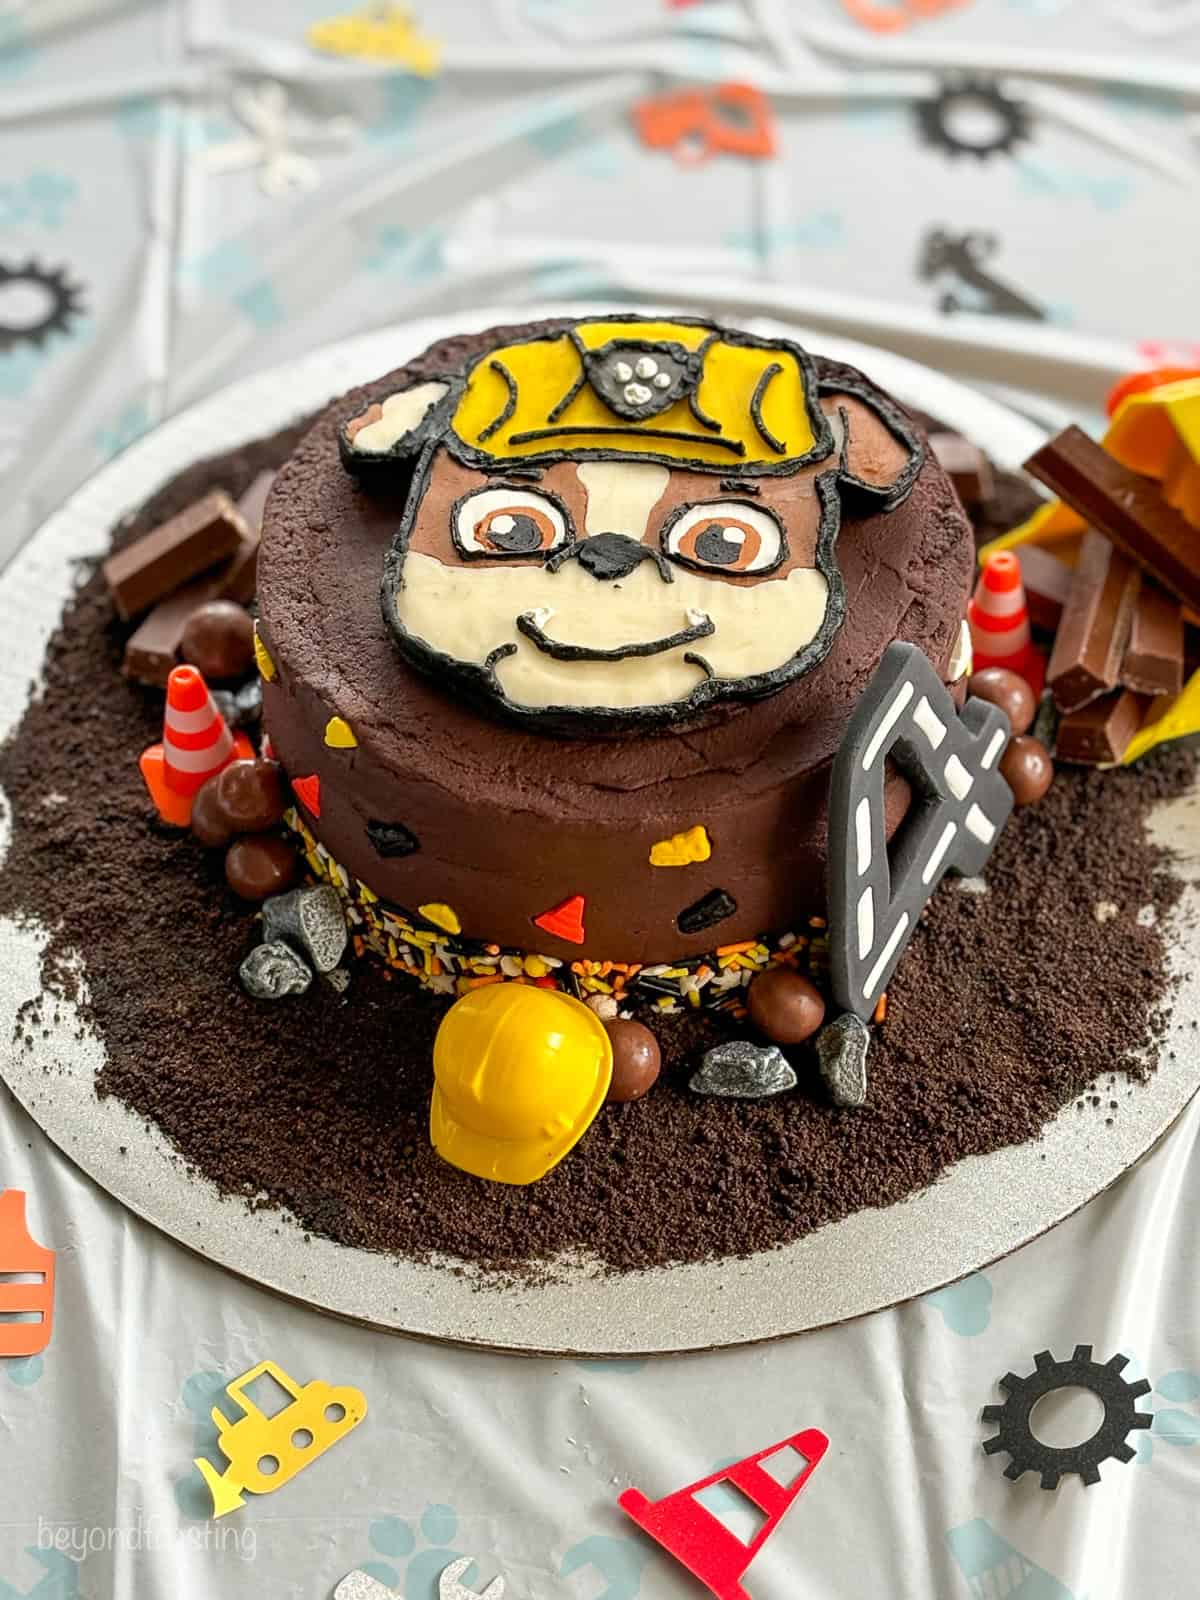
I am a mom of two boys who loves to go ALL OUT for their birthdays. After so many different construction cakes, I was happy to try something different with that theme here. The round cake below was the actual cake I made for my son’s 4th birthday for our family party. My son asked me to make him a smash cake since his little brother had just turned one a few weeks prior.
For the tutorial I am sharing today, I’ve made some changes, but I have also learned from my mistakes along the way, and that’s why I am so excited to finally share this cake (and the newly improved design) with you nearly a year after I made my first one. I am OBSESSED with how it turned out, and I know one day my son will look back at the pictures and know how much time and love went into making his birthday cakes. that’s what I remember about my mom too.
You Need To Know This…
100% buttercream. I’ve seen many Paw Patrol-themed cakes made with fondant or edible images. What sets this one apart is that it’s decorated completely with buttercream. So, even if you’re just starting out decorating, it’s very approachable.
Step-by-step. I share detailed steps to create the buttercream transfer and decorate this Paw Patrol cake using simple techniques. You’ll be so impressed by how it turns out!
Adaptable. I think everyone’s kid has a favorite Paw Patrol character. I chose Rubble, the show’s resident construction pup, but you can really adapt this tutorial to any character you’d like following this method.
Want to know a secret? I make 2 of the buttercream transfers, so I always have a backup. I did actually crack one once after it was finished, and was so thankful to have another one on standby in the freezer.
Which Cake Flavor Should I Use?
You can apply this Paw Patrol cake design to any cake flavor you’d like! I recommend my classic chocolate cake and vanilla cake recipes. Or, try any of these suggestions.
Tools and Decorations You’ll Need
The best part about this tutorial is that you don’t need to be a master decorator to create this fun Rubble Paw Patrol cake design. You will need to use a piping bag, however. If you’re getting the hang of handling piping bags, I have a complete guide on how to use a piping bag to set you up for success.
For now, these are the tools and decorations you’ll need for this buttercream Paw Patrol cake:
Couplers – Couplers come in handy when switching out the piping tips (see below). If you’re new to working with tips and couplers(affiliate link), refer to my full tutorial on how to use piping tips.
Piping Tips – For this tutorial, I use size 12, size 3, and size 5 piping tips to create the Rubble outline and fill in the details. I then use a #199 piping tip to pipe the shell border around the bottom of the cake, and a #47 basket-weave tip to create the construction stripes.
Julianne’s Tip
I highly recommend using couplers with your piping bags since you’ll be changing out the piping tips. I’ll often use the double bag method, where I fit a coupler to one bag and fill a second bag with buttercream to place inside the first. This can be especially helpful if you have a limited number of couplers.
Decorations
Chocolate Rocks – You can find options on Amazon (also this one) or at Hobby Lobby in the US. They’re relatively affordable and you’ll only need a small amount. Sprinkles – I generally purchase all my themed cupcake liners and sprinkles from Shop Sweets and Treats. Some of their products are also on Amazon. For this cake, you can use these construction sprinkles and traffic cone sprinkles which are similar to what you’ll find from them.
Extras – Use any of your (clean) existing Paw Patrol trucks or figurines to put a unique spin on this Rubble cake.
I use my favorite vanilla buttercream frosting for the buttercream transfer and to frost and decorate the final cake.
You will have leftovers (better to be safe than sorry!), and you can freeze any leftover buttercream airtight for up to 2 months. I also needed additional buttercream since I removed the cake from the pan to decorate the sides. You can certainly frost only the top of the cake and leave it in the pan if you’d prefer! In this case, you won’t need as much frosting. See my notes and amounts required below.
How to Make a Rubble Paw Patrol Cake
Let’s prepare the Rubble design transfer and decorate this buttercream Paw Patrol cake. I highly recommend taking your time and reading through the steps before you start so you have an idea of what to expect.
You’ll find the vanilla buttercream recipe that I use for this tutorial in the printable recipe card below the post.
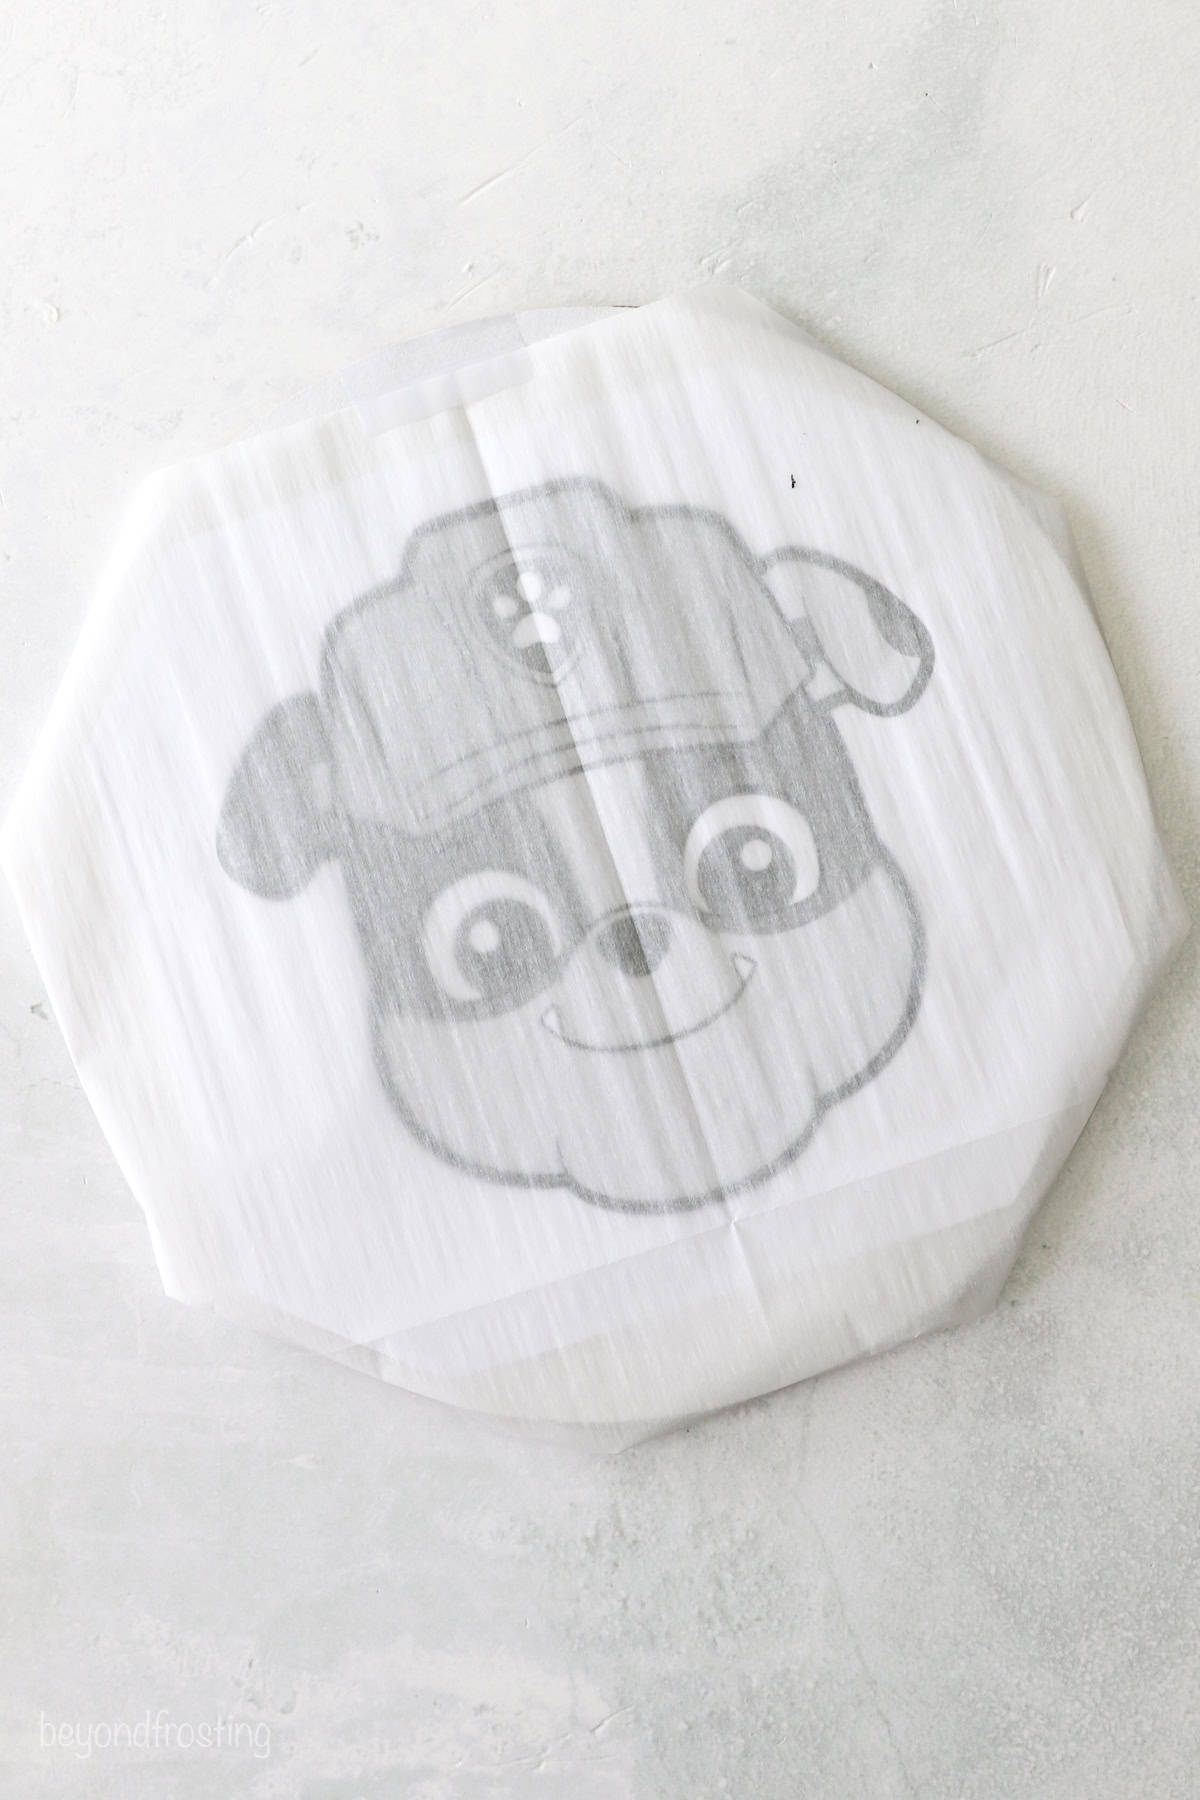
Sizing and Printing the Templates
First, prepare the image. I searched Google for a downloadable image of Rubble. I found the one pictured, which cost $5 and came with several formats.
Scale the image. Next, open the image in Canva or a similar editing app and adjust the size. You can make a 9×13 inch artboard and scale the size there, but I find it’s best to print the image and lay it on a cake pan until you’re happy with the size. Be sure to FLIP the image horizontally so that when you turn the transfer over onto the cake, it’ll face in the right direction. Note that the smaller the face, the trickier it becomes to decorate. For reference, my image size is 6 5/8 inches wide and 6 1/2 inches tall.
Secure the stencil. Attach the final printed paper to a flat surface that will fit in your freezer. I used a cardboard cake circle, and I’ve also done this with a small cookie sheet. Double-check that you flipped the image before you start!
Layer parchment paper. Finally, lay a piece of parchment paper completely flat over the image and tape it tightly to the surface to secure it in place. This will be your canvas for piping the buttercream!
Julianne’s Tips
Flip the image before printing. Again, make sure to mirror the transfer on paper, so that when you flip the finished buttercream design over to the cake, you’re looking at the image in the correct position.
Prepare the transfer. The parchment paper should be taped down tightly and straight. Ripples or bends in the paper will affect the results, you can see in my picture below, I learned my lesson the hard way. If you have a color printer, it’s helpful to print the stencil in color. If not, keep a reference image nearby.
Prepare and Color the Buttercream
Next, you’ll make a batch of buttercream frosting and color it according to the design you’ve chosen. I have a full tutorial on how to color buttercream that you can refer to if needed.
Beat the butter. Begin by beating cold, cubed butter with the paddle attachment for 5-7 minutes. It should be super whipped and easily spreadable. Do not rush this step or your buttercream will be too stiff.
Add the powdered sugar. Next you’ll add 2 cups of powdered sugar, followed by the vanilla extract, beating until it’s well incorporated. Then you’ll gradually add the remaining powdered sugar, adding the heavy cream and a pinch of salt and beat for another 3-5 minutes until the frosting comes together.
Divide and color the buttercream. All the colors pictured here were created using my favorite AmeriColor gels 12-pack. I also use white gel color to achieve a true bright white.
Julianne’s Buttercream Tips
Preparing and coloring the buttercream takes time. The color saturation also improved if it’s had time to sit. To break up the process, consider preparing and coloring the buttercream the day before you plan to decorate. It can be left at room temperature for up to 3 days or stored in the refrigerator for 7 days. In that case, bring it to room temperature and rewhip before using.
Buttercream Colors and Amounts
Brown – ½ cup, used for the face and ears.
Light Tan – ¾ cup, used on the face. You likely won’t need quite that much. I suggest piping the brown frosting first, and afterwards, take a spoonful of the leftover brown and mix it into the undyed frosting to achieve a very light tan color. You could also color the undyed frosting using brown gel, but use a toothpick and add it very slowly.
Yellow – 1 ½ to 2 cups, used for the hat and cake decorating. You’ll need approximately 1 cup for the shell border along the bottom edge of the cake, and less than ½ cup for the hat. So if you want additional for decorating, consider coloring 2 cups of yellow. If you don’t plan to pipe the border, then 1 cup should be plenty.
Black – ¾ cup, used for the outlines and any additional decorating. To color buttercream black, separate the needed amount and add 1-2 tablespoons cocoa powder, and ¼-½ teaspoon of milk. Once it’s mixed, add the black gel color until you’re satisfied with the shade. Starting with a brown base helps darken the black without too much additional gel color.
Grey – You’ll need about 1 tablespoon for the Paw Patrol badge. Since this can be hard to pipe, I recommend 2 tablespoons.
White – 3 tablespoons, for the face and the pawprint on the Paw Patrol badge.
Orange – 2 tablespoons, for the eyes. If you want, you can substitute orange with the brown color above.
Uncolored – Leave any leftover frosting uncolored to combine with the frosting for the cake and to use when sealing the back of the buttercream transfer.
Piping the Buttercream Transfer
After many test runs, I found that the best way to pipe the buttercream transfer is to pipe areas that don’t sit directly next to each other, then place the design into the freezer to set, add the next color, refreeze, and repeat. Layering some of the buttercream on top of each other makes it easier to do. I also recommend leaving some of the final outlines until the very end. I’ll go over this with the rest of the details below.
Julianne’s Tips
Avoid gaps. Do your best to add the frosting colors so they’re right up against the outlines to prevent gaps.
Fix any mistakes. This buttercream is pretty forgiving. If you pipe a line and it breaks, you should be able to lift it with the edge of a knife. It should come right up. Also, remember that what you’re seeing as you decorate is the BACK of the transfer, so it’s okay if it’s not 100% smooth.
Watch the video tutorial before you begin and rewatch it as much as needed as you’re working, especially if you are a visual learner.
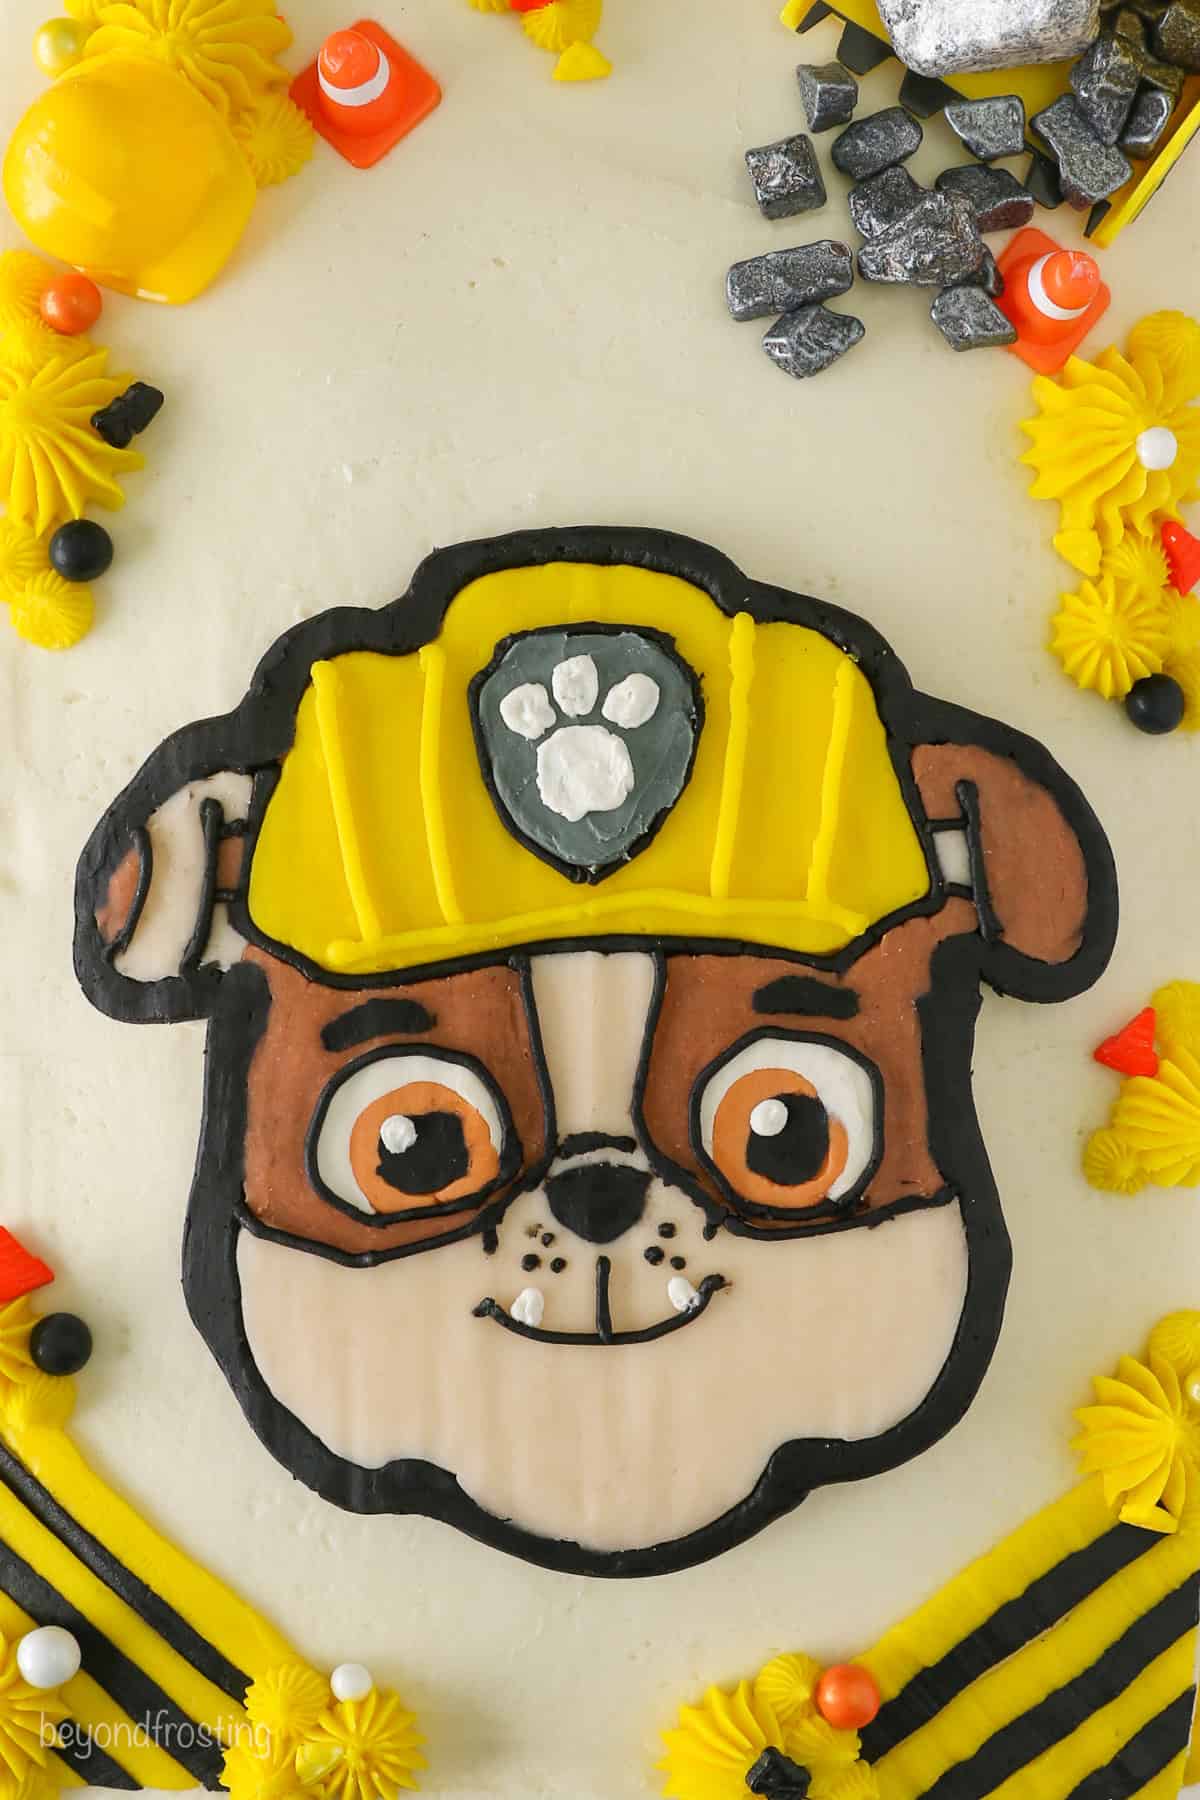
Start with a black outline.Add the brown and yellow details.
Start with the black outline. Use a size 12 tip and black buttercream to pipe around the outside edge of the face, the nose and center of the eye. Switch to a size 5 to add the outline of the hat and ears. You’ll notice that I did not leave a space for the white of the eye, and that’s because I add that at the end. Place the black outline into the freezer for 30 minutes, or until the buttercream is solid.
Next, add the yellow for the hat. Use a size 12 tip and yellow buttercream. Pipe around the black outline, and then proceed to fill the space, working in the same direction (top to bottom or side to side) until it’s filled. Smooth the frosting over with your knife or spatula.
Add the brown details. At the same time, using a size 5 tip, add the brown color for the ears and patches around the eyes. I prefer to pipe my outline, so I have a clean edge to work with, and afterward, I smooth the buttercream with a knife. Place this layer into the freezer for 30 minutes so it sets.
Add the tan frosting for the face.Pipe the frosting for the eyes.
Next, add the tan for the face. You’ll notice I also piped over top of the nose instead of trying to go around it. Smooth the buttercream and refreeze.
Pipe the eyes. Once again, instead of piping an outline, I piped entirely over the eye. Afterward, refreeze (this may only take 15 minutes as the area is much smaller). Finish it off by adding a white outline around the eyes. Refreeze again.
Add the backing color.Flip the transfer and smooth out any gaps.
Add the backing color. At this step, your buttercream transfer should be completely frozen. Adding a final back layer helps to bind the design together and prevents cracking. For the back layer, I recommend using the same color as the frosting you intend to use for your final cake, whether it’s uncolored, colored, or chocolate frosting. This is because it will sit just above the buttercream (as opposed to flush with it). Smooth the frosting over as best you can, place a piece of parchment paper on the back, and return the transfer to the freezer until it’s completely frozen.
Finish the transfer. Turn the transfer out onto a very flat surface without a bend (like a table or cake plate). Be sure there’s a piece of parchment paper on the back so it doesn’t stick. Use a warm but dry angled spatula or your (clean) finger to smooth out any gaps in the buttercream. Do not turn the transfer over again. Return it to the freezer for 15-20 minutes.
Make the paw patrol badge. Once you’re satisfied with your design, it’s time to add the finishing touches. I made the badge by cutting out a stencil in the shape of the badge and placing it over the hat. I then piped a grey outline around it using a size 3 tip, before removing the stencil and filling in the outline. Next, use a size 3 tip to add the white paws. Outline the badge with black using a size 3 tip if desired.
Add the black eyebrows, nose, and mouth. I use a size 3 tip. For a cleaner look, you can choose to go over some of the smaller areas again with the black, like I’ve done for the ears. Next, use the size 3 tip to add the white teeth and the dot in the eye. Lastly, add the yellow lines in the hat (I recommend a size 3 or 5 tip, depending on how thick you’d like them).
Flash freeze. Place it back in the freezer one more time before placing it on the cake. It needs to be completely frozen. When ready, use a large spatula to place it on the cake. See the next section for assembly tips.
Assembling the Final Cake
Frost the cake. Make a second batch of frosting for the cake. Frost the top and sides of the cake until smooth.
Position the buttercream transfer. First, place the buttercream transfer on the cake using a large spatula (this should be quite easy as long as it’s frozen).
Add a yellow border. Next, pipe the yellow shell border along the bottom edge of the cake as pictured.
Decorate! Decorate the top of the cake using sprinkles and leftover buttercream. To make the stripes, I used the flat side of a basket weave tip 47 (practice on a plate first if you’re unsure). To get the sharp edges, you can lay a piece of parchment paper directly on the cake edge, pipe the lines, ending on the parchment paper, and then use a sharp knife to cut a straight edge and peel the parchment paper away with the extra frosting. Finally, add additional decorations as you’d like.
FAQ: How to Smooth Out the Final Buttercream Transfer
If you notice a few holes or bumps after flipping the transfer, don’t panic. You can easily smooth these out using a flat edge of a knife or an angled spatula. It helps to warm the knife in a cup of hot water and wipe it dry, and then gently join together any areas that show cracks. You could also do this with a clean finger. This can be surprisingly easy as the buttercream warms, but also take caution not to press too hard, or you’ll crack the design.
How Far Can I Make This Ahead of Time?
It can be difficult to decorate the cake and prepare the buttercream transfer in the same day. Due to the freezing time, you’ll want to allow a couple of hours to complete the transfer.
For this reason, I’d at the very least get a head start the day before you plan to decorate the final cake. These are some ways that you can break up the process of making your Paw Patrol cake:
Prepare and color the buttercream in advance. Buttercream can be made up to 3 days in advance. Also, the color saturatuion also gets better if it’s had time to sit, so coloring the buttercream a day ahead of time is recommended. It can be left at room temperature for up to 3 days or stored in the refrigerator for 7 days. In that case, bring it to room temperature and rewhip before using.
Make the design ahead of time. The buttercream transfer can be prepared up to 7 days in advance and kept frozen until you’re ready to frost and assemble the cake.
Cake. The cake is at it’s best within 48 hours of preparation. You can make and decorate the final cake in the same day or prepare the cake 24 hours prior to decorating. Store it in a tightly sealed container and wrap the top of the pan in plastic wrap to lock in the moisture.
How to Store the Finished Cake
The frosted Paw Patrol cake can be stored in an airtight container at room temperature for up to 4 days. However, if you live in a hot and humid environment, consider storing the cake in the refrigerator and serving at room temperature instead. Either way, be sure you’re using an airtight container so it doesn’t try out.
This Paw Patrol cake uses a buttercream transfer method to create an adorable Rubble-themed design! There’s no fancy techniques or fondant involved. It’s the perfect cake for a Paw Patrol fan’s birthday.
For the Cake
Frosting for the Buttercream Transfer and Decorations
Frosting for the Cake
To Make the Frosting
Cut the butter into pieces. Using the paddle attachment, whip the butter for 5-7 minutes, scraping down the bowl occasionally, and beating until the butter looks light in color.
Add 2 cups of powdered sugar and mix on low speed until incorporated into the butter then add the vanilla extract and mix to combine. Beat for about 60 seconds.
Next, add an additional 2 cups of powdered sugar and beat on low speed until sugar is incorporated. Increase speed to medium-high and beat for 3 minutes.
Add the remaining 1 cup of powdered sugar along with the heavy whipping cream and salt. Beat on low until the ingredients start to mix together. Increase speed to medium-high and beat for another 3-5 minutes to whip additional air into the frosting.
Color the buttercream and decorate the cake following the detailed tutorial in the post.
Notes
If you plan to remove the cake from the pan, be sure to grease the pan generously or line the bottom of the pan with parchment paper.
If you only want to frost the top of the cakeand not the sides, just make half of the second batch (frosting for the cake).
You will have leftover buttercream, but you can certainly freeze any leftover buttercream for up to 2 months. Store in an airtight container or bag, removing any excess air.
If you want to make a chocolate buttercream for the cake, swap out 1 cup of powdered sugar for 1 cup of cocoa powder.
Piping Tips – For this tutorial, I use size 12, size 3, and size 5 piping tips to create the Rubble outline and fill in the details. I then use a #199 piping tip to pipe the shell border around the bottom of the cake, and a #47 basket-weave tip to create the construction stripes. The blog post has the full tutorial and products listed.
Storage
The frosted cake can be stored in an airtight container at room temperature for up to 4 days. However, if you live in a hot and humid environment, consider storing the cake in the refrigerator and serving at room temperature instead.