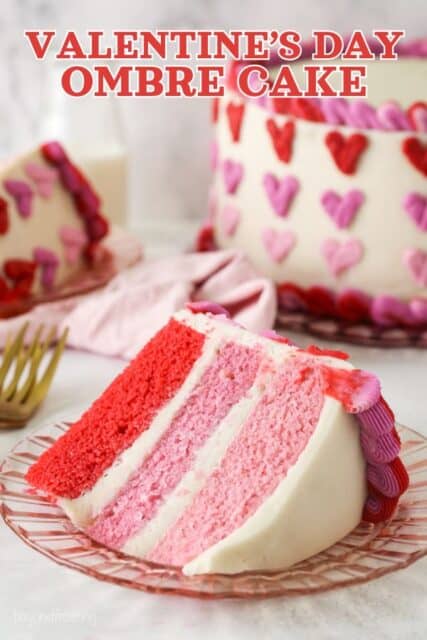
Make a perfect Valentine’s Day cake with three light and fluffy ombre cake layers in shades of red and pink! I’ll show you how to decorate this cake with frosting hearts using a simple piping technique.
The original published cake in 2020 was a chocolate cake with vanilla buttercream. I’ve updated the recipe to be a vanilla cake with the ombre cake layers. You’ll find the chocolate cake base is linked below if you’d like to make that instead.
Easy Valentine’s Day Cake Tutorial
It’s taken many years and hundreds of cakes to get the hang of frosting and decorating, but I’ve had so much fun, from my buttercream flower cake and dinosaur birthday cake to today’s Valentine’s Day layer cake.
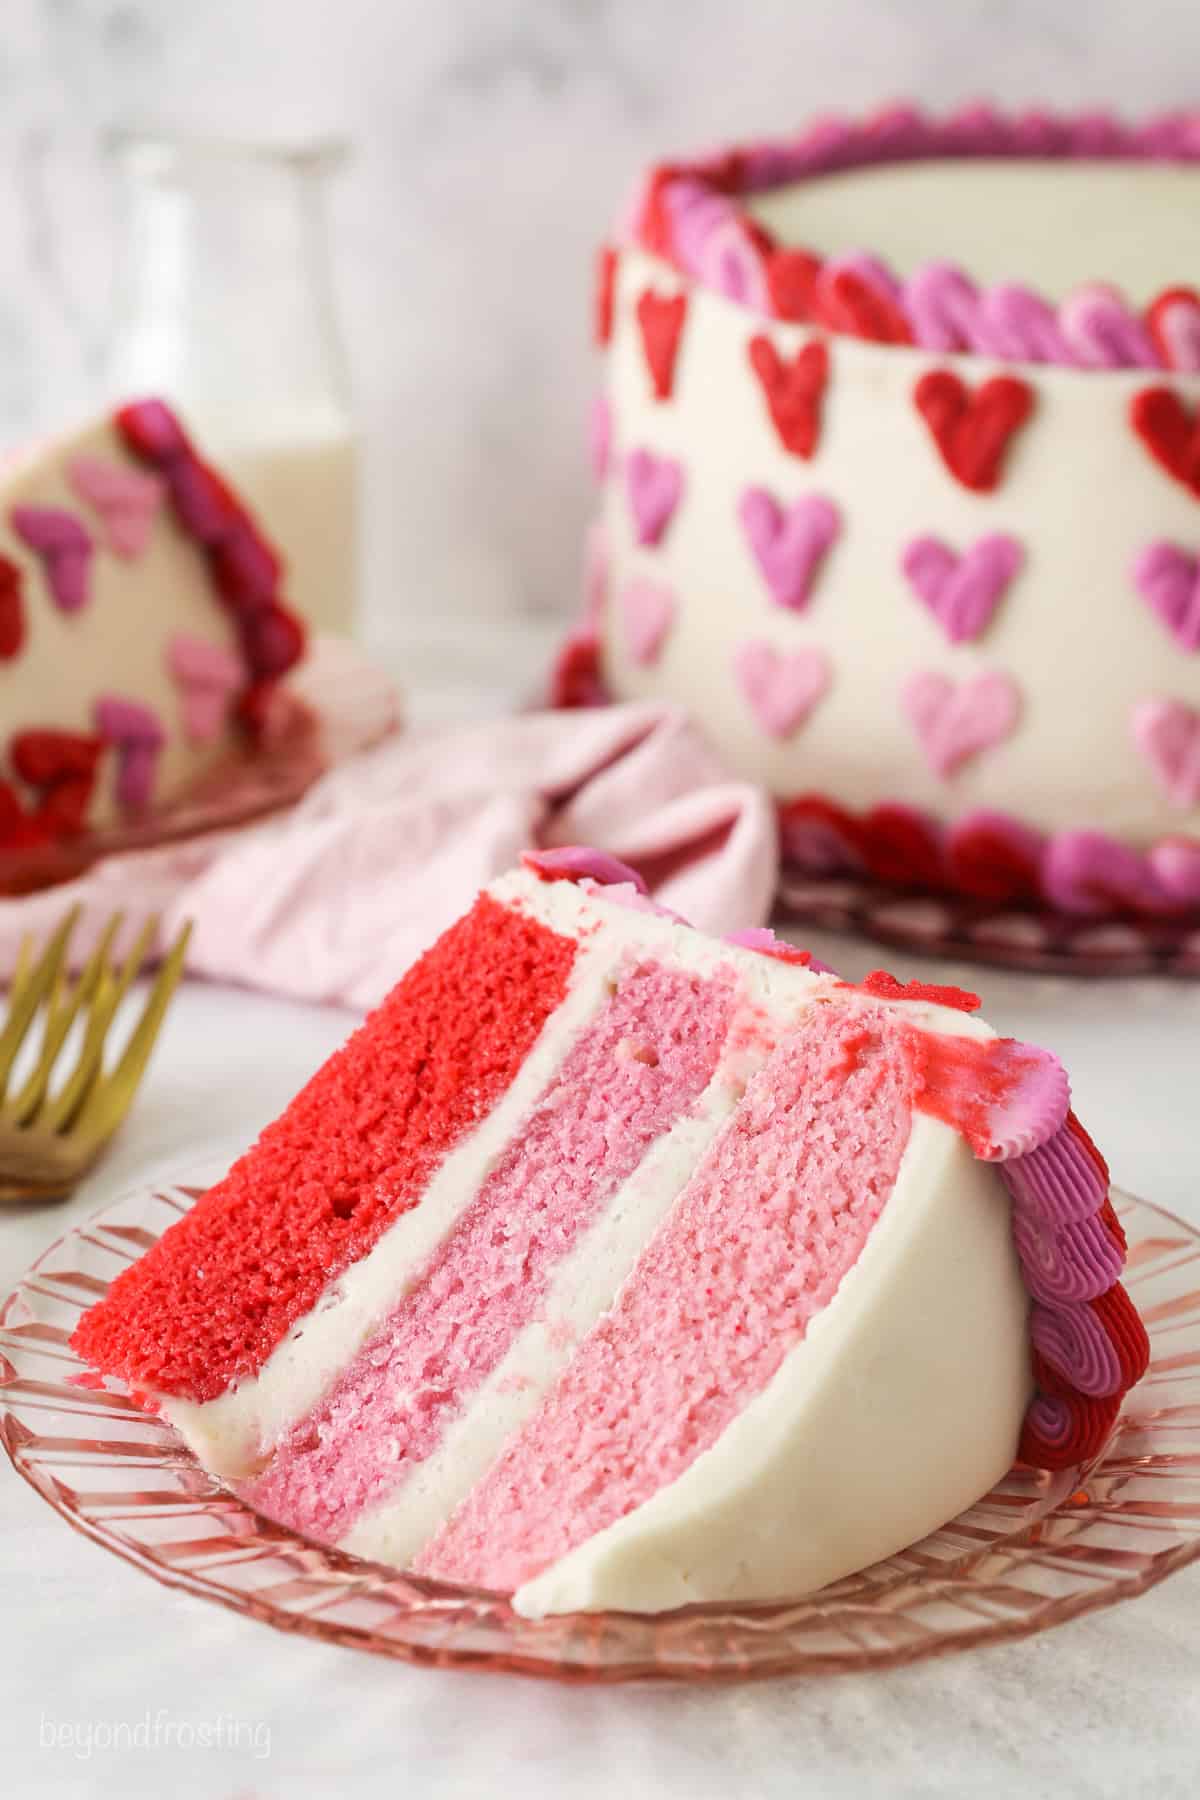
This Valentine’s Day cake was my first attempt at an ombre cake, with three thick layers that fade from red to pink. I was thrilled with how it came out! Then, I frosted and decorated the cake with rows of frosting hearts.
If that sounds a bit intimidating, trust me. Even the most beginner baker can make this cake. I’m sharing my easy recipe, plus my tips for coloring, assembling, frosting, and decorating. You can opt to make an ombre cake, or choose your favorite cake and follow the decorating instructions.
What You’ll Need
First things first, here’s a short overview of what you’ll need to make this Valentine’s Day cake from scratch. Scroll down to the printable recipe card below the post for the complete ingredients lists for the cake and frosting along with the amounts.
Cake – The cake you see here is my vanilla cake with vanilla buttercream. Feel free to use your favorite cake recipe, or you can even use a boxed cake mix if you’re short on time.
Gel Colors – Gel food coloring offers the brightest, most concentrated colors compared to water-based food coloring (like the kind you find in grocery stores). You’ll find gel colors in baking stores and online. I recommend the colors from AmeriColor or Chef Master.
Piping Tips and Piping Bags – I recommend piping tips from Wilton or Ateco (I include the sizes and types of tips I use in the tutorial below). You can buy piping bags, or use large ziplock bags and snip the corners off if needed.
More Cake Options
If you aren’t tied to the ombre cake layers, you can try any of these flavors for the cake! If you don’t see anything here you like, here’s all my cake recipes.
How to Make a Valentine’s Day Ombre Cake
It’s an easy, versatile recipe that makes a perfect base for the ombre layers in this Valentine’s Day cake. You’ll find the printable recipe in the recipe card below the post. For now, let’s walk through the steps.
Create the Cake Layers
Both the cake and frosting are colored with concentrated gel icing colors, which produce vibrant results without compromising the integrity of the cake or frosting. For this cake, I chose pink and red.
Prepare the cake batter. Set the oven to preheat to 350ºF while you grease and line two 8” round cake pans. Meanwhile, prepare your vanilla cake batter according to the recipe.
Color the batter with the lightest shade first. Start by dying the entire batch of cake batter or frosting with the lightest color (in this case, pink). Measure out 1 ⅔ cups of batter into your first cake pan.
Add additional color. Next, to the mixing bowl with the remaining batter, add more pink to darken the batter one shade further. Once again, you’ll portion out 1 ⅔ cups into your second cake pan.
Add the darkest color last. Now, add 1-2 drops of red gel coloring(affiliate link) to the batter that’s left. Mix that in and pour the last of the batter into the third and final cake pan.
Bake the cakes. Bake the cakes at 350ºF for 20-23 minutes, until a toothpick inserted into the center of one of the cakes comes out clean. Afterward, leave the cakes to cool completely before frosting.
Prepare the Frosting
If you’re using a standard 5-quart mixer, it’s much easier to prepare the frosting for the cake first and make a separate, smaller batch of frosting for decorating the cake. Otherwise, it’s a bit too much for most mixers, especially since my recipe starts with cold butter.
Here’s the directions to prepare the frosting, you’ll follow the same instructions for both batches:
Whip cold butter. To prepare the frosting I use for this tutorial, whip cold, cubed butter using the paddle attachment for 5-7 minutes.
Add the rest of the ingredients. Once that looks light in color, alternate adding powdered sugar with vanilla and heavy cream.
Whip again. Lastly, give the frosting a good final whip so that it’s well-combined and fluffy.
Assemble and Frost the Cake
Before frosting and assembling the layers, it’s a good idea to trim the “domes” from the tops of your baked and cooled cakes. You can do this using a serrated knife or a special tool called a cake leveler, so you end up with flat, even cake layers.
If you’re new to layer cakes, I have a complete tutorial on how to make a layer cake that you can refer to. Afterward, you’re ready to assemble the ombre cake:
Start with the first layer. Place a small dollop of frosting in the center of a plate or cake board. Then, place the first cake layer (I started with red) over the frosting. The frosting helps the cake stay in place.
Stack the layers. Place your second cake layer over top, and repeat. Place the final, lightest cake on top, inverted so that the top of the layer cake is flat and smooth.
Make a crumb coat. Fill any gaps between the layers with frosting, wiping away the excess frosting with a spatula to create a crumb coat. Next, chill the cake in the fridge for 30 minutes so that the crumb coat can set.
Frost the cake. Finally, use an offset spatula and the remaining frosting to liberally frost the top and sides of the cake. If you’d like, use an icing smoother or fondant smoother to smooth out the frosting.
Stack the cake layers.Pipe frosting over the sides.Create a crumb coat.
Prepare the Frosting for Decorating
Prepare the second batch of frosting you’ll need for decorating, remember to follow the same instructions as before to prepare.
Next, you’ll need to color the buttercream. I recommend coloring it the same way you colored the cake layers above. The goal is to match the cake layers as closely as possible (I like to keep leftover cake scrapes for color matching, to save a lot of guessing!). See this post on how to color buttercream if you need tips.
Color the entire batch of frosting with the lightest color first, transfer about 1 cup of the frosting to a piping bag (see more below), and repeat, adding more gel color to darker the pink, and finally adding the red gel until you’ve colored and filled the frosting for all 3 piping bags.
Prepare the Piping Bags
If needed, I have a full tutorial on how to use a piping bag that goes into these steps in detail. Since you’ll be using the same-sized piping tip for all 3 frosting colors, I recommend preparing the piping bags using the double-bag method.
Using this method, you can take off and wash only the piping tip instead of emptying the whole piping bag. You’ll use the leftover frosting to make the borders on the top and bottom of the cake.
First, prepare one bag fitted with a coupler and piping tip. I use a size 12 round tip. I don’t recommend smaller than a size 12 for this tutorial.
Next, fill 3 individual piping bags, one of each frosting color (red, pink, light pink). Snip the tip from each bag, about ¾-1” from the end.
How to Decorate
After you’ve finally gone through all these steps, it’s time to start actually decorating.
How to Add The Frosting Hearts
I practiced on a piece of parchment paper, and then I practiced on a glass as if I were piping on the cake. I found it very helpful to do this before actually applying it to my cake. Afterward, don’t let that frosting from the parchment paper go to waste! Just scrape it back into the bowl.
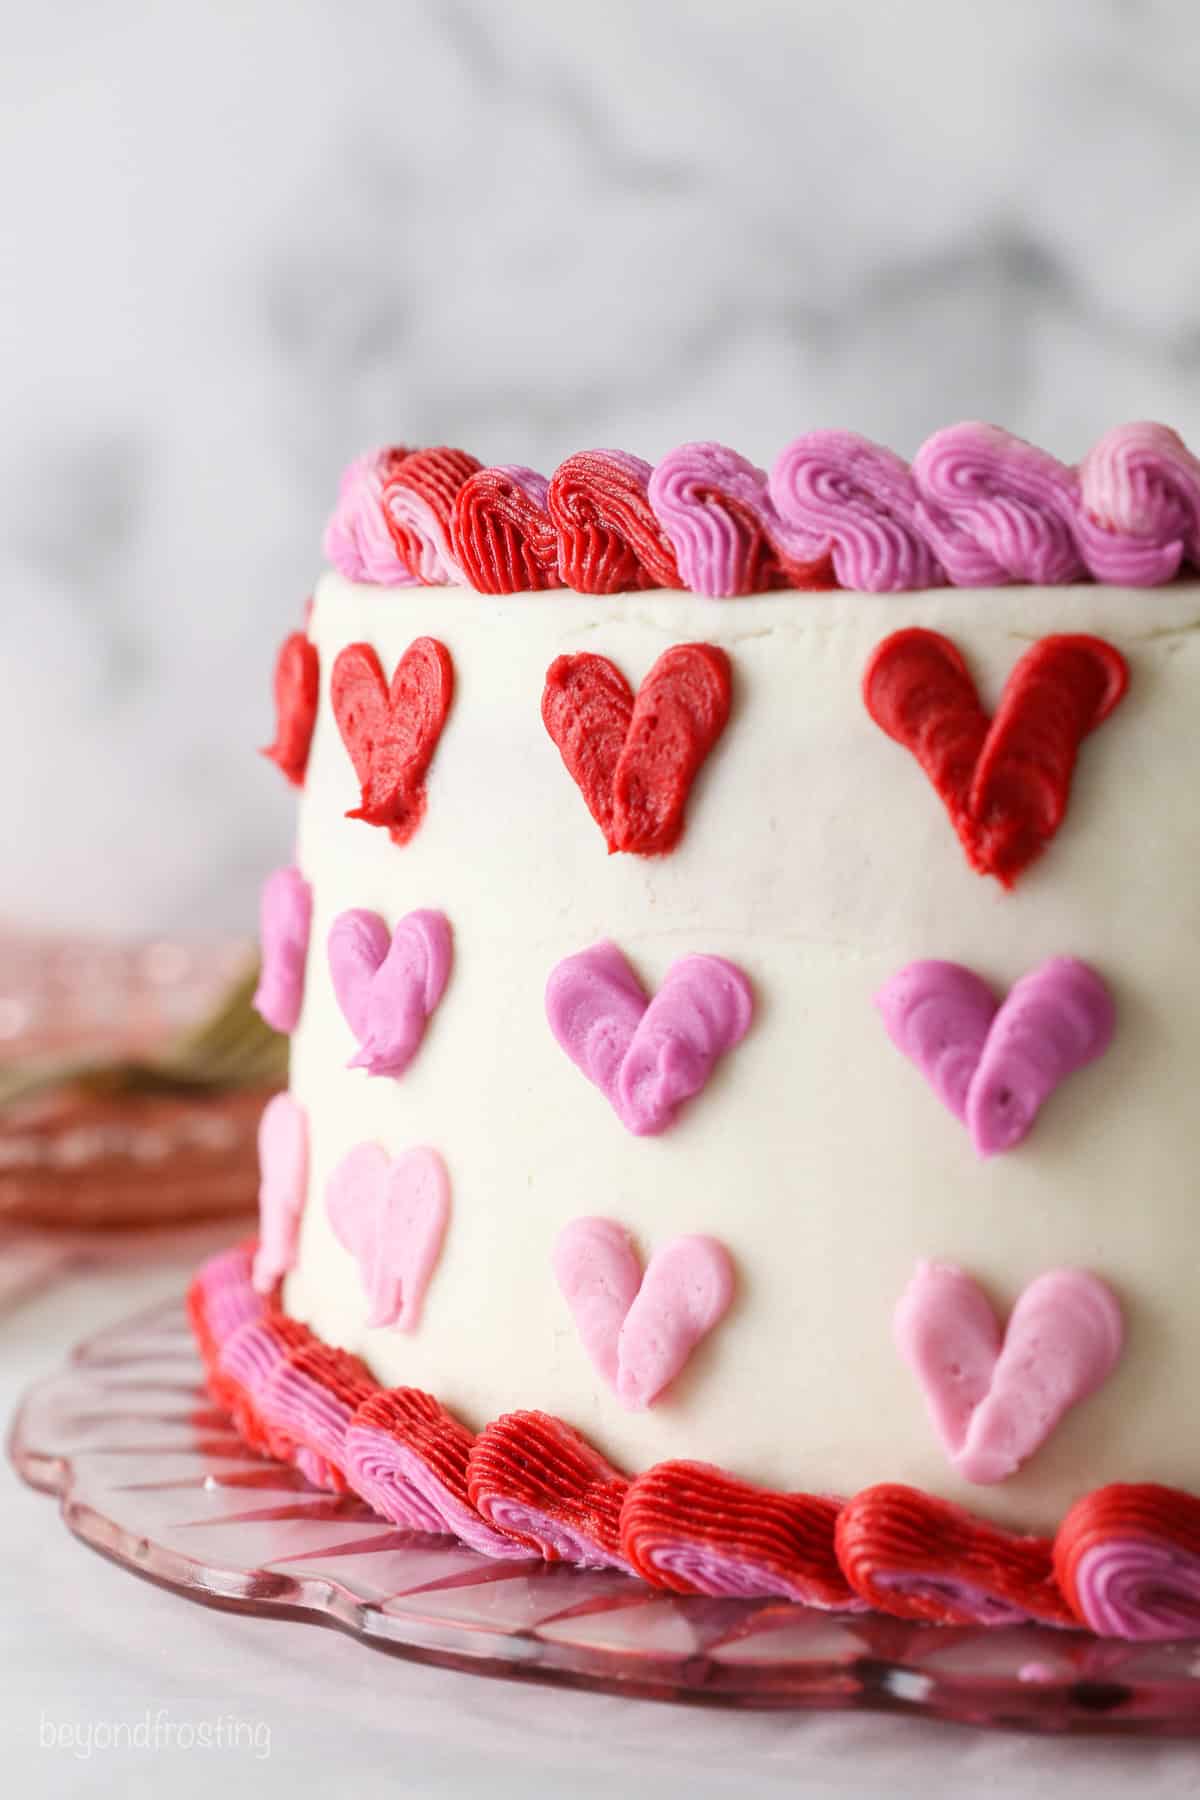
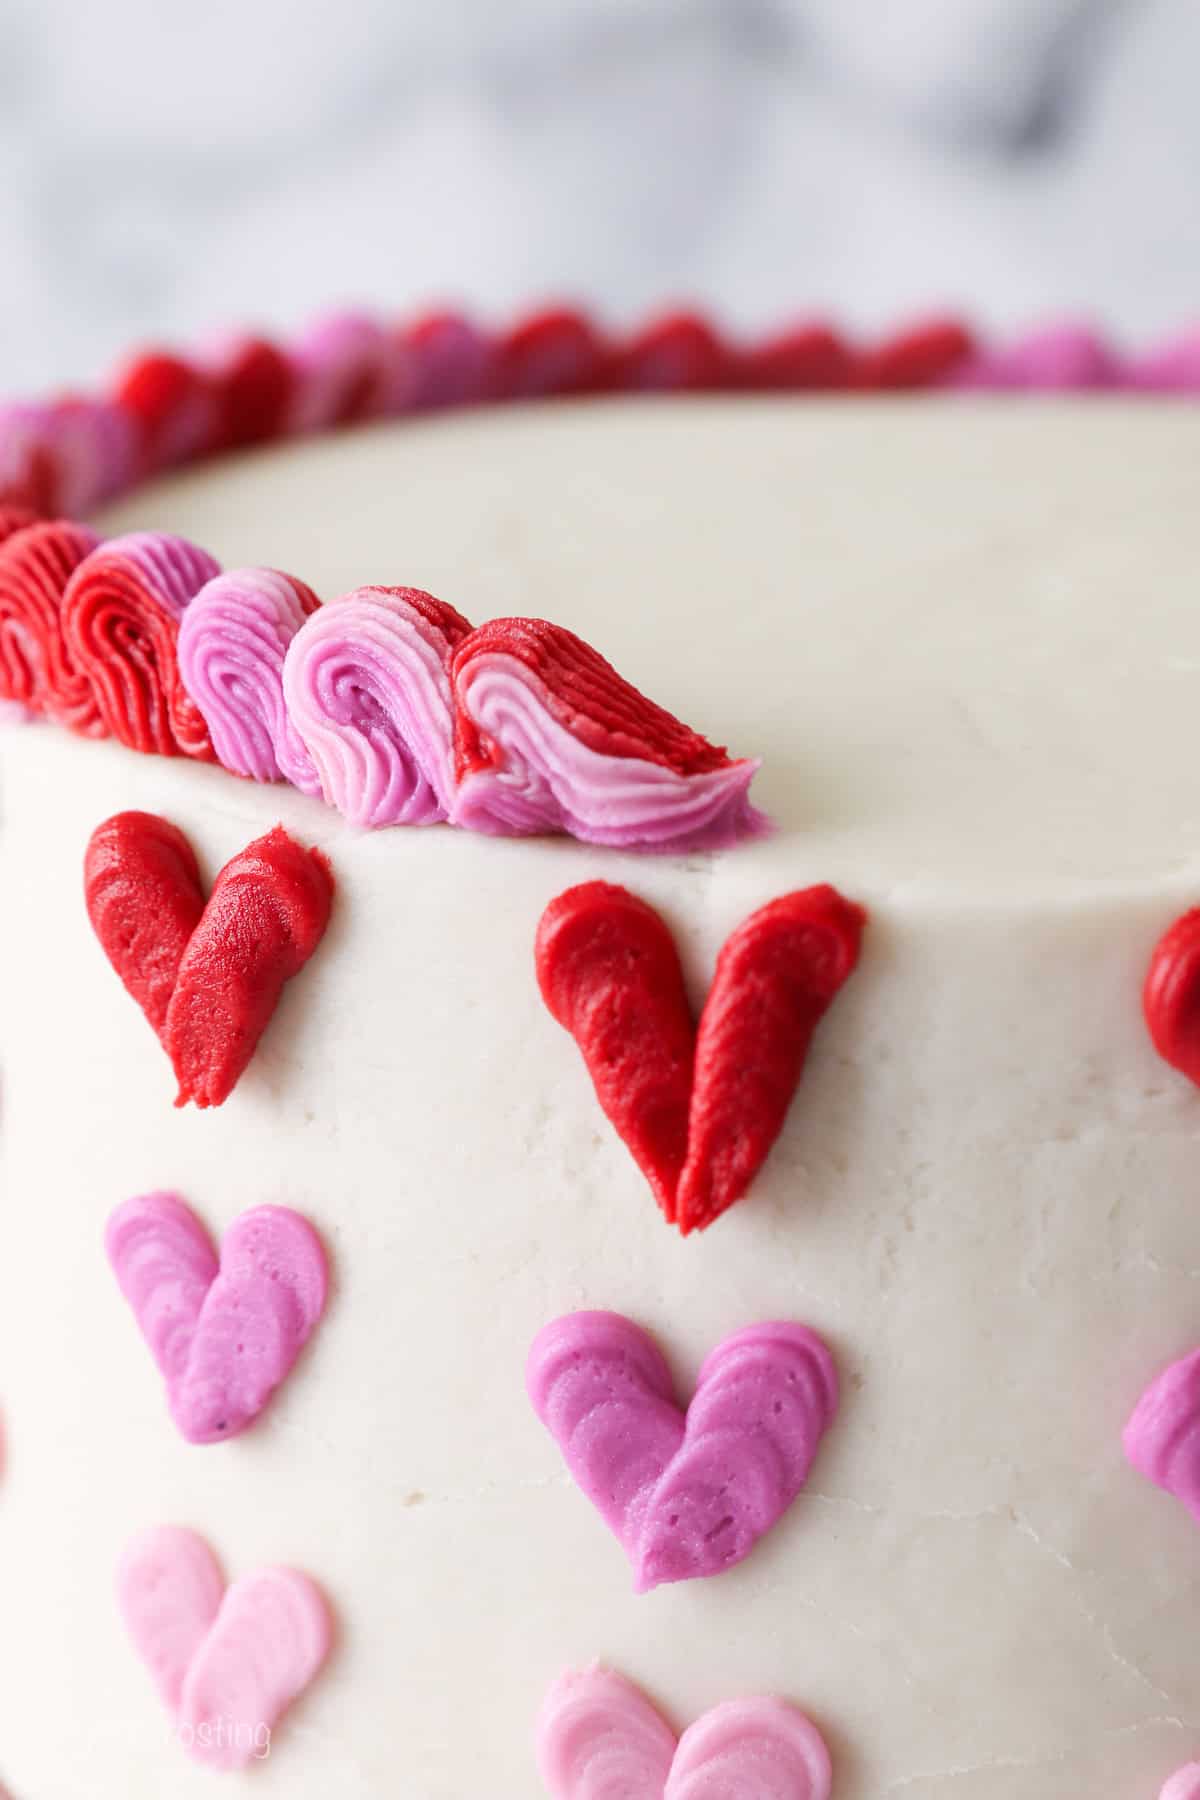
Plan your pattern. When you’re ready to take it to the cake, I recommend marking out the top row of hearts so that they’re evenly spaced around the cake. The hearts on my cake are spaced about 1 ½ inches apart, center to center. Use a flexible tape measure and a toothpick to mark the spots for the hearts if needed.
Pipe a heart. Starting with your first row, make a teardrop shape. Squeeze the piping bag until it makes a circle, and slowly pull down as you ease off the pressure and swiftly pull the piping tip away. Repeat on the opposite side, meeting at the center.
Repeat. Working row by row (lightest to darkest), continue piping hearts around the cake, creating an “ombre” effect that mimics the cake layers underneath.
The order of the hearts shown in the photos here is technically incorrect. The red should be on the bottom, to match the red cake layer, and the lightest pink should be on top. It was just one of those days! The cake still looked great and tasted delicious, though.
Pipe the Borders
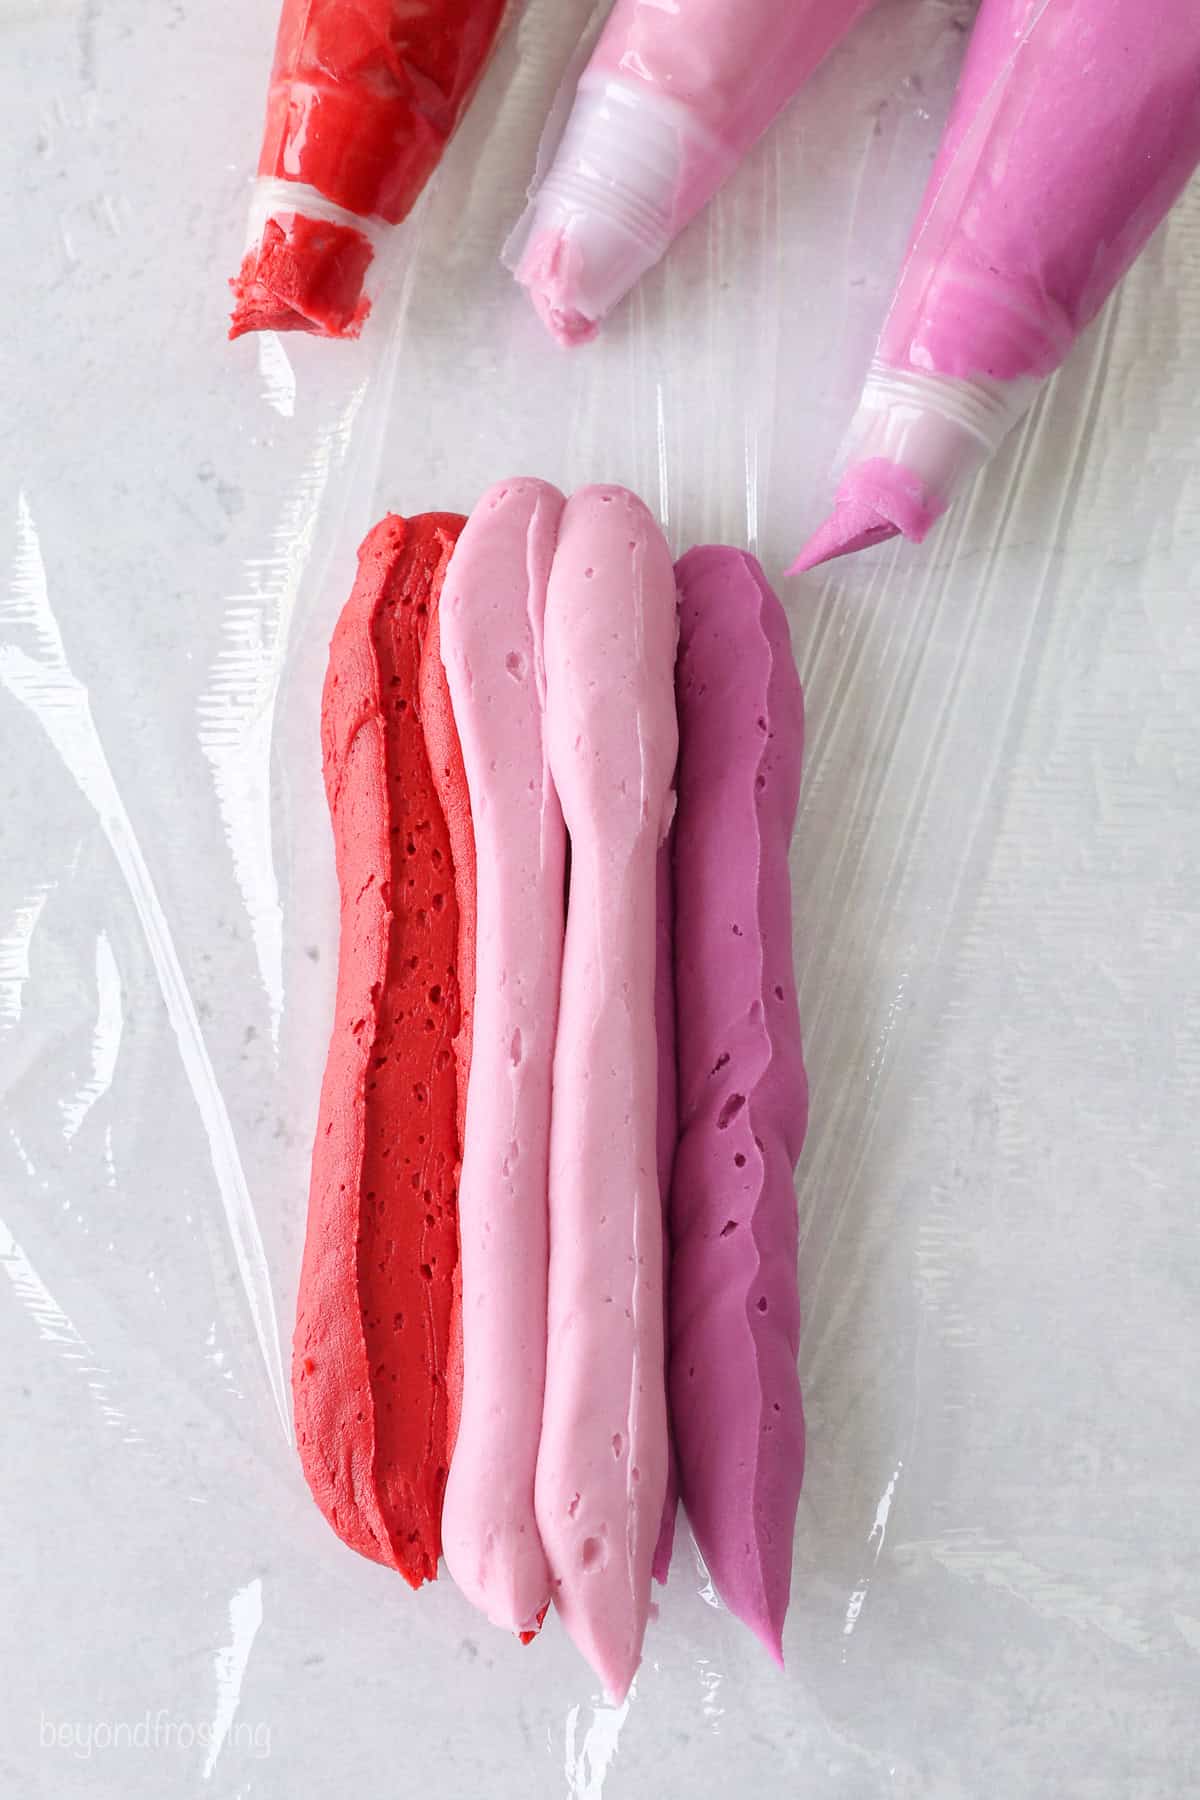
For the colorful shell borders, I combined all 3 frosting colors into one tri-colored piping bag, using a similar technique as my rainbow cupcakes. You’ll use what’s left in the piping bags to do this.
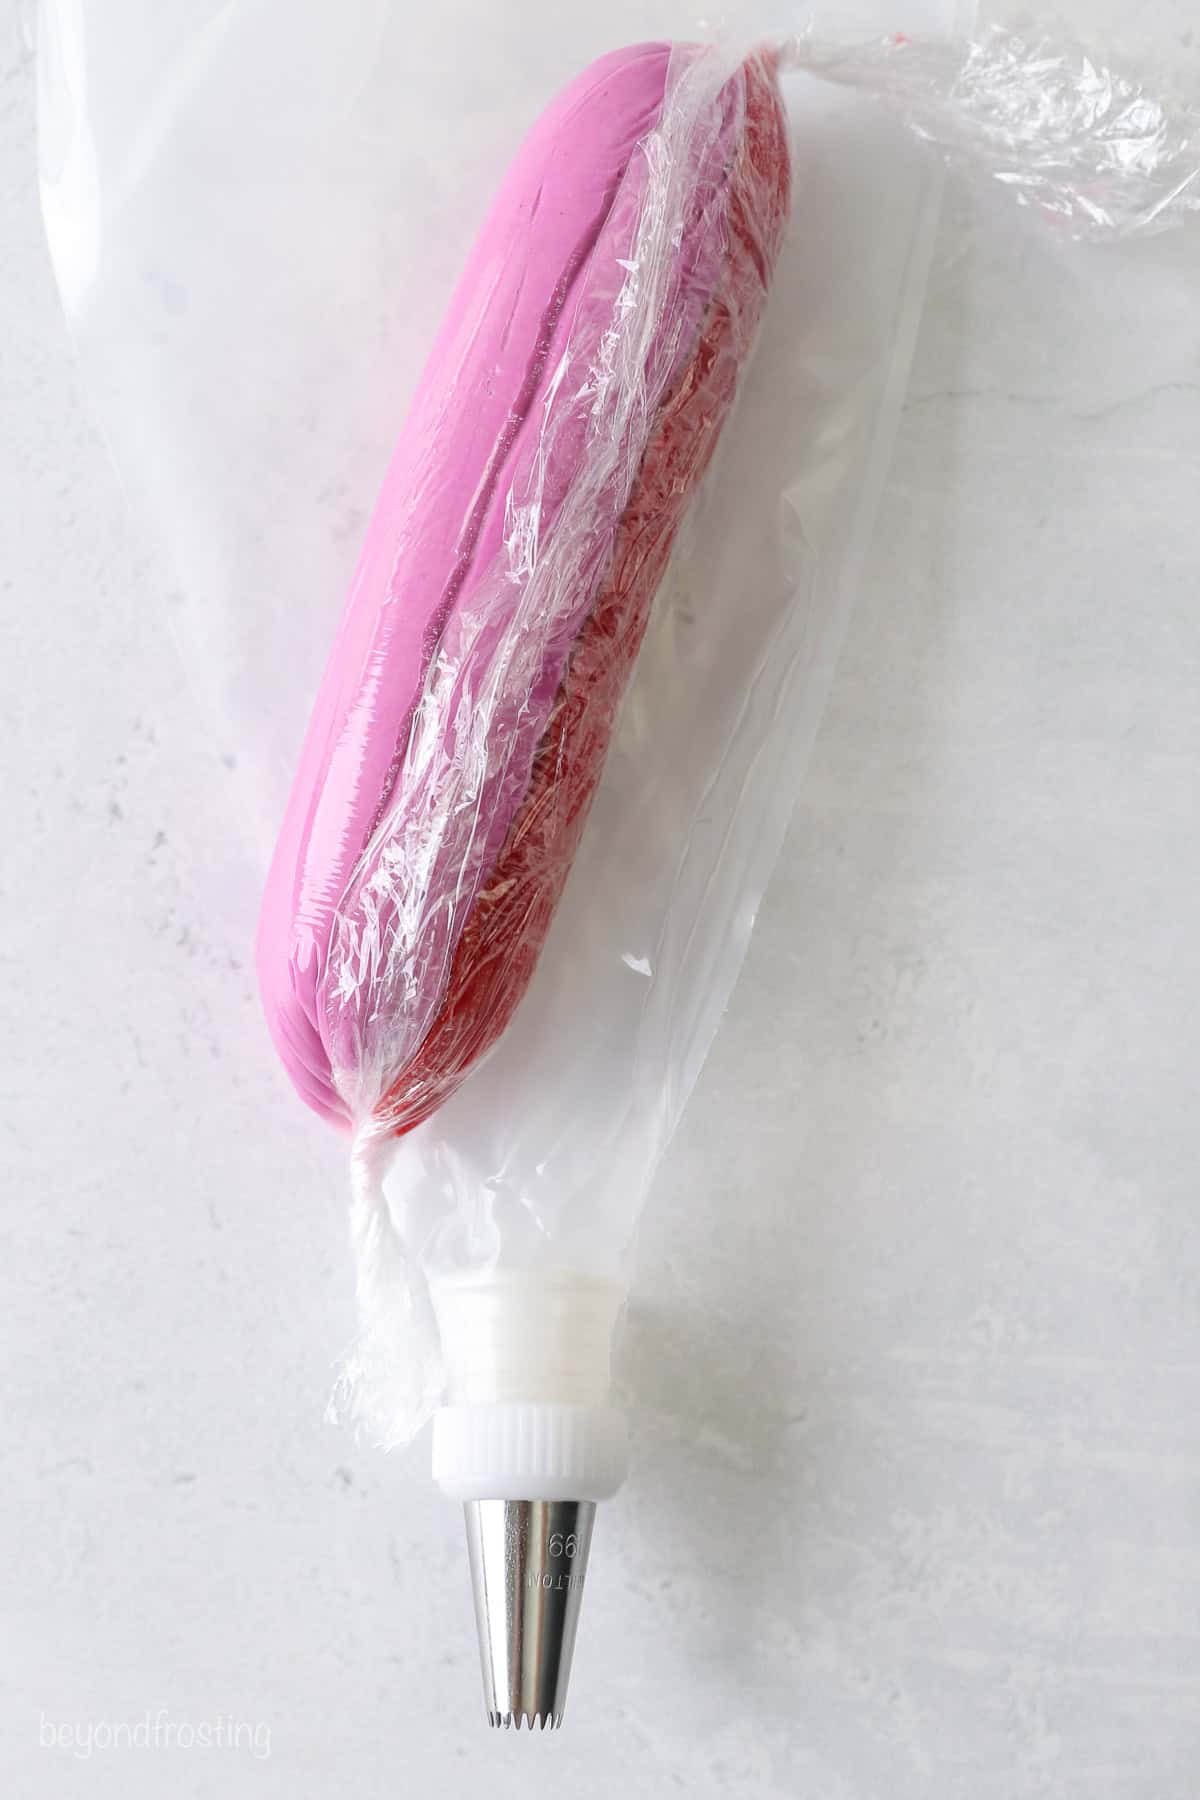
Prepare the frosting. Pipe parallel lines of each colored frosting onto a sheet of plastic wrap. Tightly roll the frosting into a log, twisting the ends to seal before dropping it into a piping bag fitted with a coupler. Make a second one and set it aside.
Pipe the shells. Using a French star tip (like a size 199), hold the piping bag at a 45º angle, squeezing to form a shell on top of the cake. Release the pressure as you pull down and away. Repeat, overlapping the previous shell with the next, creating a border around the top and bottom edges of the cake. If you rotate the piping bag while doing this, you’ll see more of the ombre effect.
Pipe parallel lines of each frosting color.Tightly roll it up and secure the ends.Pipe the rope boarder
More Ways to Decorate a Valentine’s Cake
In case you wanted to jazz up this Valentine’s Day ombre cake with even more easy add-ons, try these ideas:
Proper Storage
Store the cake. The best way to store a frosted cake is in an airtight container, like a cake carrier, at room temperature. You can also store individual slices in a container. The cake lasts about 3 days at room temperature or 1 week in the fridge. In a warmer or humid climate, you’ll need to refrigerate it from the start, and be sure to serve at room temperature.
Freeze the cake. I don’t usually like to freeze a decorated cake. If you need to freeze yours, store it in a cake box double-wrapped in plastic wrap. Freeze the cake for up to 1 month. Thaw the cake first in the fridge overnight, and then remove from the fridge to serve at room temperature.
Save the leftover buttercream. Store any leftover frosting in an airtight container or bag and keep it in the fridge for up to 1 week, or in the freezer for up to 1 month.
This homemade chocolate cake with vanilla buttercream is decorated with ombre hearts. You can make this Valentine’s Day Ombre Heart Cake with these few easy tips.
For the cake:
For the Cake Frosting:
For the Colored Frosting (decoration)
For the Cake:
Preheat the oven to 350°F. Prepare three 8-inch round baking pans, line the bottom with parchment paper, and grease the sides.
In a large mixing bowl, combine the sugar, vegetable oil, eggs, and vanilla extract. Beat on medium speed until well incorporated. Scrape down the bowl as needed. Next mix in the sour cream and beat until well combined.
In a separate bowl combine the remaining dry ingredients and sift together. Add half the dry ingredients, and stream in half the milk while beating on the lowest speed just until the flour starts to incorporate. Repeat until all ingredients are added and combined. Use a spatula to scrape down the sides of the bowl and stir the batter from the bottom to the top to ensure it’s well mixed.
To color the cake, add just a touch of a light pink color to the entire batter, mixing slowly or by hand until incorporated. Measure out 1 2/3 cups of batter, and place it into one of the prepared pans. Next, to the same mixing bowl, add another drop or 2 of the pink to achieve a darker color. Once mixed, measure out 1 2/3 cup of batter and place in a second pan. To the remaining batter, add a drop or two of red gel color, mixing to combine and filling the final pan.
Bake at 350°F for 20-23 minutes. Test the cake for doneness by inserting a toothpick into the center of the cake. If the toothpick comes out clean, the cake is done. Remove from the oven and allow to cool completely.
For the Frosting:
Since most mixers would not be able to handle such a large batch, I’ve separated out the buttercream for the cake and for the decorating. You can follow these same instructions, preparing the batches separately.
Cut butter into pieces. Using the paddle attachment, whip the butter for 5-7 minutes, scraping down the bowl occasionally. Beat until the butter looks light in color.
Alternate adding 2 cups of powdered sugar at a time with the liquid ingredients: vanilla extract & heavy cream. Ensure the powdered sugar is well combined, then and whip for 1-2 minutes before adding more powdered sugar.
Once all the powdered sugar has been added, increase speed to medium-high and beat for another 3-5 minutes to whip additional air into the frosting.
To Assemble the Cake:
Use a cake leveler to cut the domes off the top of the cake. Place a dollop of frosting on your cake board and place the bottom layer of cake on top of that.
Place about 2 cups of frosting in a large piping bag fitted with a large open round tip, or simply cut off the end of the piping bag. Pipe a layer of frosting on top of the cake, starting at the outside edge and working your way into the middle. Spread evenly with an offset spatula. Repeat with the second layer of cake and then place your third layer on top.
Place about 2 cups of frosting in a large piping bag fitted with a large open round tip, or simply cut off the end of the piping bag. Using 1 cup of frosting for each layer, pipe a layer of frosting starting at the outside edge and working your way into the middle. Spread evenly with an offset spatula. Place another layer on top and repeat the frosting with the second layer, then place the final layer on top, inverted so the bottom of the cake is on top.
Use your piping bag to fill in any gaps between the layers and to create a rough crumb coat. Using an offset spatula, wipe away the excess frosting, leaving just enough to coat the outside of the cake. Do not mix your crumb-coating frosting back into your icing if it has cake debris in it. Refrigerate the cake for 15-30 minutes to allow the crumb coat to harden.
Once chilled, use the remaining frosting to add the final layer to the top and bottom of the cake.
To decorate
Prepare the piping bags using the double bag method. Fit one piping bag with a coupler and tip (size 12 round recommended) and then prepare 3 additional bags of frosting, one of each color, cut off the tip about ¾-1 inch up.
Prepare the frosting for decorating if you haven’t already. To color the buttercream, start with the lightest pink: Add 1 drop of pink gel color to the frosting and mix until well combined, add more as needed to match the cake until the desired color is reached. Remove 1 cup of frosting, and place into a piping bag.
Next, add 1–2 more drops of pink gel to the remaining frosting to deepen the color to match the cake layer, mixing to combine. Remove 1 cup of frosting, and place it into a piping bag. To the remaining frosting, add 2–3 drops of red gel color. Mix thoroughly and transfer to a third piping bag.
On the cake, mark the top row of hearts evenly around the circumference (about 1.5 inches apart center to center). Use a flexible tape measure and a toothpick for spacing. Begin piping the hearts directly onto the cake, working row by row, starting with the lightest pink on top to match the cake layer (opposite of what I am showing in the photos). Start by making a teardrop shape, squeeze the piping bag until it makes a circle and then slowly pull down as you ease the pressure and swiftly pull it away. Repeat on the opposite sides, meeting at the center. Repeat with all 3 colors of hearts.
With the remaining frosting, prepare the tricolor piping bags. Pipe two parallel lines of each frosting color onto a sheet of plastic wrap. Roll it tightly into a tube and twist the ends to seal. Repeat to make two tubes. Insert the wrapped frosting into a piping bag fitted with a coupler and an open star or French star tip (size 199).
Hold the piping bag at a 45-degree angle to the cake. Squeeze to form a shell, releasing pressure as you pull down and away. Overlap each shell slightly with the previous one for a seamless border. Rotate the piping bag slightly after each shell to enhance the ombre effect. Repeat along the top and bottom edges of the cake.
Notes
Note that the ombre hearts piped onto this cake are placed opposite of the way the cake layers are. Ideally, you want to hearts to match the cake layers. I did it backwards.
Storing
Store the cake. The best way to store a frosted cake is in an airtight container, like a cake carrier, at room temperature. You can also store individual slices in a container. The cake lasts about 3 days at room temperature or 1 week in the fridge. In a warmer or humid climate, you’ll need to refrigerate it from the start and be sure to serve at room temperature.
Freeze the cake. I don’t usually like to freeze a decorated cake. If you need to freeze yours, store it in a cake box double-wrapped in plastic wrap. Freeze the cake for up to 1 month. Thaw the cake first in the fridge overnight, and then remove it from the fridge to serve at room temperature.
Save the leftover buttercream. Store any leftover frosting in an airtight container or bag and keep it in the fridge for up to 1 week, or in the freezer for up to 1 month.