
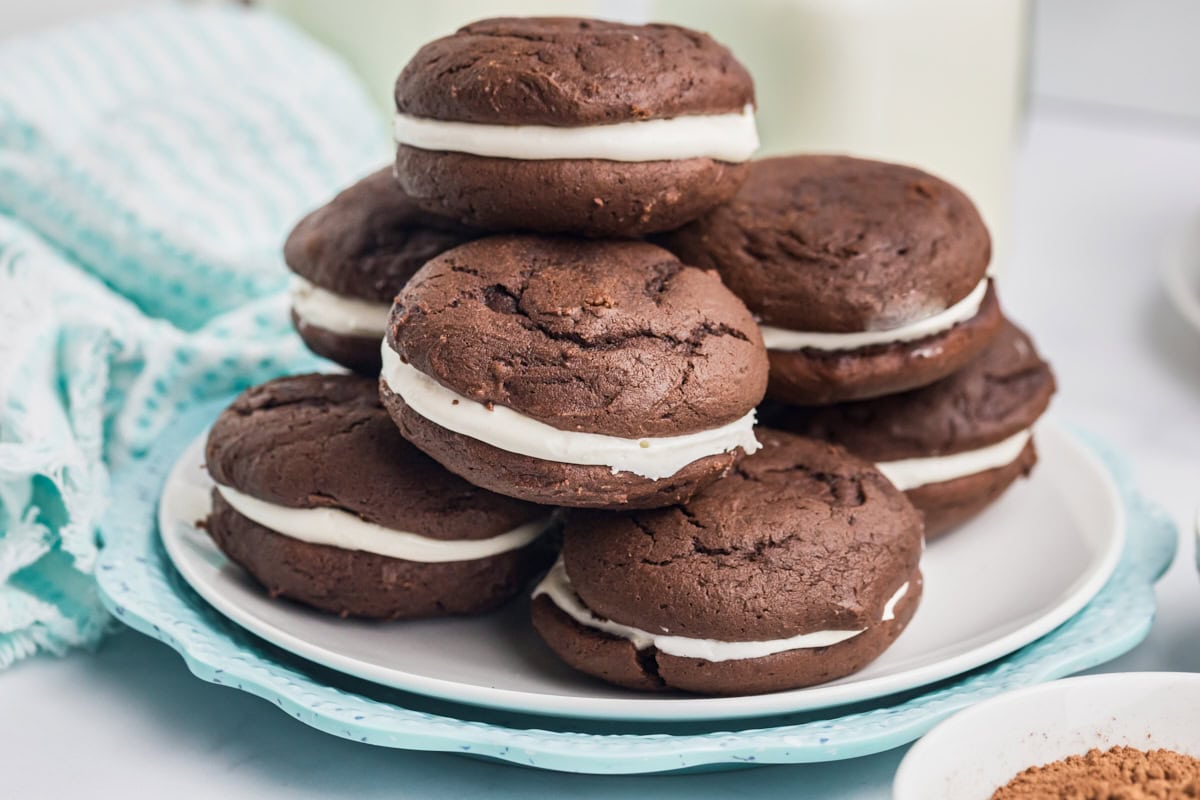

Soft, cakey, and filled with fluffy marshmallow goodness, these classic whoopie pies are always a crowd favorite.

If you’ve never had a classic whoopie pie, you’re in for a treat. These nostalgic sandwich cookies (or are they mini cakes?) are made with soft, chocolatey rounds and a sweet, fluffy marshmallow creme filling. They’re equal parts fun and indulgent, making them perfect for birthdays, bake sales, or anytime you want a dessert that brings a smile.
I first fell in love with whoopie pies when we lived near One Girl Cookies in Brooklyn. Their version was incredibly soft and just the right amount of sweet. This recipe aims to capture that same tender texture and simple, classic flavor. No twists or trendy add-ins—just traditional chocolate whoopie pies done right.
Why You’ll Love This Whoopie Pies Recipe
- Soft, cake-like texture. These aren’t your typical cookies. They’re rich and pillowy, almost like mini chocolate cakes.
- Classic marshmallow filling. The sweet and fluffy center is made with marshmallow creme for a simple, no-fuss option.
- Nostalgic and crowd-pleasing. These feel straight out of a bakery or childhood lunchbox, but made right at home.
- Easy to make ahead. Both the cake rounds and the filling can be prepared in advance, making assembly a breeze.
- Great for sharing. Whether for a party or just your freezer stash, these hold up beautifully and are easy to portion.
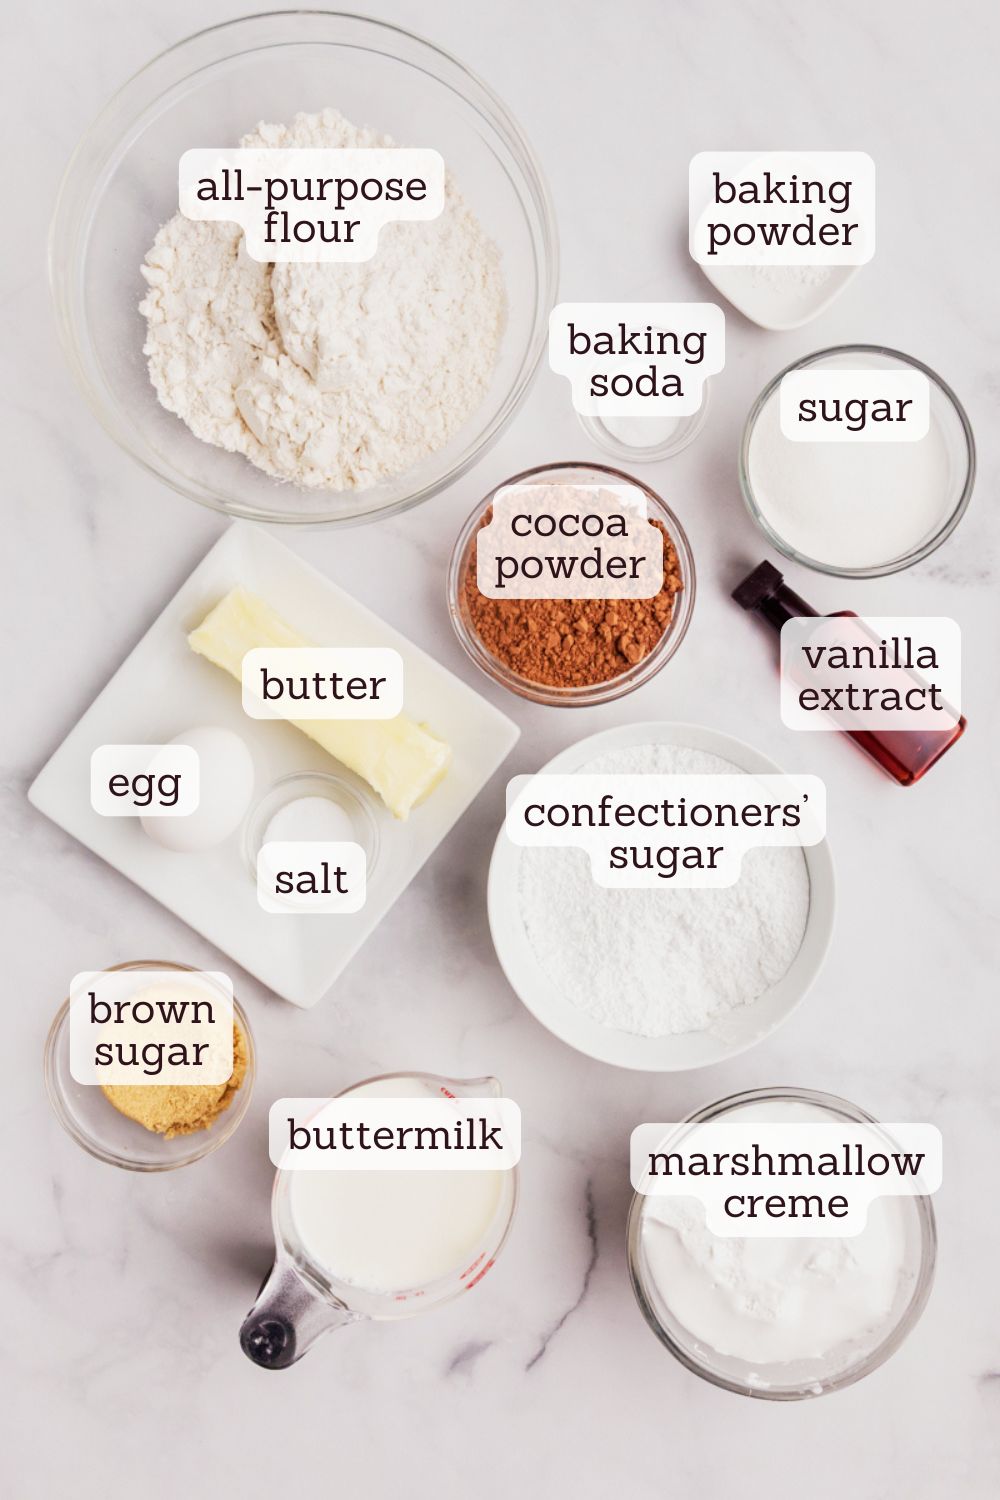
Key Ingredients
Here’s a brief look at some of the key ingredients and how they work to make your whoopie pies turn out perfectly. For the full recipe details, scroll down to the recipe card below.
- Cocoa powder – Use natural cocoa for the classic flavor and to react properly with the leavening.
- Baking soda + baking powder – This combination gives the cakes their light, tender structure.
- Granulated sugar + brown sugar – A mix of both gives sweetness and moisture.
- Vanilla extract – Adds warm flavor to both the cakes and the marshmallow filling.
- Buttermilk – The key to that soft, tender texture in the chocolate rounds.
- Marshmallow creme – The shortcut to a fluffy, sweet filling without fuss.
- Confectioners’ sugar – Thickens and stabilizes the filling. (Also labeled as powdered sugar.)
Tips for Success
- Scoop or pipe for uniformity. A cookie scoop works well, but piping the batter gives you more precise rounds. Either way, aim for consistent sizing so the cakes bake evenly and sandwich neatly.
- Don’t over-mix the batter. Once the dry ingredients and buttermilk are added, mix just until combined. Over-mixing can lead to denser, less tender cakes.
- Check for doneness early. Start checking at the 8-minute mark. The cakes should spring back when lightly touched. If they’re over-baked, they’ll lose that soft, cakey texture.
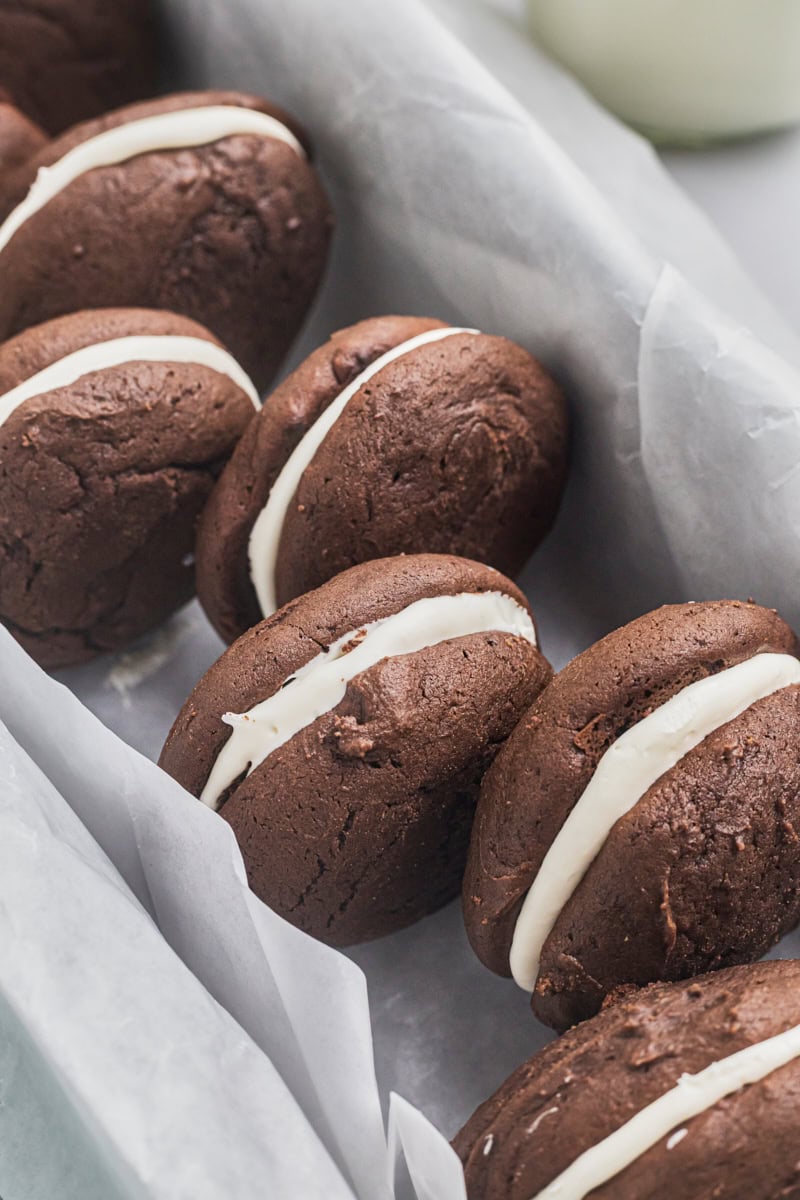
- Cool completely before filling. It’s tempting to assemble while they’re warm, but patience pays off. Cool cakes are easier to fill and hold together better.
- Chill the filling if needed. If your kitchen is warm or the filling feels too soft, place it in the refrigerator for 10–15 minutes before assembling.

Variations
- Mini whoopie pies: Use a small cookie scoop (about 1 tablespoon) to make bite-sized versions—perfect for parties or gifting.
- Chocolate filling: Swap the marshmallow filling for chocolate buttercream if you’re craving a double chocolate version.
- Cream cheese frosting: Try a tangy cream cheese frosting for another great flavor pairing.
- Add a flavor twist: A small splash of peppermint, almond, or coffee extract in the filling can change things up without overpowering the classic taste.
- Sprinkle the edges: Roll the assembled pies in mini chocolate chips, sprinkles, or crushed cookies for a fun decorative touch.
- Holiday colors: Tint the filling with gel food coloring for a seasonal spin. Think pastel pink for Valentine’s Day or orange for Halloween.
How to Store
- Short term: Store whoopie pies in an airtight container at room temperature for up to 1 day.
- Refrigerator: For longer storage, keep them in the refrigerator for up to 5 days. Let them sit at room temperature for 20–30 minutes before serving for the best texture.
- Make ahead: You can bake the cakes and make the filling a day in advance. Store the cakes in an airtight container at room temperature, and refrigerate the filling until you’re ready to assemble.
- Freezer: Wrap individual whoopie pies in plastic wrap and place them in an airtight container or freezer bag. Freeze for up to 2 months. Thaw at room temperature before serving.
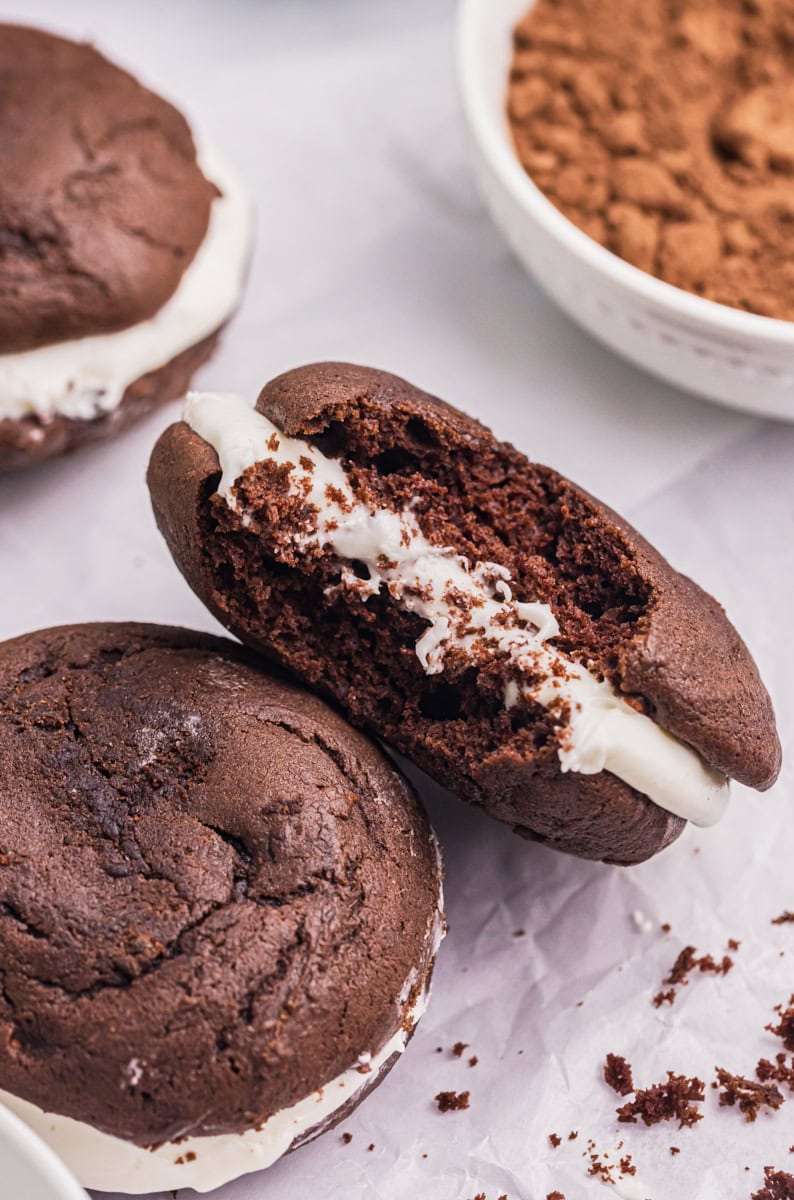
Whether you’re baking for a nostalgic treat, a special celebration, or just because, these classic whoopie pies are always a hit. With their soft, chocolatey cake rounds and sweet marshmallow filling, they’re the kind of treat that makes people smile. I hope you’ll love them as much as we do!

Get the Recipe:
Whoopie Pies
Soft, chocolatey, and filled with sweet marshmallow creme, these classic whoopie pies are a nostalgic favorite with that perfect cake-like texture and fluffy filling.
For the chocolate cakes:
- 2 cups (240 g) all-purpose flour
- 1/2 cup (42 g) unsweetened natural cocoa powder
- 1 teaspoon baking soda
- 1/2 teaspoon baking powder
- 1/2 teaspoon salt
- 1/2 cup (113 g) unsalted butter, softened
- 3/4 cup (150 g) granulated sugar
- 1/4 cup (50 g) firmly packed light brown sugar
- 1 large egg
- 1 teaspoon vanilla extract
- 1 cup (240 ml) buttermilk
For the marshmallow filling:
- 1/2 cup (113 g) unsalted butter, softened
- 1 cup (128 g) marshmallow creme (such as Marshmallow Fluff)
- 1 cup (110 g) confectioners’ sugar
- 1 teaspoon vanilla extract
- pinch salt
Prevent your screen from going dark
To make the cakes:
-
Preheat the oven to 350°F (175°C). Line two baking sheets with parchment paper.
-
Whisk together the flour, cocoa powder, baking soda, baking powder, and salt in a medium bowl. Set aside.
-
Cream the butter, granulated sugar, and brown sugar in a large bowl with an electric mixer until light and fluffy (about 3 minutes). Beat in the egg and vanilla until well combined.
-
Add the dry ingredients in three portions, alternating with the buttermilk. Mix just until combined. Don’t over-mix.
-
Scoop the batter onto the prepared baking sheets using a medium cookie scoop (#40, about 1.5 tablespoons per cake), spacing them 2 inches apart. Lightly smooth the tops with a damp fingertip or the back of a spoon before baking. (See below for piping option.)
-
Bake for 8-10 minutes, or until the cakes are set and spring back when lightly touched.
-
Cool completely on the baking sheets before assembling.
To make the filling:
-
Beat the butter with an electric mixer until smooth and creamy.
-
Add the marshmallow creme, confectioners’ sugar, vanilla, and salt, and beat until fluffy.
- To pipe the batter:
- Transfer the batter to a piping bag fitted with a large round tip (or use a zip-top bag with a 1/2-inch cut at the corner).
- Pipe 1.5-inch rounds onto the parchment-lined baking sheet, spacing them 2 inches apart.
- If needed, smooth any peaks with a damp fingertip.
- If the batter is a bit soft, chill the piped rounds for 10-15 minutes before baking to help them hold their shape.
- Store in an airtight container at room temperature for a day or in the refrigerator up to 5 days.


