
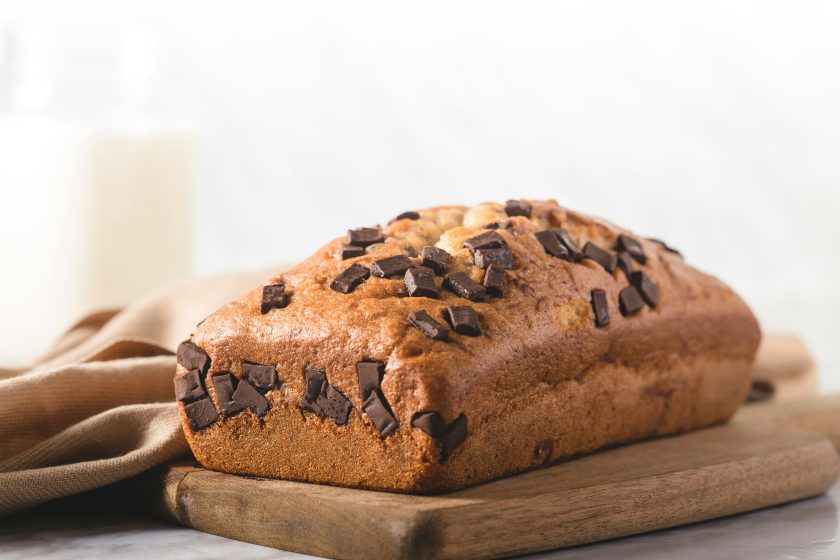
Chocolate chip sourdough bread can be challenging to master at home. Many home bakers struggle with chocolate chips melting prematurely or overpowering the delicate sourdough flavor. Our proven methods ensure perfect balance with even chocolate distribution and the iconic crispy-chewy texture. These time-tested techniques help you achieve bakery-quality chocolate chip sourdough bread in your kitchen. From proper folding techniques to optimal baking temperatures, we’ll guide you through every step to avoid common pitfalls like sticky dough or burned chocolate. Master this artisanal bread and create a chocolate paradise at home.

Table of Contents
Ingredients
- 80% bread flour (400g)
- 20% whole wheat flour (100g)
- Fed sourdough starter (100g)
- Filtered water (340g)
- Sea salt (10g)
- Quality chocolate pieces (150-200g)
- Optional: 1 tablespoon blackstrap molasses
- Optional: ½ teaspoon pure vanilla
- Optional: Pinch of finely ground espresso
Pro tip: Select chocolate with 60-70% cacao content for optimal flavor. While chocolate chips are convenient, hand-chopped chocolate bars create more interesting shapes and better distribution. Skip milk chocolate—it becomes too melty and overwhelmingly sweet. For texture variety, combine 75% medium-sized chunks with 25% smaller pieces that will partially melt during baking.
Which Chocolate Chips To Use?
Selecting the right chocolate can make or break your sourdough, so let’s explore your options to find the perfect match for your taste preferences and baking goals.
Dark Chocolate (60-70% cacao)
The gold standard for sourdough bread. This range provides rich chocolate flavor without overwhelming the tangy sourdough notes. Brands like Guittard, Valrhona, or Ghirardelli semi-sweet chips work beautifully. These maintain their shape during baking while offering slight melting at the edges.
Semi-Sweet Chocolate (40-55% cacao)
A slightly sweeter option that appeals to those who find dark chocolate too intense. Nestle Toll House, Hershey’s, or Kirkland semi-sweet chips deliver consistent results. They melt more than darker varieties, creating lovely chocolate pools throughout your loaf.
Bitter-Sweet Chocolate (70-85% cacao)
For serious chocolate lovers who want intense flavor. These chips stay quite firm during baking, offering distinct chocolate bites. Look for specialty brands like Callebaut or Scharffen Berger. Mix with a few semi-sweet chips if you want some melted chocolate contrast.
Chunk vs. Chip Debate
Hand-chopped chocolate creates irregular pieces that distribute more naturally than uniform chips. Chopping also allows you to control size—go for penny-sized pieces for even distribution, or vary sizes for textural interest. However, quality chips designed for baking (look for “chip-stable” on packaging) hold their shape better during bulk fermentation.
Avoid These:
- Milk chocolate chips (melt too easily, overpower sourdough)
- Candy-coated chocolates (artificial colors bleed, coating melts)
- White chocolate chips (too sweet, lacks chocolate depth)
- Chocolate with nuts or fillings (interfere with gluten development)
Pro Baker’s Choice
Many professionals recommend combining 60% semi-sweet chips with 40% chopped dark chocolate (70% cacao) for optimal flavor and texture. The chips maintain structure while the chopped pieces provide rustic charm and varied melting points.
Related: Soft and Chewy Sourdough Chocolate Chip Cookies
Building Your Starter
Create your foundation by mixing equal amounts of flour and water (100g each). Add a tablespoon of whole grain flour to attract beneficial wild yeasts. Mix thoroughly, then let it sit exposed to air for 30 minutes before covering loosely. Keep at room temperature (68-75°F) for the first day.
Over the following week, establish a feeding routine: discard half the mixture daily and refresh with equal parts flour and water. For chocolate bread success, maintain a 1:2:2 feeding ratio (1 part starter to 2 parts flour and 2 parts water) to build sufficient strength for supporting heavy chocolate pieces.
Know your starter is ready when it consistently doubles within 4-6 hours, develops a bubbly network throughout, and produces a mildly sour aroma. For incorporating chocolate, time your baking to use the starter just past its peak, when it’s beginning to recede slightly. This timing ensures strong lift power while preserving the sourness that makes chocolate shine.
Creating Your Dough
Start by combining your ingredients—aim for 78-80% hydration to compensate for the chocolate’s moisture-absorbing properties. Work the water in slowly until achieving a soft, manageable consistency.
Build dough strength through autolyse (30-minute flour-water rest) followed by mixing your starter and salt. Perform three rounds of stretch-and-fold at 30-minute intervals to create the network that will hold your chocolate evenly distributed.
After 90 minutes, when your dough shows good elasticity, gently work in your chocolate pieces. Room temperature chocolate incorporates best—cold chocolate can shock the dough, while warm chocolate gets messy. Use a letter-folding technique to wrap the chocolate throughout without breaking the gluten structure.
Total fermentation time runs 4-5 hours at 72°F, but watch the dough, not the clock. You’re ready when the dough has increased 40-50%, feels airy and jiggly, shows surface activity, and passes the poke test with a slow, gentle spring-back.
Forming Your Loaf
Once bulk fermentation completes, transfer your chocolate-laden dough to a lightly floured surface. Work with care to maintain air bubbles and prevent chocolate from tearing through the dough.
First, perform a gentle pre-shape by drawing the edges inward to form a loose ball. This initial shaping creates structure without stressing the chocolate-filled dough. Allow 20-25 minutes rest to let the gluten relax.
For the final shape, use a coil folding technique to build tension while protecting the chocolate pieces. Work methodically, creating a tight surface while avoiding excessive manipulation that could damage embedded chocolate.
Related: Bread Shaping Techniques and Tips
Prepare your proofing basket by coating generously with rice flour mixed with regular flour (60/40 ratio works well). Transfer your shaped loaf seam-side down into the banneton, which will support the structure during the final rise.
The last proof can take 2-3 hours at room temperature or extend to 8-12 hours in cold storage. Cold-proofing intensifies flavor and makes scoring easier. Watch for a 50% size increase and perform the finger poke test—proper proofing shows slow rebound with a gentle impression remaining.
Important: Chocolate-enriched dough often needs less proofing than regular sourdough, as excessive rising can compromise structural integrity around chocolate pieces.
Perfecting Your Bake
- Select a 5-6 quart Dutch oven rated for high temperatures. Position your oven rack in the lower-middle position.
- Preheat your empty Dutch oven at 475°F (245°C) for a minimum of 45 minutes. This simulates professional steam-injection ovens and creates optimal conditions for chocolate chip sourdough while preventing chocolate from burning during the early baking phase.
- Line your Dutch oven with parchment paper for effortless dough transfer. Keep quality heat-resistant gloves ready for safe handling throughout the process.
- Just before baking, score your dough using a razor-sharp lame angled at 30-45 degrees. Execute swift, decisive cuts to guide expansion while strategically navigating around visible chocolate pieces.
- Reduce oven temperature to 450°F (232°C) when placing your dough in the Dutch oven. Cover with the lid for the steam phase.
- Maintain lid-on baking for 25 minutes to create steam. Monitor chocolate areas carefully as they tend to darken before the surrounding dough.
- Remove the lid and continue baking uncovered for 15-20 minutes until the crust achieves a rich bronze color.
- Check internal temperature with a thermometer—it should reach 205-210°F when done. The bottom should sound hollow when tapped.
- Cool completely for a minimum of 2 hours before slicing. This allows the crumb to fully set and prevents a gummy texture.
If you don’t have a Dutch oven, create steam by placing a baking stone on the center rack and an empty skillet on the lowest rack. Heat both to 475°F for 45 minutes, transfer your dough to the stone via parchment, immediately add 1 cup boiling water to the skillet, close the oven door quickly, reduce to 450°F, and bake for 35-40 minutes total. Shield with foil if the chocolate darkens excessively.
Serving and Preserving Your Bread
Delicious Ways to Enjoy:
- Spread with cultured butter for pure indulgence
- Toast lightly, then top with whipped cream cheese and honey drizzle
- Create a sophisticated grilled cheese with aged cheddar
- Warm and serve alongside vanilla gelato for dessert
- Transform into brioche-style French toast for special occasions
Keeping It Fresh:
- Allow full cooling to room temperature before storage (prevents chocolate bloom)
- Choose breathable storage: bread box, cloth bag, or cotton wrapping
- Avoid plastic bags, which create moisture and a soggy crust
- Position the cut surface downward to preserve interior moisture
- Best quality maintained 3-4 days at room temperature
Long-Term Storage:
- Pre-slice cooled bread for convenient portions
- Double-wrap each slice: first in wax paper, then aluminum foil
- Seal in freezer-safe bags, removing excess air
- Mark with freeze date; optimal use within 3 months
- Defrost naturally or toast directly from frozen
Creative Uses for Older Bread:
- Create decadent bread pudding with chocolate sauce
- Pulse into crumbs for dessert coating applications
- Morning toast spread with almond or sunflower butter
- Reinvent as chocolatey French toast for weekend brunches
- Incorporate into holiday stuffing mix for a unique flavor
Your Chocolate Chip Sourdough Journey
Mastering chocolate chip sourdough puts you among the elite home bakers who’ve bridged traditional techniques with modern flavors. This isn’t just bread—it’s edible alchemy where time-honored fermentation transforms humble ingredients into something extraordinary. Armed with these techniques, you’re equipped to craft loaves that rival premium bakeries, whether you’re sharing with loved ones, gifting to neighbors, or savoring quiet morning moments. Your homemade chocolate chip sourdough tells a story of patience, skill, and creativity that no store-bought loaf can match. Prepare for enthusiastic reactions as people discover what real, artisanal bread tastes like when chocolate enters the equation!
FAQs – Chocolate Chip Sourdough Bread
Can I put chocolate chips in sourdough bread?
Yes, you can add chocolate chips to sourdough bread. For best results, fold them into the dough during the final stretch and fold to prevent overmixing. Use high-quality dark or semi-sweet chocolate chips, and avoid mini chips, which can burn easily. Aim for 8-10 ounces per standard loaf for balanced flavor.
Is chocolate sourdough bread good?
Chocolate sourdough bread is delicious when made properly. The combination of tangy sourdough with sweet chocolate creates a complex flavor profile that many find irresistible. The key is balancing the chocolate amount to complement rather than overwhelm the sourdough’s distinctive taste, resulting in a unique artisanal bread experience.


