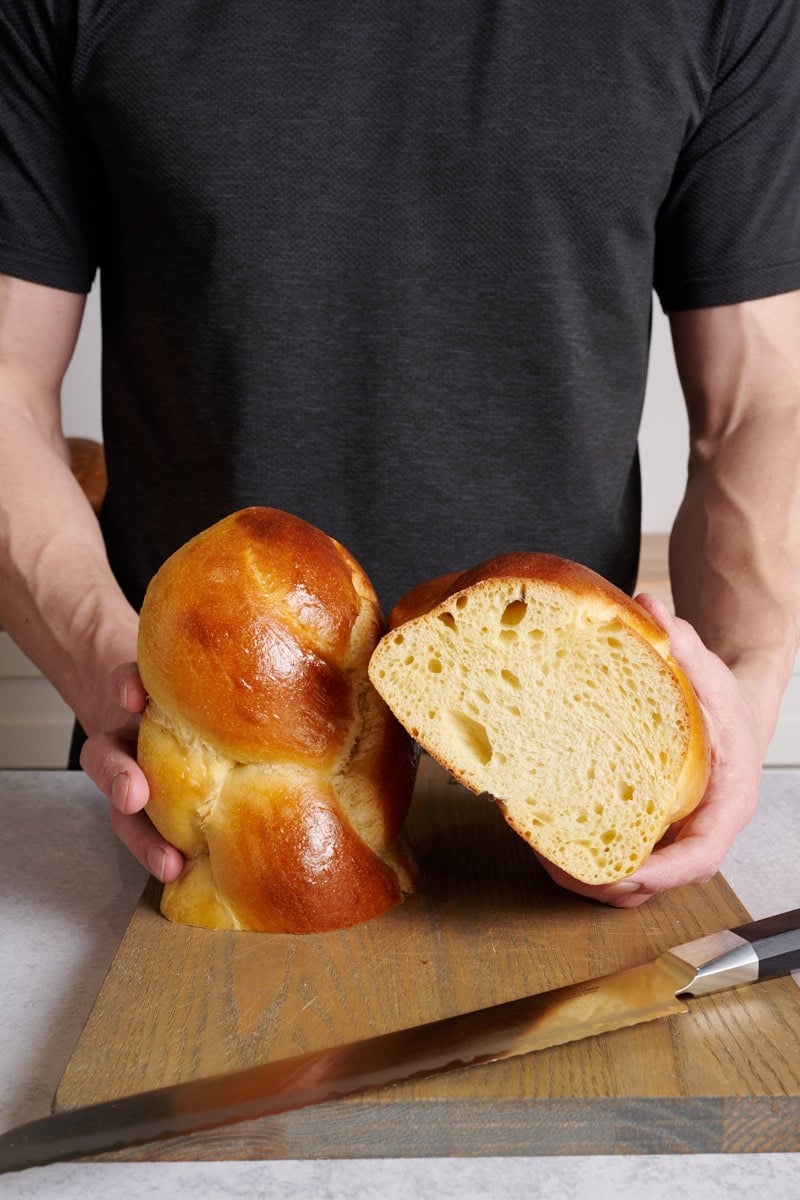
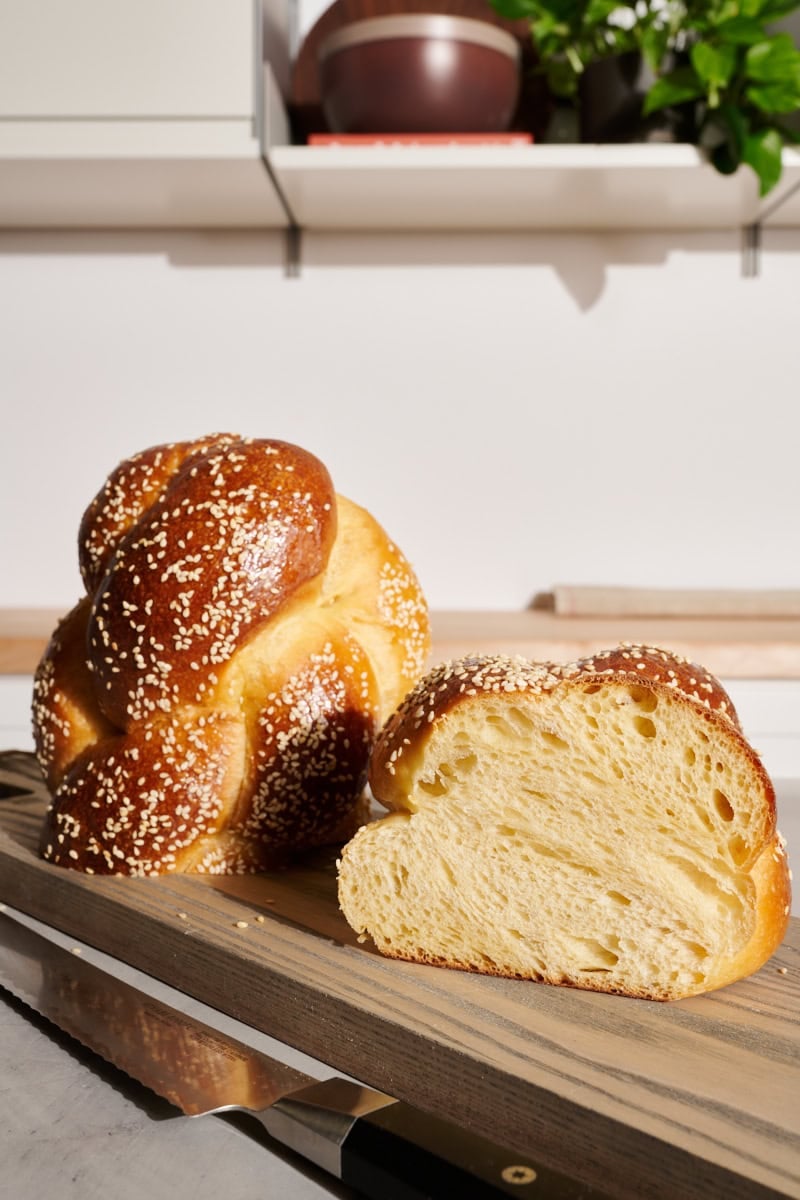
Oh, sourdough challah, you’re a challenging one, aren’t you? To create this recipe, I went through more than ten iterations, each one a little better than the previous, with the end goal of a challah that clearly shows the braids, while also being as flavorful and soft as can be. After much testing, this latest version hit top marks with my taste testers (my kids, neighbors, the mailman, any unsuspecting visitor…). And it is challah like you’ve never eaten before: deeply flavorful thanks to the long fermentation time, rich, and yet still slightly sweet, all with a soft and light texture.
If I’m completely honest, though, this was not an easy recipe to develop. Let’s walk through it step by step (and watch a video).
This post is a little different from my others. I want to walk you through the development of this sourdough challah recipe step by step. It might be helpful to see the behind-the-scenes of how I developed this recipe, building and tweaking it throughout many iterations. I started with a general idea for what I was after, and then I pulled all the fermentation and dough modification levers I have at my disposal through each test as I honed in on the final result.
If I’m completely honest, though, this was not an easy recipe to develop. Let’s walk through it step by step (and watch a video).
Along the way, I’ll talk about the decision I made and point out the signs (dough strength, fermentation, etc.) for when to proceed with each step of the bread-making process. The key with this recipe is to have really strong fermentation at each of the critical stages: levain, bulk fermentation, and final proof.
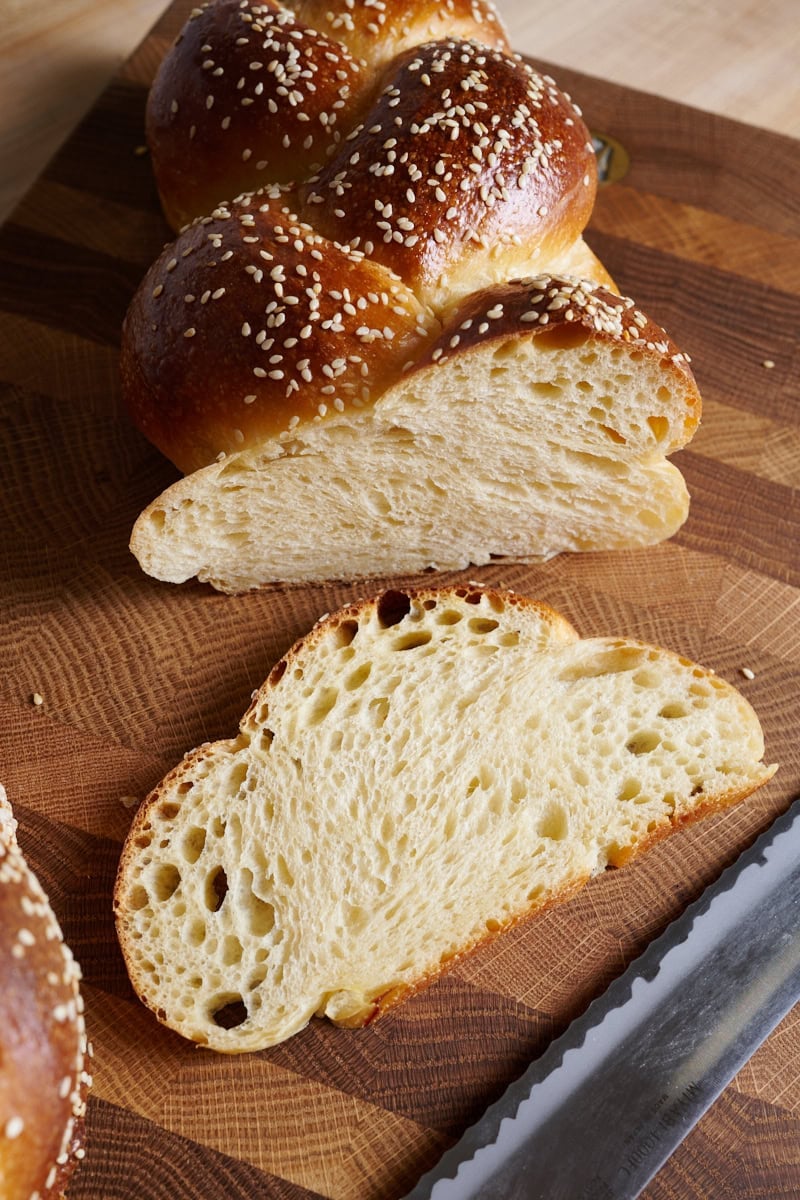
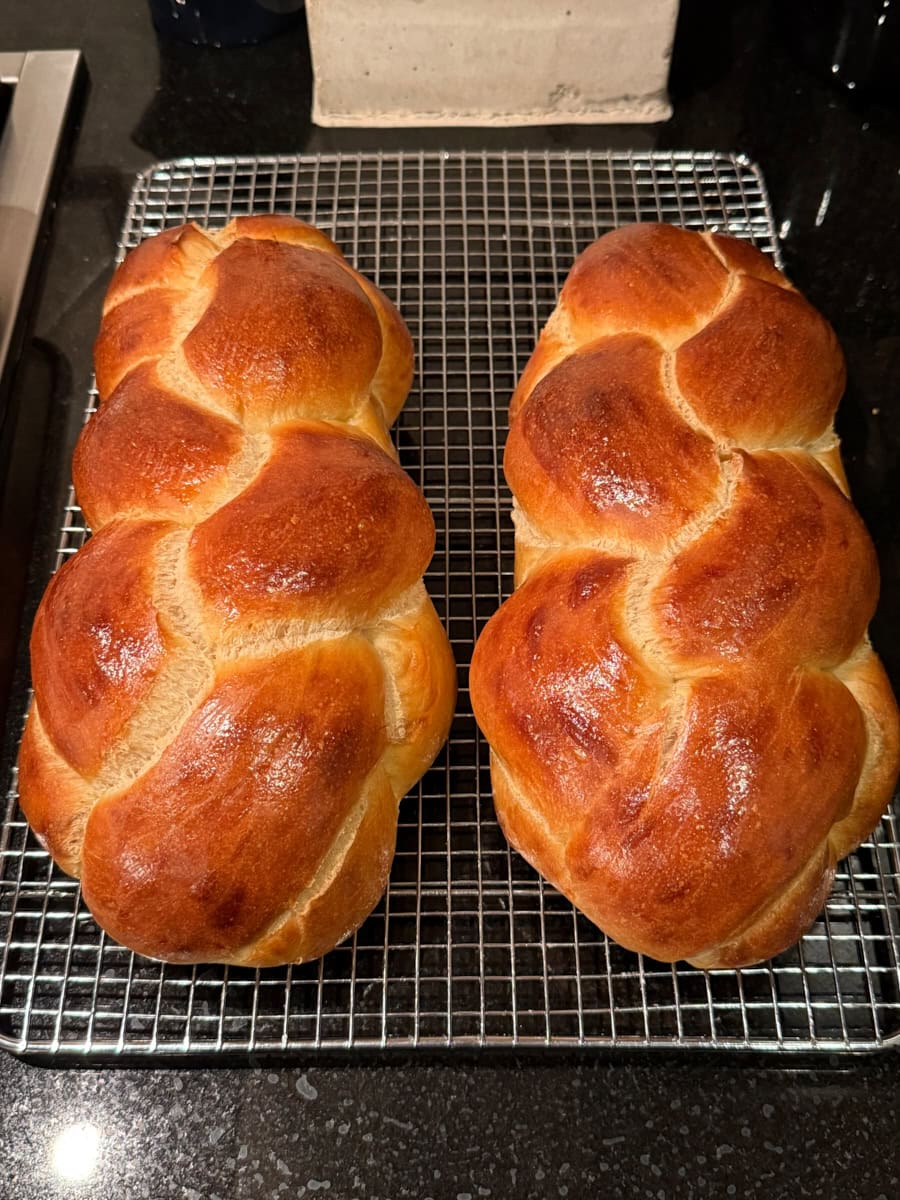
The final sourdough challah has a beautifully colored crust and a super fluffy and light texture.
But before we dive into all that, for those who aren’t in the know, let’s talk about what challah is, then read on for details about how I developed this delicious recipe.
What is Challah?
Challah (often pronounced “haa · luh”) is traditionally a yeasted bread that’s braided before baking, and it is an important food in Jewish culture. Though enriched with eggs, oil, and sugar, it is made without dairy so it can be served at any kosher meal. Often, you’ll find challah brushed with an egg wash (for color) and topped with sesame or poppy seeds for added flavor and texture. Challah is typically eaten on Shabbat (the Jewish Sabbath) and holidays.
I developed this sourdough challah in tandem with Eric Pallant’s excellent article here at The Perfect Loaf on what challah is, how it’s typically eaten, and its historical, cultural, and religious significance.
I am not Jewish and have only had this bread on a few occasions (though we did make it in France!), but regardless, I think everyone will find this dairy-free bread wonderfully delicious.
Video: Watch Me Make This Sourdough Challah
Before we get into the nitty-gritty of developing this recipe, watch me make this sourdough challah from start to finish, below (here’s a direct link to YouTube, too).
The video also includes how I like to braid a 4-strand challah based on instructions from Jeffrey Hamelman’s BREAD.
Next, let’s examine some of my decisions as I developed this sourdough challah.
How I Created This Sourdough Challah
Below, you can see a few tests while developing this sourdough challah recipe. In the end, I did over 14 bakes with varying formulas.
Very evident is my struggle to increase dough softness while maintaining distinct braids (more on this below). In testing, I added softness with more eggs, more sugar, and more oil—but of course, there can be too much of a good thing. Increasing the sugar for added softness and flavor meant the dough needed longer to proof, and it wasn’t until I really started pushing the fermentation time that I arrived at the look and texture I was after (last image in the sequence).
After finding the right level of sweetness with sugar and honey, I dialed back the eggs. Finally, I settled on a ratio of each that brought maximum softness with lots of flavor without compromising the dough structure.
Slightly underproofed but not sweet enough.Underproofed and too many eggs (6).Underproofed.Excessive bursting—underproofed.Almost properly proofed—so close. Great color.
Minimizing Challah Sourness
Challah is traditionally a yeasted product leavened primarily by instant or commercial yeast. To make it sourdough, you must first consider the flavor profile change. Since sourdough fermentation involves lactic acid bacteria, I knew I had to manage fermentation properly, or my loaf could be overly sour and just wouldn’t taste good (trust me, I tested a version using a starter straight from the fridge—way too sour).
Don’t get me wrong, having slight sourness is a great thing—it awakens the palate at each bite, brings added depth of flavor, and I think balances out the overall sweet flavor profile. But fermentation must be kept in check to avoid an overly sour loaf.
To minimize sourness, I used a technique I talk about often in my cookbook: using a sweet levain as the preferment. This sweet levain has 40% sugar to flour, which helps deactivate most of the bacteria while allowing the yeasts to proliferate, thus setting the stage for dramatically reduced sourness in the final product while still achieving a fantastic rise.
Challah Dough Softness and Ensuring Distinct Braids
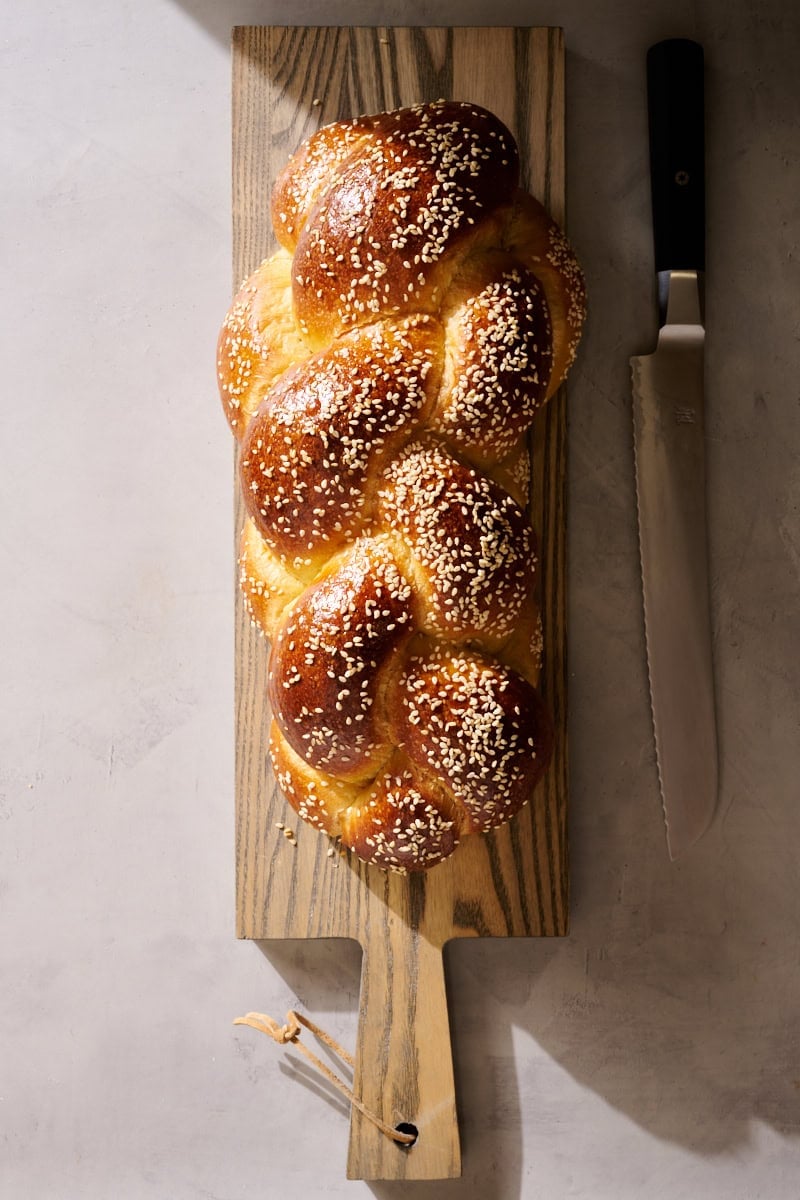
One of the most striking things about challah is that the dough is braided, creating a beautiful pattern as it weaves in and around itself, resulting in bumps of extra color interspersed with lighter areas.
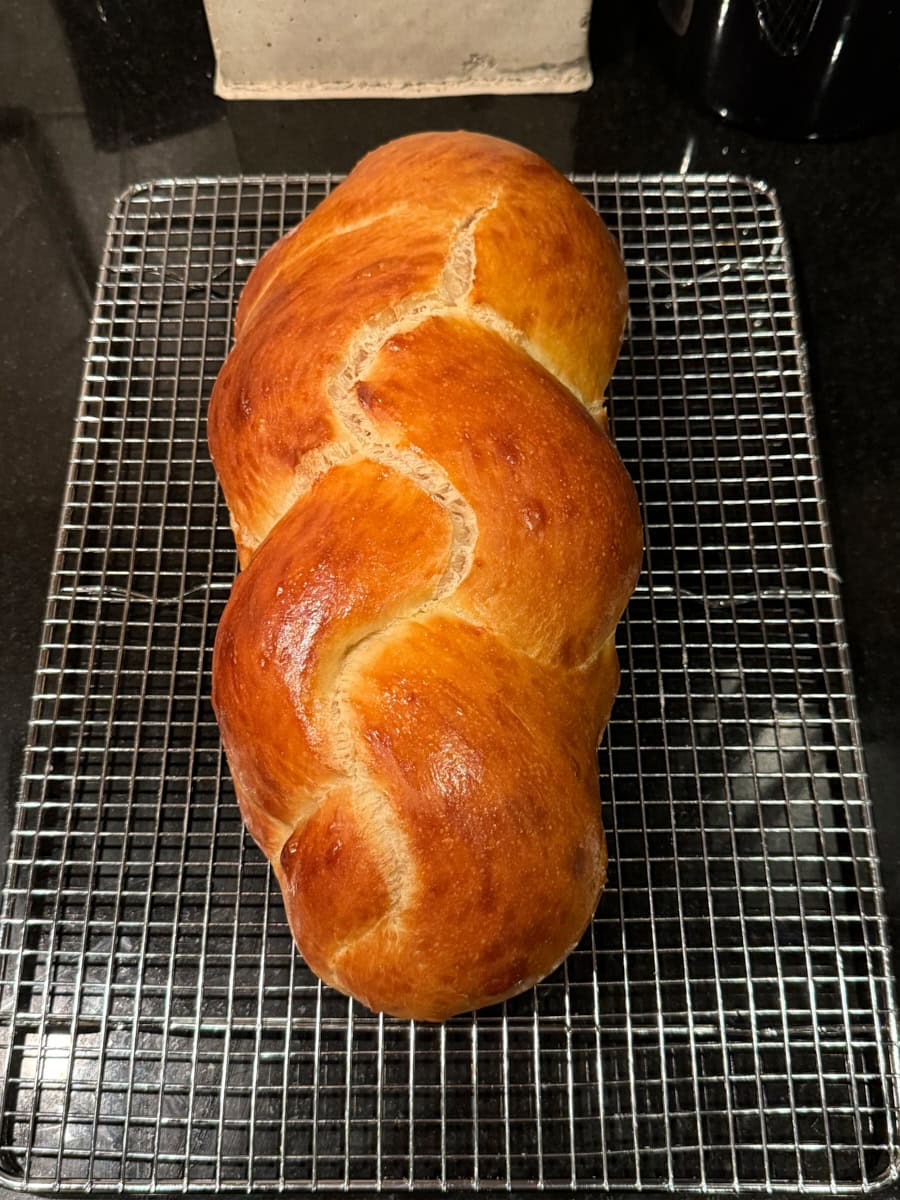
Sourdough challah with clear and defined braids.
Now, you want each strand in the braid to be distinct in the final loaf. So, the dough can’t be too soft, otherwise it’s very difficult to handle when braiding and the braids merge together during proofing.
So, the dough and final loaf structure are at odds with each other. How can we get a soft challah without the dough being too soft to handle and braid?
The answer is to use a few techniques, ingredients, and processes all in balance. I:
Used the tangzhong technique to pre-cook some of the flour and water, which holds on to significant amounts of moisture without making the dough harder to handle
Used oil (fat) which coats flour proteins, thus preventing them from forming a strong gluten network
Used sugar which holds moisture and also slightly interferes with gluten formation
Incrementally increased the dough’s hydration just to the point where it started making the dough too soft and hard to handle
I feel like I had to pull every lever with this dough to make it aesthetically beautiful with distinct strands and for it to be soft and flavorful. It turns out, there’s a reason why dairy (particularly butter) is used so often in baked goods searching for softness!
How Many Eggs Go Into a Challah?
One of the big questions for me was deciding how many eggs to use in this recipe. Challah is known to be an egg-heavy bread, and the eggs give it richness and its characteristic yellow color. I started out way too high at 25% egg plus 10% yolks to total flour. The resulting bread was soft, very rich, and beautifully yellow, but the dough was really hard to handle.
Eggs make mixing very difficult because they turn the dough into a sticky mess, both when mixing and later in the process. You can make challah with zero eggs and all oil; I tasted such a loaf and while the flavor was actually okay, it wasn’t nearly as striking visually.
Through incremental testing I slowly decreased the amount of whole eggs and yolks until the dough was easier to handle, the final product was still rich-tasting, and it also had a beautiful yellow hue in the crust and crumb. I landed on 20% whole eggs and 4.25% egg yolks, which conveniently turns out to be 3 whole large eggs and 2 egg yolks for this recipe.
How To Properly Ferment Sourdough Challah Dough
A common theme in this recipe is an emphasis on keeping the dough warm, especially with the levain (keep it warm!) and meeting the final dough temperature of 78°F (26°C) at the end of mixing. Due to the high sugar percentage in this enriched dough, proofing takes longer than a leaner bread dough (a dough without eggs, sugar, or butter).
There are a few important things to help ensure your dough is adequately proofed:
Keep the levain and dough warm at all stages of fermentation
Let’s take a look at two trial bakes I did, one where the challah is underproofed (below, left) and one where it’s properly proofed (below, right).
Underproofed sourdough challah (left) and properly proofed (right).
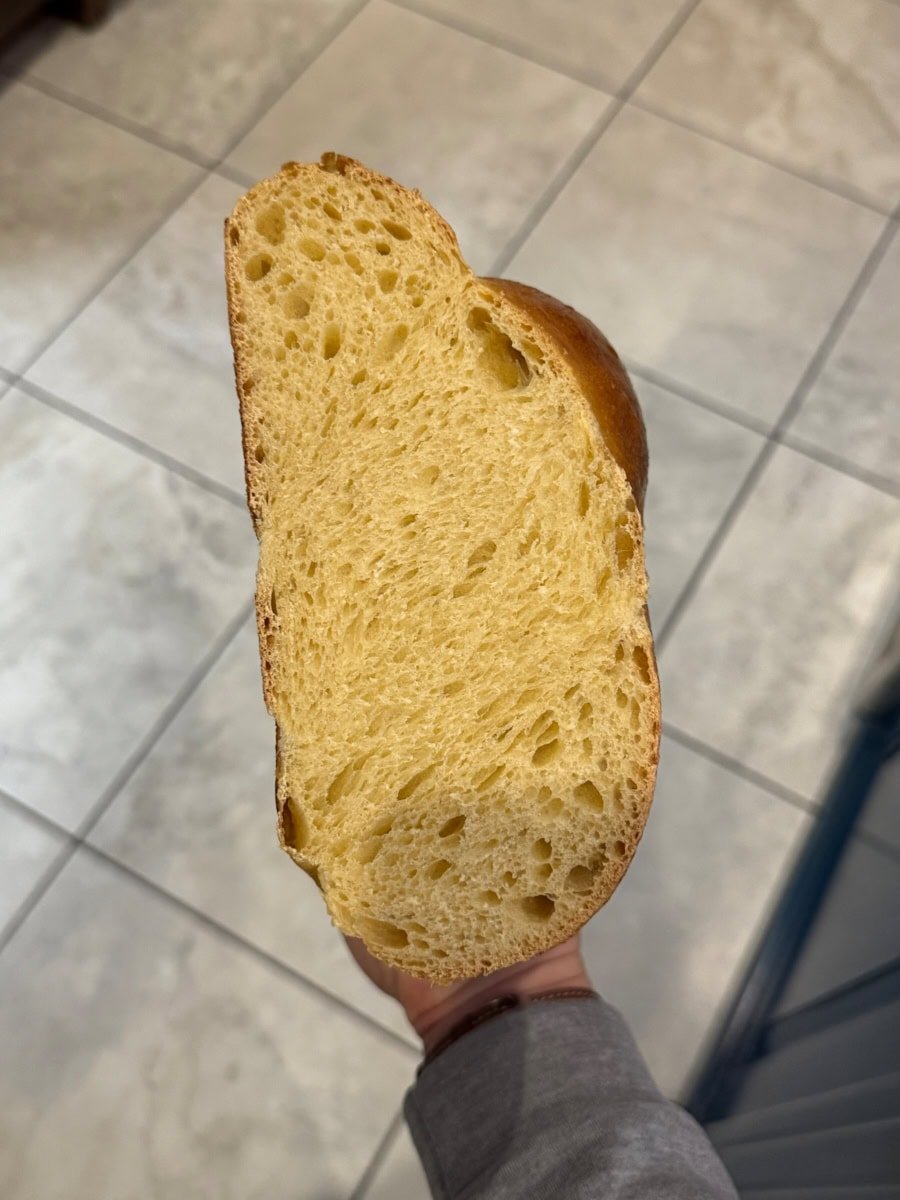
These doughs have the same weight and formula, but notice how tight the challah on the left is. It hasn’t expanded and generally looks denser (it eats that way, too). The one on the right has expanded much more, and if you could hold it, it feels like holding a puffy cloud.
The dough on the right was kept very warm during bulk fermentation (76°F/24°C on my proofer, which translates to about 78°F/25°C on the dough) and proofing (as described in the recipe to come). It wasn’t baked until a poke to the dough showed it to be very, very soft and airy (it passed the poke test and almost started to feel overproofed).
Flour Selection
For this sourdough challah, I initially tested using all high-protein white bread flour but found the resulting texture to be a little tough and dry (which is why I often minimize using high-protein flour). I then tried a blend of high-protein and medium-protein white flour to get the best of both worlds: a strong and manageable dough, but a final product that’s still tender. It worked well.
For medium-protein white flour, I have successfully used both King Arthur All-Purpose Flour and Central Milling Artisan Baker’s Craft+. Similarly, for the high-protein white flour, both King Arthur Bread Flour and Central Milling High Mountain worked very well (with slightly higher points for the Central Milling flour).
Baking Schedule
Since we’re using natural leavening, adversely affected by relatively high sugar concentrations, this recipe requires lengthy warm fermentation time. I typically start things at 8:00 or 9:00 am, and the challah should be ready to bake later that night.
I tested retarding this dough in the refrigerator in shape (that is, after braiding), but I found the resulting challah to be a bit too sour for my liking. I highly recommend baking this challah the same day it’s mixed.
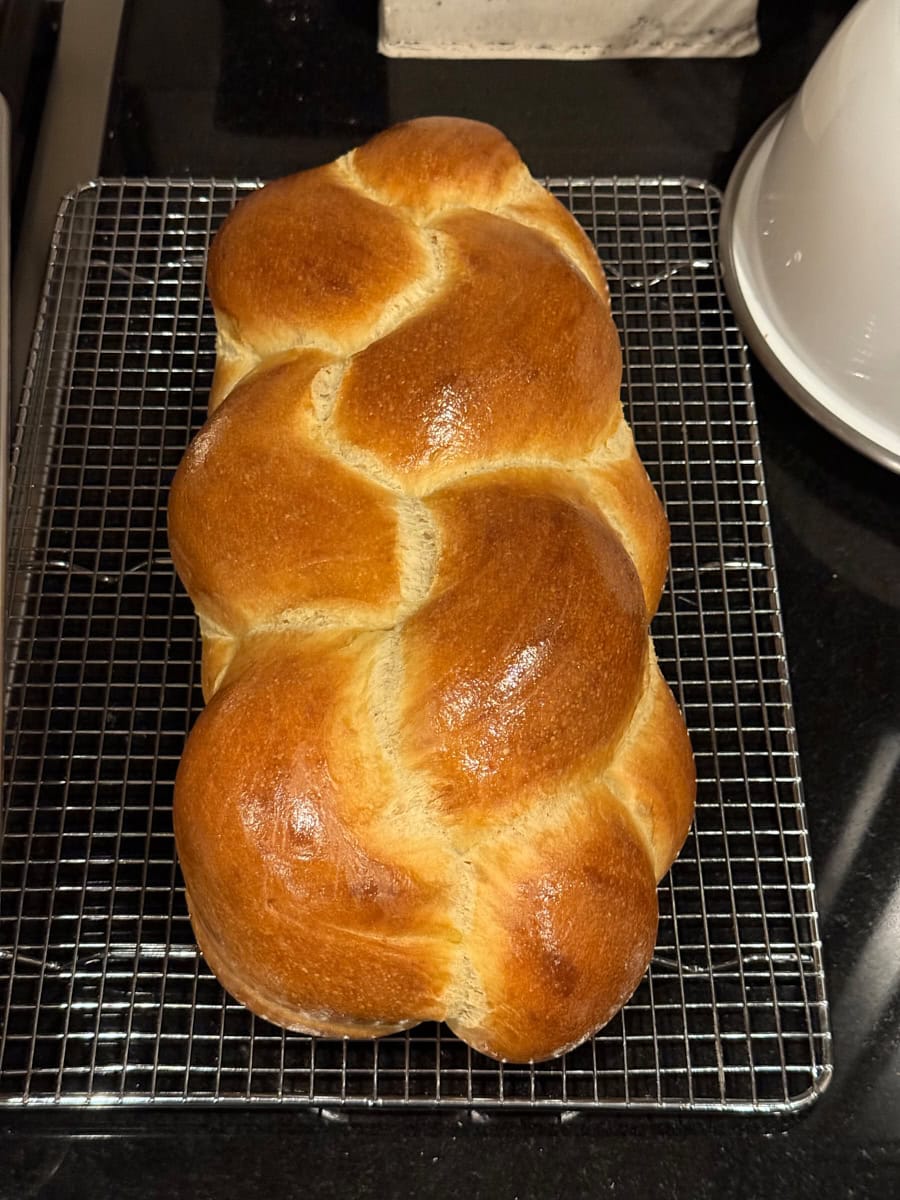
Beautifully colored sourdough challah with clear braids and deep yellow color.
Sourdough Challah Recipe
See my guide to using baker’s percentages for tips on calculating baker’s percentages or modifying this formula (like doubling the recipe to make four sourdough challahs or two larger ones).
Vitals
Total dough weight
1,600 grams
Prefermented flour
16.5%
Levain in final dough
55.3%
Hydration
43.5% (includes water in levain and tangzhong but does not include oil or egg)
As mentioned earlier, with this sourdough challah there’s a heavy my emphasis on ensuring dough, bulk fermentation, and proof temperatures are high. It’s very important with this enriched dough to achieve a soft, light, and flavorful loaf!
Weight
Ingredient
Baker’sPercentage
397g
Medium-protein white flour (King Arthur All-Purpose Flour or Central Milling Artisan Baker’s Craft)
50.0%
318g
High-protein white bread flour (Central Milling High Mountain, 13% protein, or King Arthur Bread Flour, 12.7% protein)
40.0%
79g
Tangzhong: High-protein white bread flour
10.0%
214g
Tangzhong: Water
27.0%
159g
Whole egg (About 3 large)
20.0%
34g
Egg yolk (About 2; save the egg whites in a covered container in the fridge to use for the egg wash when baking)
*The oil in this recipe is split into Oil 1 and Oil 2. The second is held back until the end of mixing.
Additional Ingredients
1 whole egg (or use the saved egg whites from above) and a pinch of salt for the egg wash
Raw sesame seeds, for topping (optional)
Sourdough Challah Method
1. Prepare the levain – 9:00 p.m. (the night before mixing)
Weight
Ingredient
Baker’s percentage
131g
High-protein white bread flour
100.0%
52g
Superfine white sugar (or granulated sugar)
40.0%
131g
Water
100.0%
52g
Ripe sourdough starter, 100% hydration
40.0%
Mix the ingredients in the chart above in your favorite jar and leave them covered at a warm temperature, 74-76°F (23-24°C), to ripen for 14 hours. This is a sweet liquid levain and it will expand in volume significantly. Be sure to use a tall jar so it doesn’t overflow.
It is incredibly important that the levain is very ripe when you proceed with mixing the next day. It should be bubbly on top and very aerated with a sweet aroma.
2. Prepare the tangzhong – 9:00 a.m. (the day of mixing)
In a medium saucepan over medium-low heat, combine the 79 grams high-protein white bread flour and 214g grams water. Cook, whisking continuously, until the mixture thickens and becomes a paste (it should look like mashed potatoes), 4 to 5 minutes. Remove the pan from the heat and spread the tangzhong on a small plate to expedite cooling (or, if it’s cool in your kitchen, use when warm to help hit the high final dough temperature for this recipe).
Set aside.
3. Mix – 9:30 a.m.
Weight
Ingredient
397g
Medium-protein white flour
187g
High-protein white bread flour
293g (All*)
Tangzhong (from Step 2)
159g
Egg
34g
Egg yolk
36g
Oil 1: Vegetable oil or mild-flavored olive oil
36g
Oil 2: Vegetable oil or mild-flavored olive oil
27g
Superfine sugar (or granulated sugar)
48g
Honey
17g
Fine sea salt
367g (All*)
Ripe levain (from Step 1)
*Note that it may be difficult to scrape every bit out of the pan or container; plus or minus 5g won’t make a massive difference.
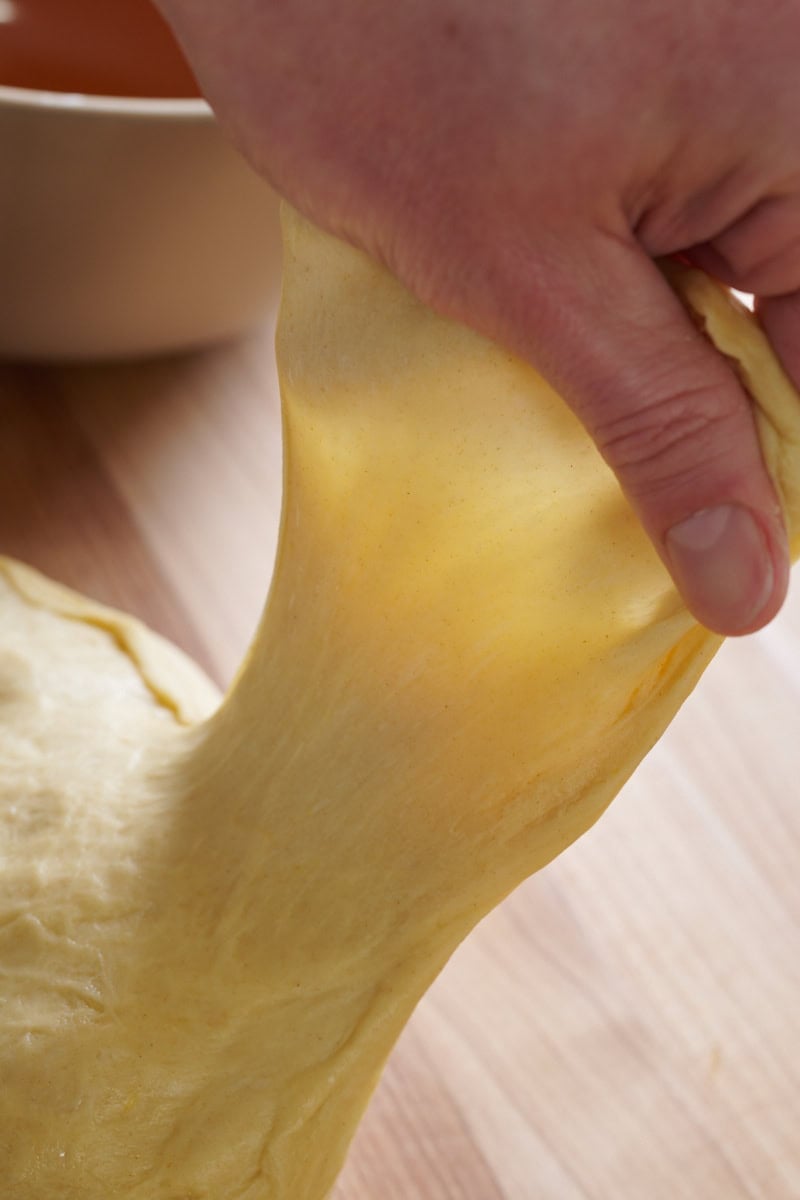
Like other enriched bread, this sourdough challah requires intensive kneading to ensure a smooth and elastic dough. But with challah, it’s also very important the dough is strong at the end of mixing so braiding is more manageable, and for the best-looking challah with distinct braids.
For this bread, I use two longer mixing phases with a short rest of 5 minutes in between to ensure the dough passes the windowpane test at the end of mixing. Letting the dough rest lets the dough cool slightly to help avoid overshooting the final dough temperature (a hot dough is never a good thing). Additionally, it allows the gluten to relax. That way, the dough can be strengthened further during the second mixing phase (kneading) without tearing.
I highly recommend using a stand mixer or spiral mixer to mix this sourdough challah.
I used my KitchenAid stand mixer to efficiently mix and knead the dough. I highly recommend using a stand mixer or spiral mixer to mix this sourdough challah. However, it’s also possible to mix this dough by hand using the slap and fold kneading technique or folds in-the-bowl technique, but know that mixing will likely take many minutes to reach a full windowpane. If mixing by hand, Be sure to hold back the oil until the dough is significantly strengthened.
To the bowl of a stand mixer fitted with the dough hook attachment, add the flour, tangzhong, egg, egg yolks, oil 1 (be sure to reserve oil 2 until later in mixing), sugar, honey, salt, and ripelevain. Mix on low speed (STIR on a KitchenAid) for 1 to 2 minutes until the ingredients come together, no dry bits remain, and the sides of the bowl are clean. Next, mix on medium speed (2 on a KitchenAid) for 7 minutes until the dough smooths and begins to cling slightly to the hook (it will still be sticky and shaggy).
Let the dough rest in the bowl for 10 minutes.
Return the mixer to medium speed and mix for 7 to 10 minutes until the dough gains more strength and clings again to the dough hook. The dough will still be sticky to the touch and might be attached to the bottom of the bowl, but the sides will be clean. It should be smooth, elastic, and pass the windowpane test.
With the mixer running on speed 1, stream in the oil 2 and continue mixing until all the oil is absorbed.
Challah dough showing full windowpane after mixing.
At this point, the dough will be very soft to the touch and a bit sticky but smooth, showing defined edges. Transfer the dough to a clean work surface. As you see above, it’s very important your dough shows full gluten development (it’s passing the windowpane test).
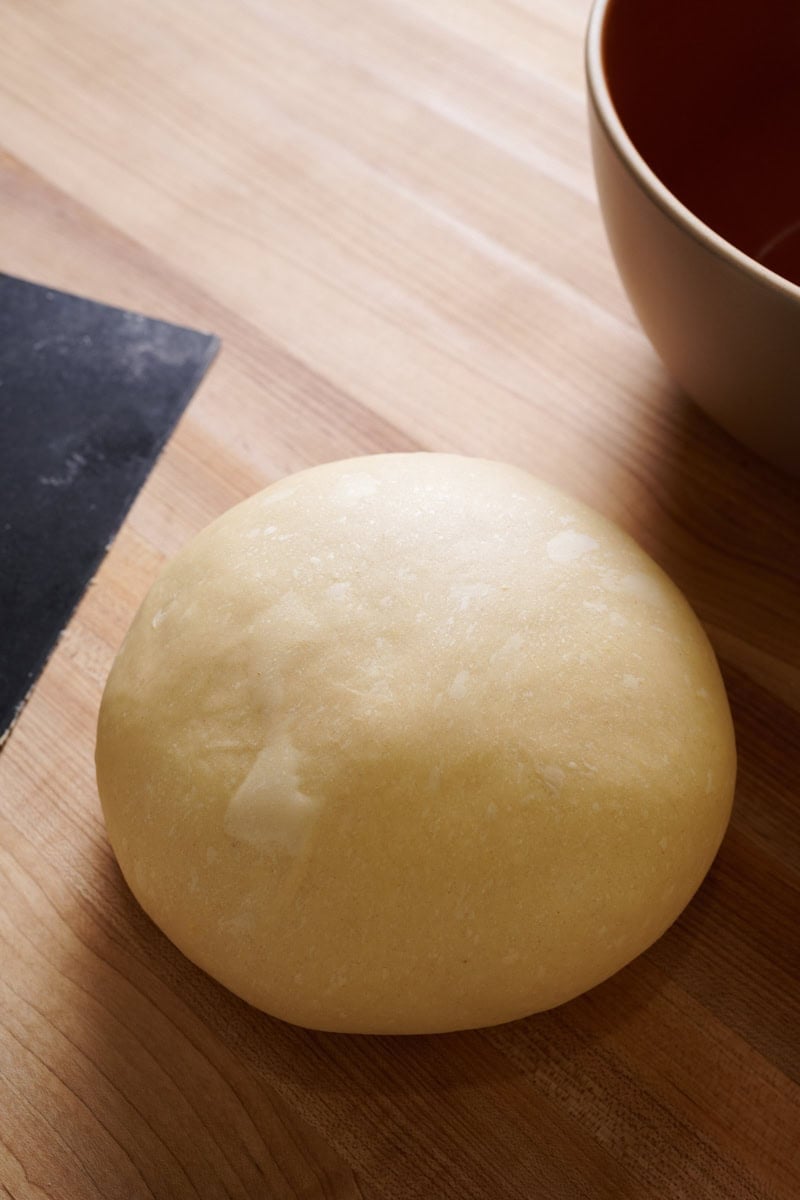
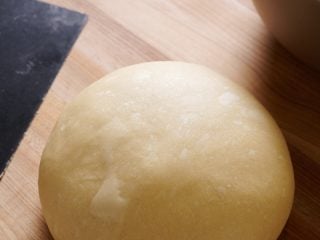
Next, use your hands to slap the dough on the counter and fold it over itself a few times, working it into a smooth, cohesive ball. Transfer it to a bulk fermentation container and cover.
Fully mixed sourdough challah dough balled up and ready for bulk fermentation.
At a warm room temperature, 74-76°F (23-24°C), bulk fermentation should take about 4 ½ hours with no sets of stretches and folds (the dough has already been sufficiently strengthened during mixing).
It’s very important to keep the dough warm during bulk fermentation as it sets the timetable for this dough.
I’ll mention it again: It’s very important to keep the dough warm during bulk fermentation as it sets the timetable for this dough. I like to keep this dough in a proofer set to 76°F (25°C), but if you don’t have one, find a warm spot or use your oven with the inside light turned on and check in on it occasionally to ensure it’s staying warm.
Let the dough rest, covered, for the duration of bulk fermentation.
5. Divide and preshape – 2:30 p.m.
At the end of bulk fermentation, the dough should have risen significantly in the bulk container (about 40% volume increase) and be soft and puffy to the touch. It’s very important your dough aerate, show some bubbles, and rise significantly during bulk fermentation. If the dough has not risen or is tight, give it another 30 minutes to ferment at a warm temperature and check again.
Challah dough at the start (left) and end (right) of bulk fermentation. Notice the volume increase, smoothness, and bubbles. Strong fermentation is key.
Line one baking sheet with parchment paper or a silicone mat.
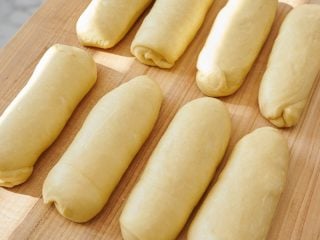
Using a bowl scraper, gently scrape the dough out of the bulk fermentation container onto a work surface. Divide the dough into 8 pieces weighing 190 grams each, trying to divide the dough so they’re mostly rectangular shapes. You might have a small bit of scrap dough left over.
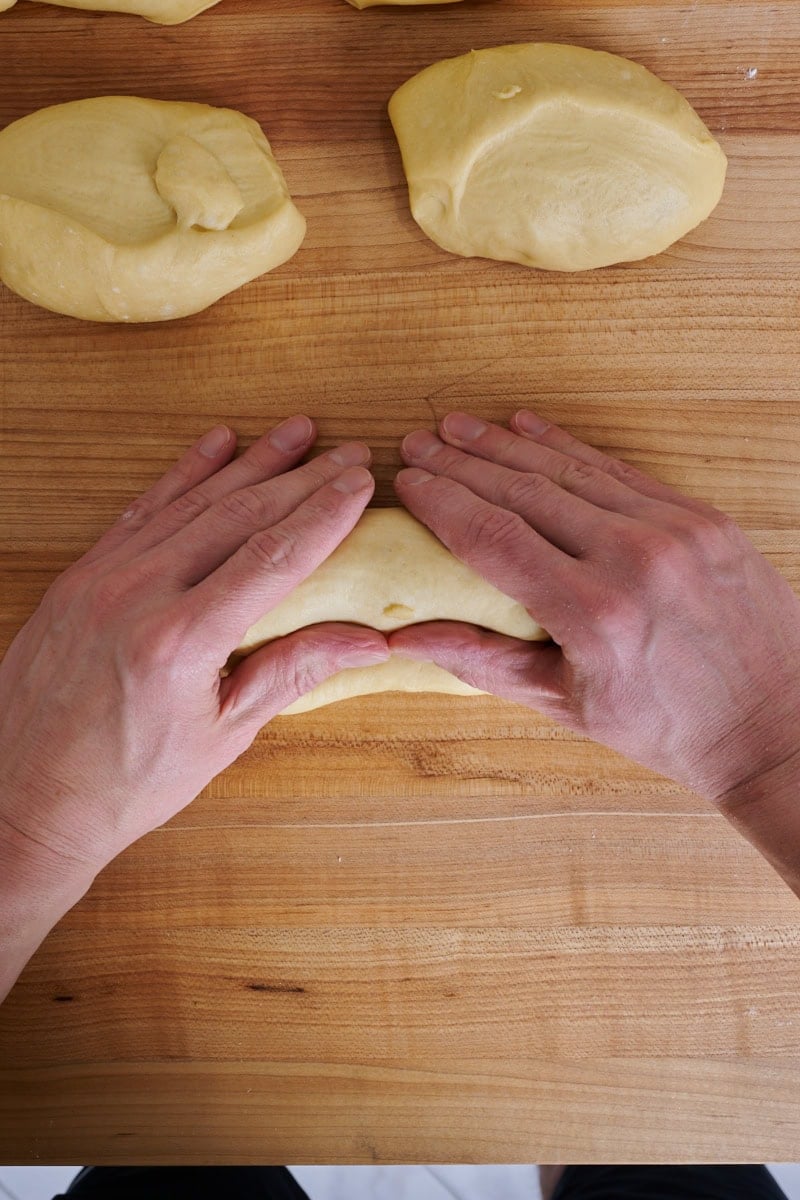
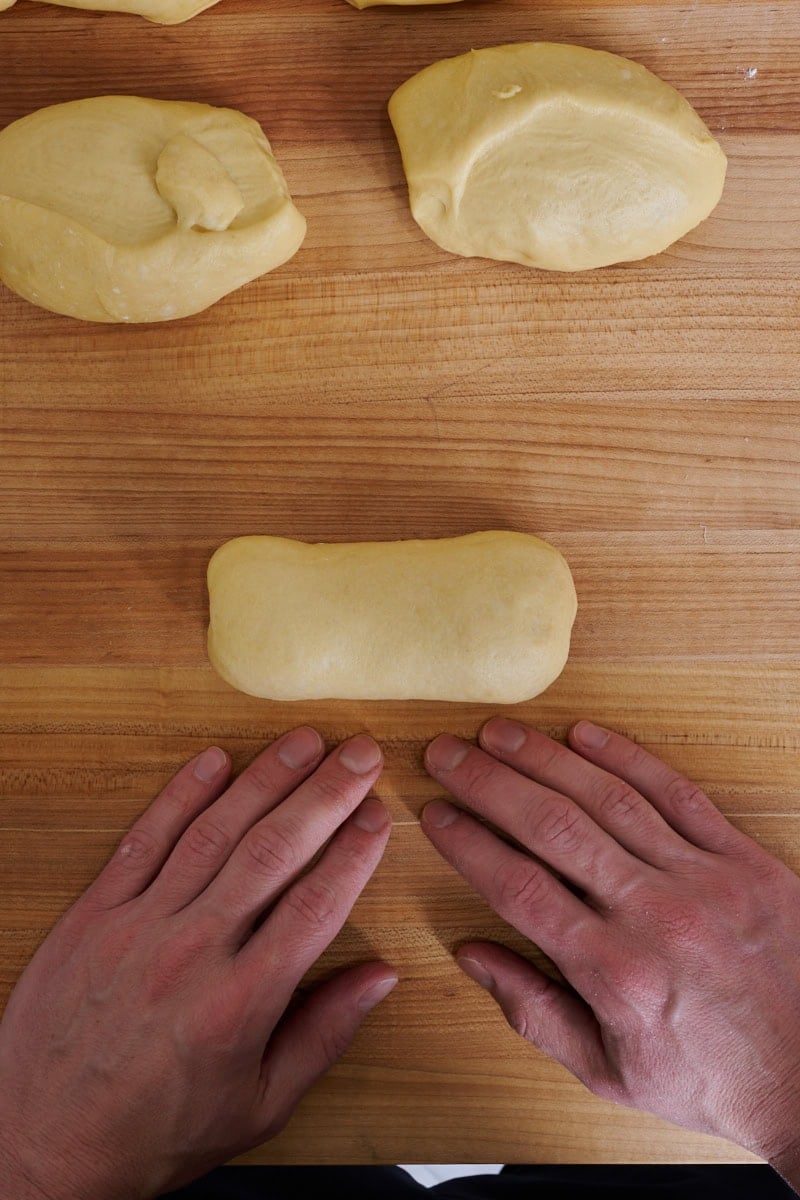
Preshape each piece of dough into a tube by rolling it down while cinching it up as you go (see above). Then, much like you’d roll out a baguette, gently and evenly roll the dough to about 4 to 5 inches long. This is not rolling out to its full length, but it will help get the dough in the right shape for more rolling after it has relaxed.
Cover the pieces with a large piece of plastic or moistened towel, and let rest for 30 minutes.
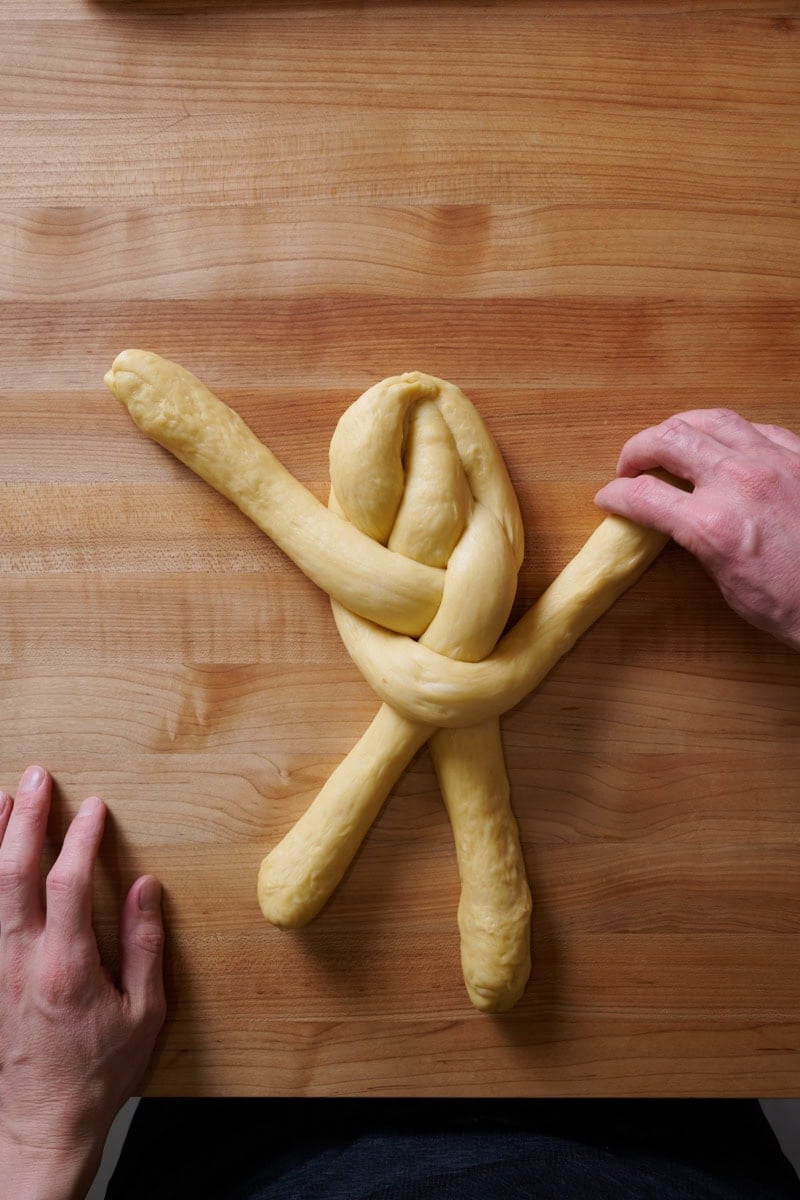
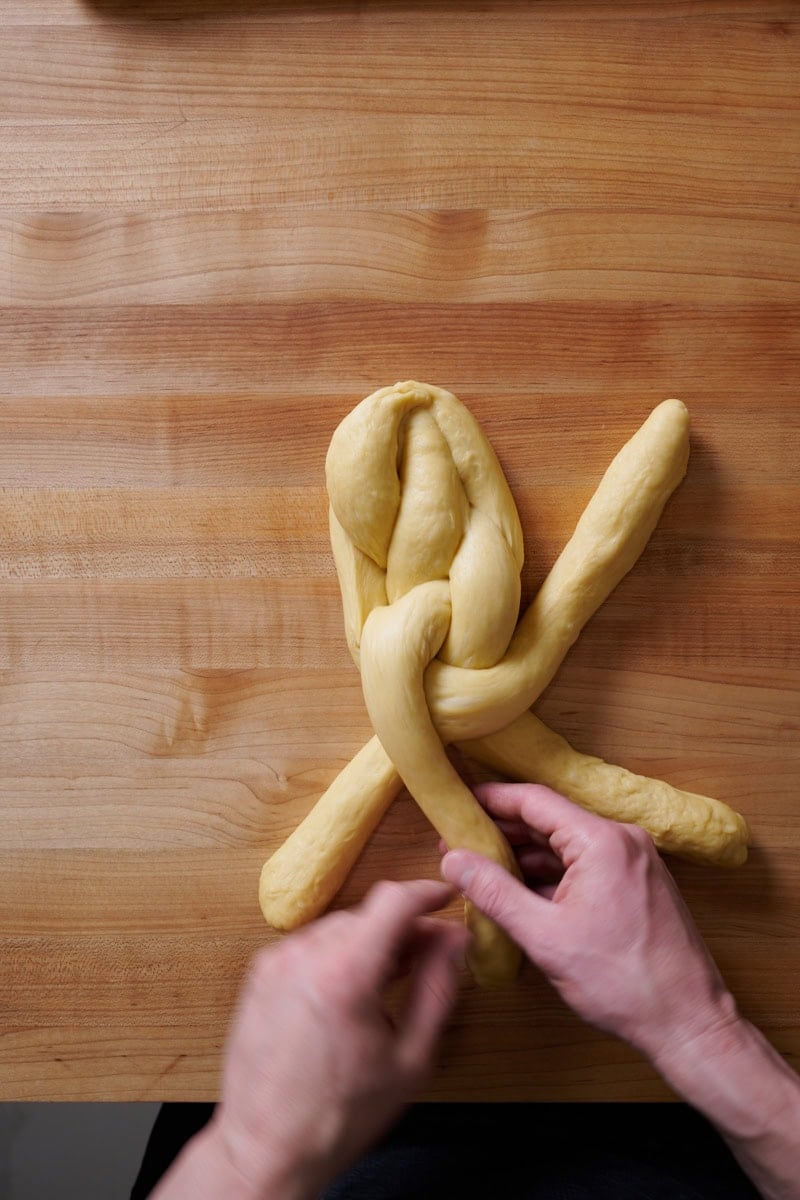
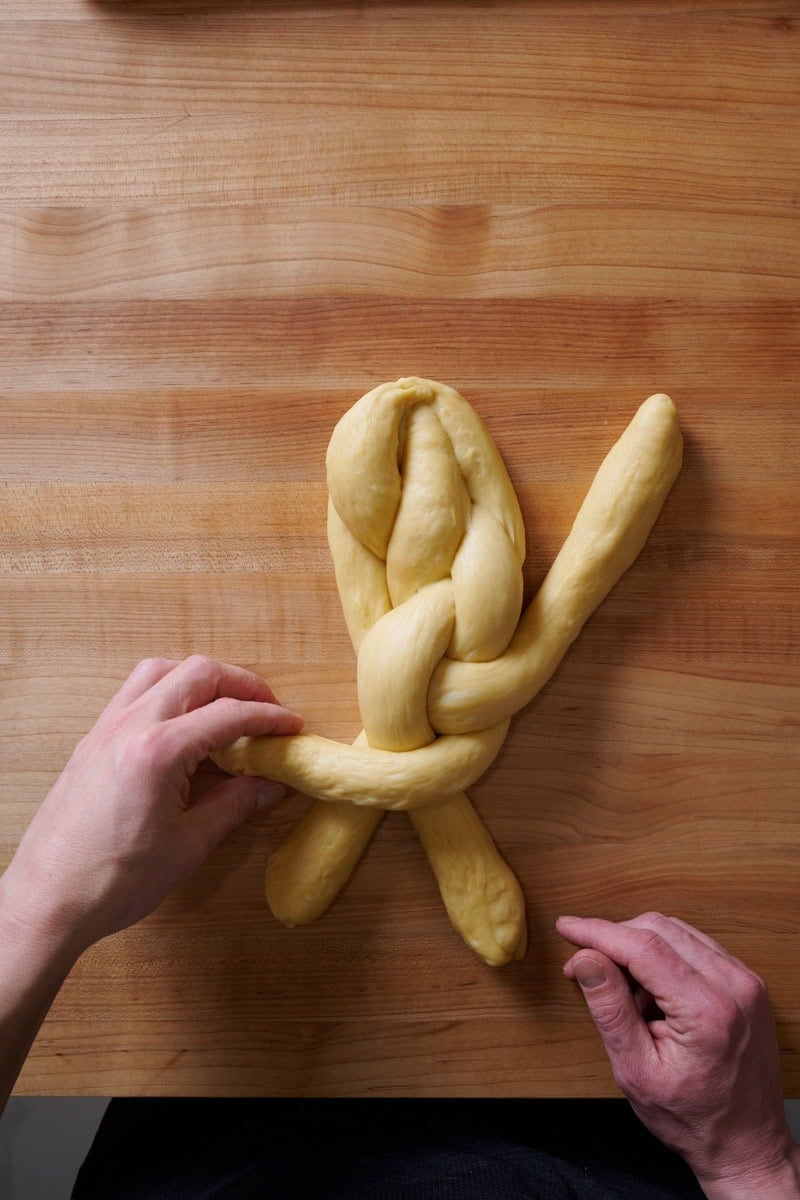
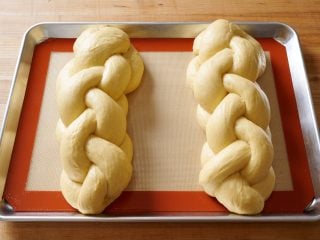
6. Roll and braid – 3:00 p.m.
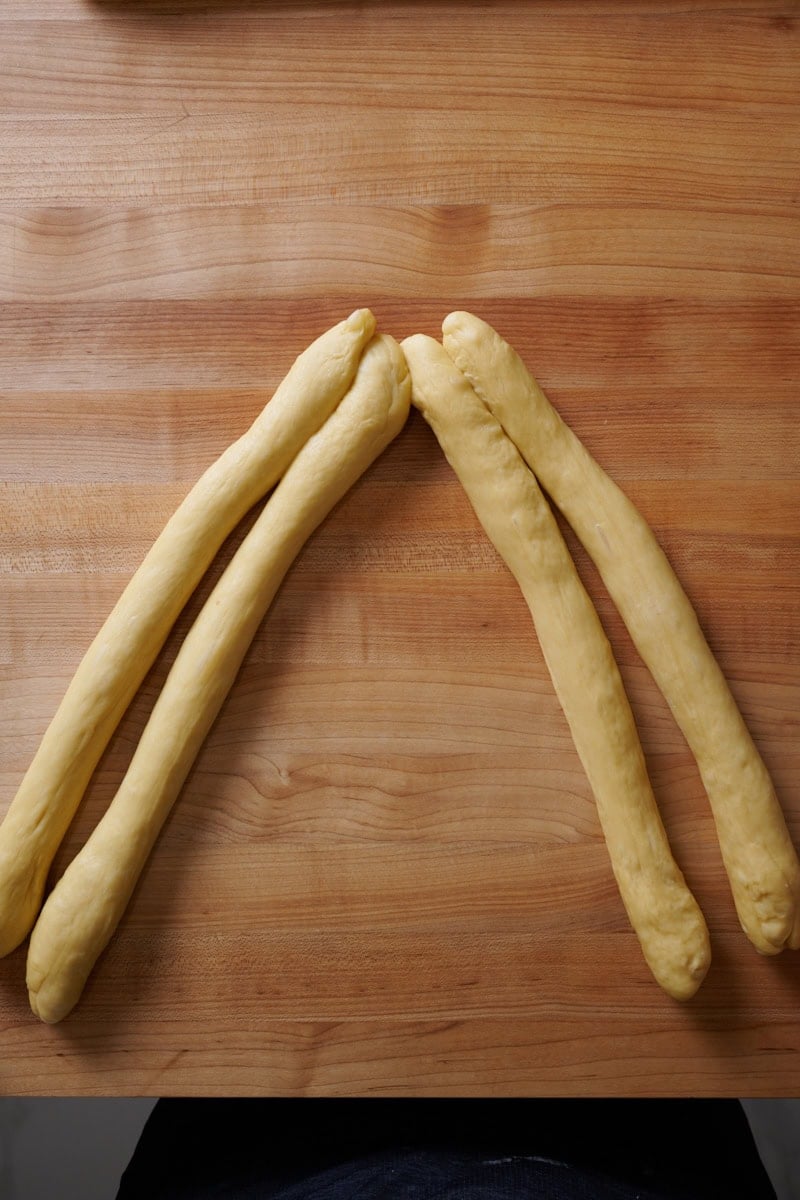
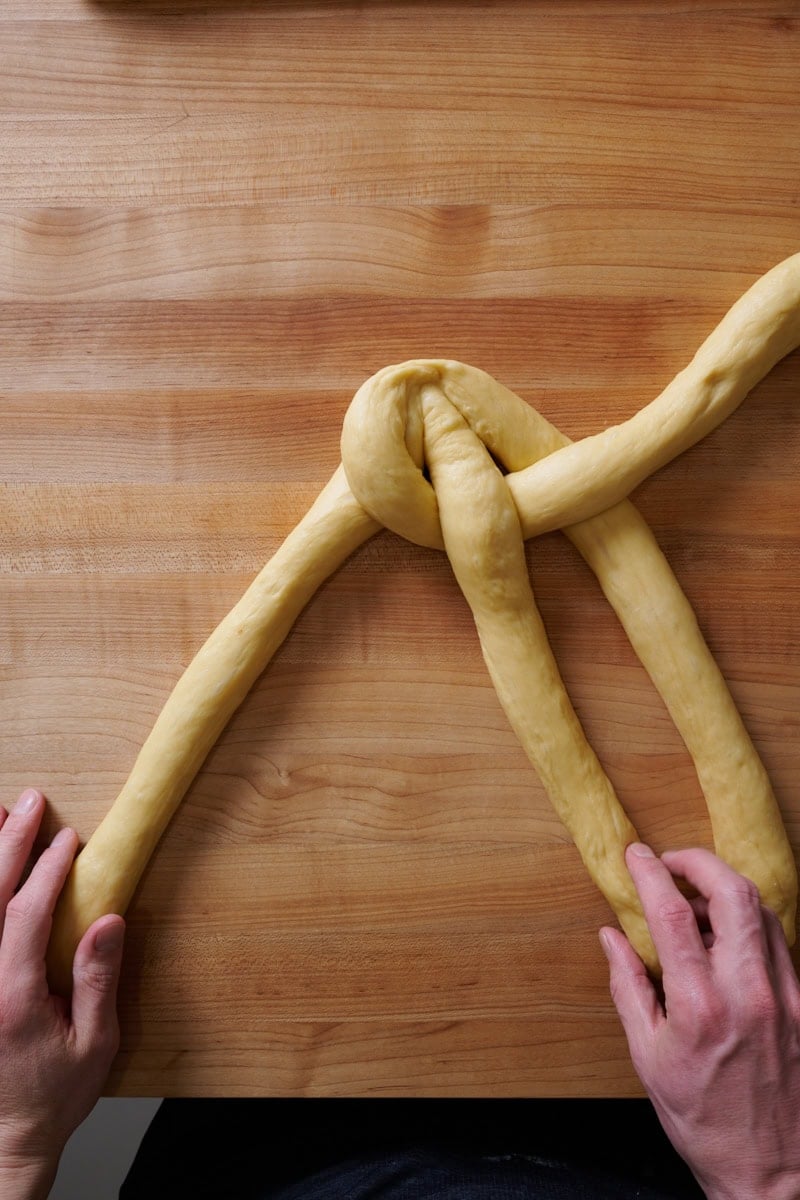
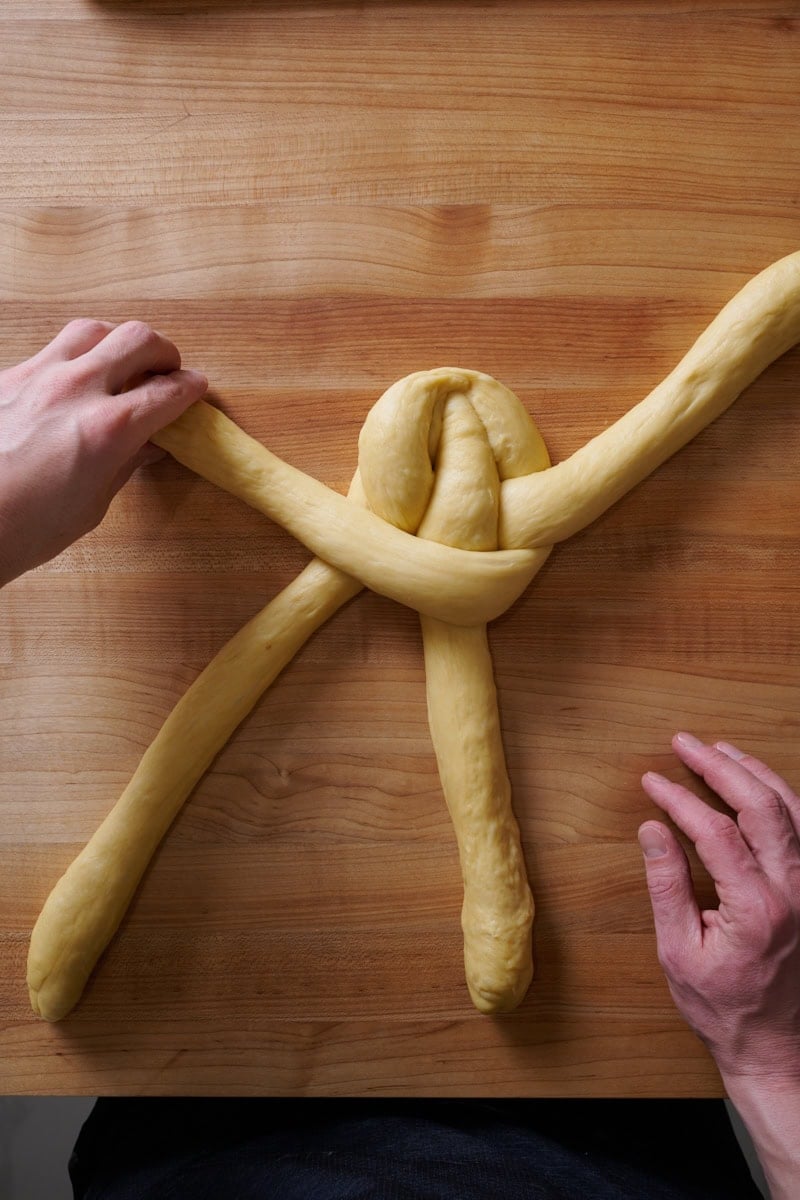
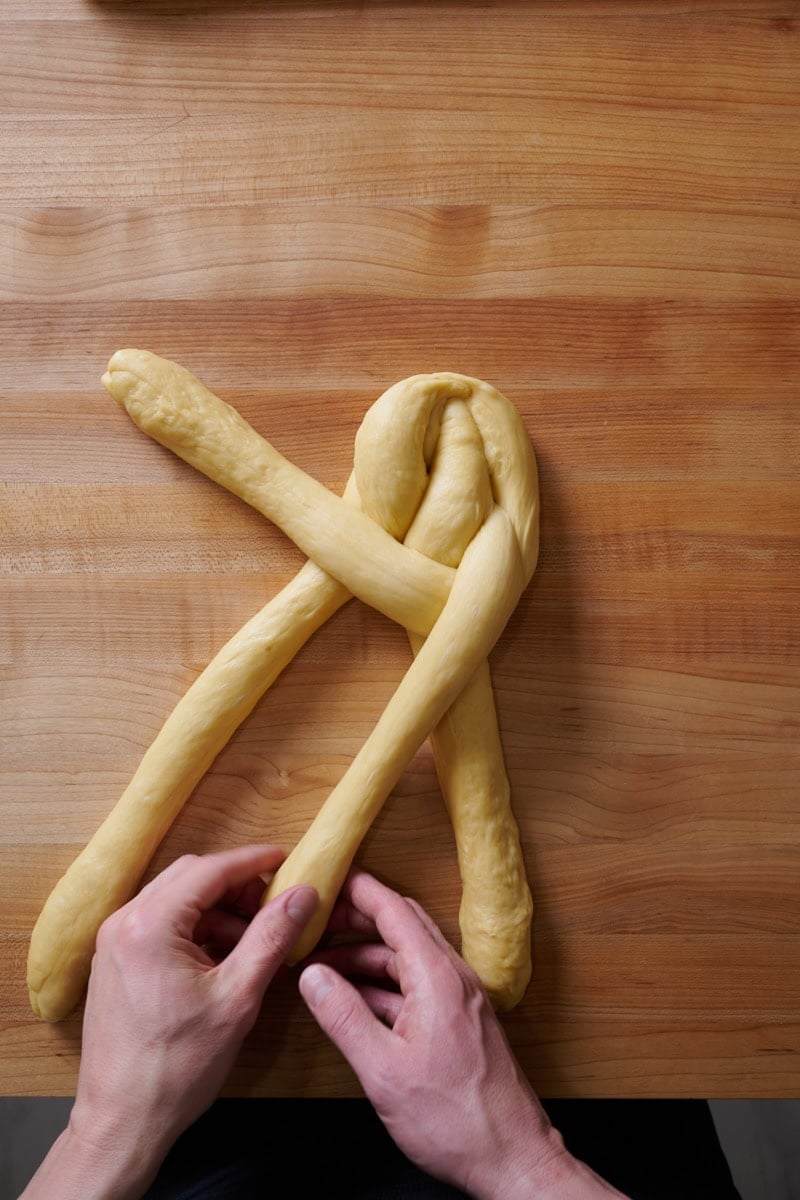
Like you’d roll out a baguette, roll out four pieces of preshaped dough to 12 to 14 inches long with tapered ends (the tapered ends help braiding). Like baguettes, you want the dough to be as even as possible from end to end and with a smooth, taut surface.
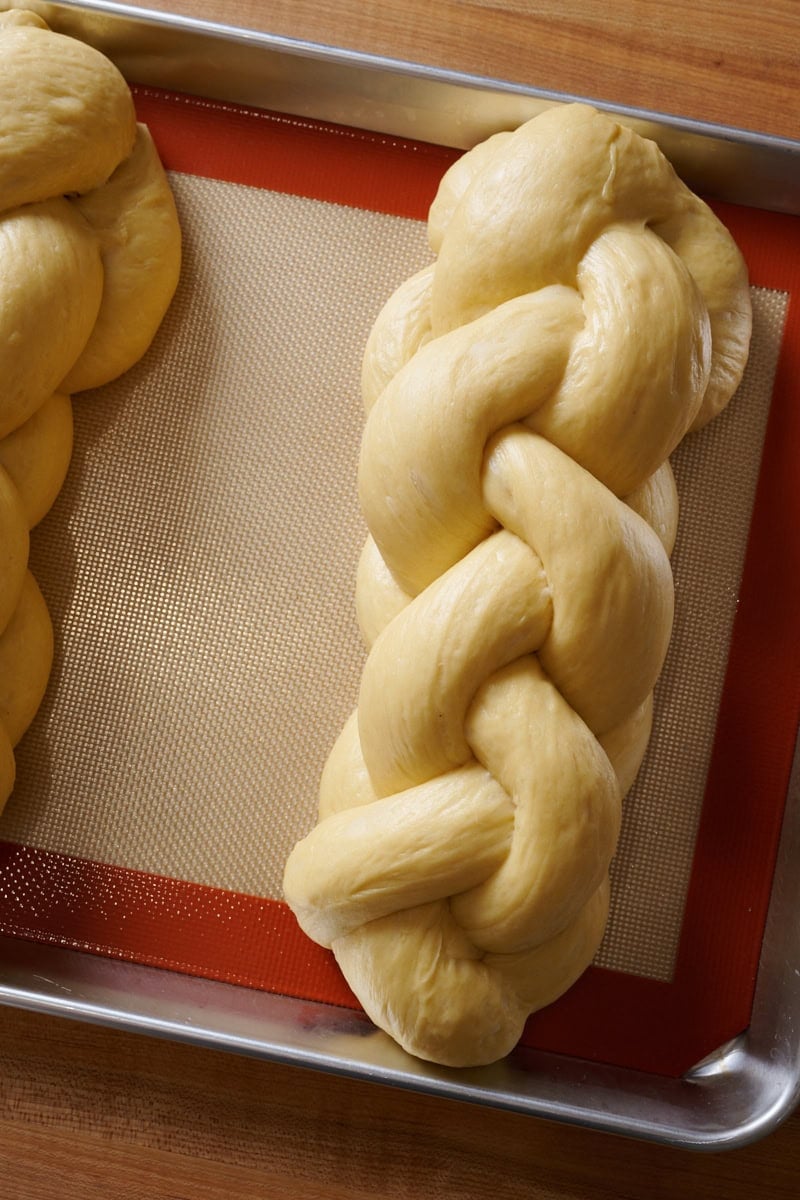
Next, braid the 4 pieces into a 4-braid challah. Don’t overly tighten the braid while doing this, as it can cause the dough to tear when it expands during proofing.
When finished braiding, turn the braided dough 90° and place your hands at the end of each side of the dough. Then, roll the dough slightly to seal the ends and tuck the points underneath the loaf.
How to braid a 4-strand challah. Repeat the pattern until there is no more dough to braid.
(Also, watch the video earlier in this post for step-by-step instructions on braiding a 4-strand challah.)
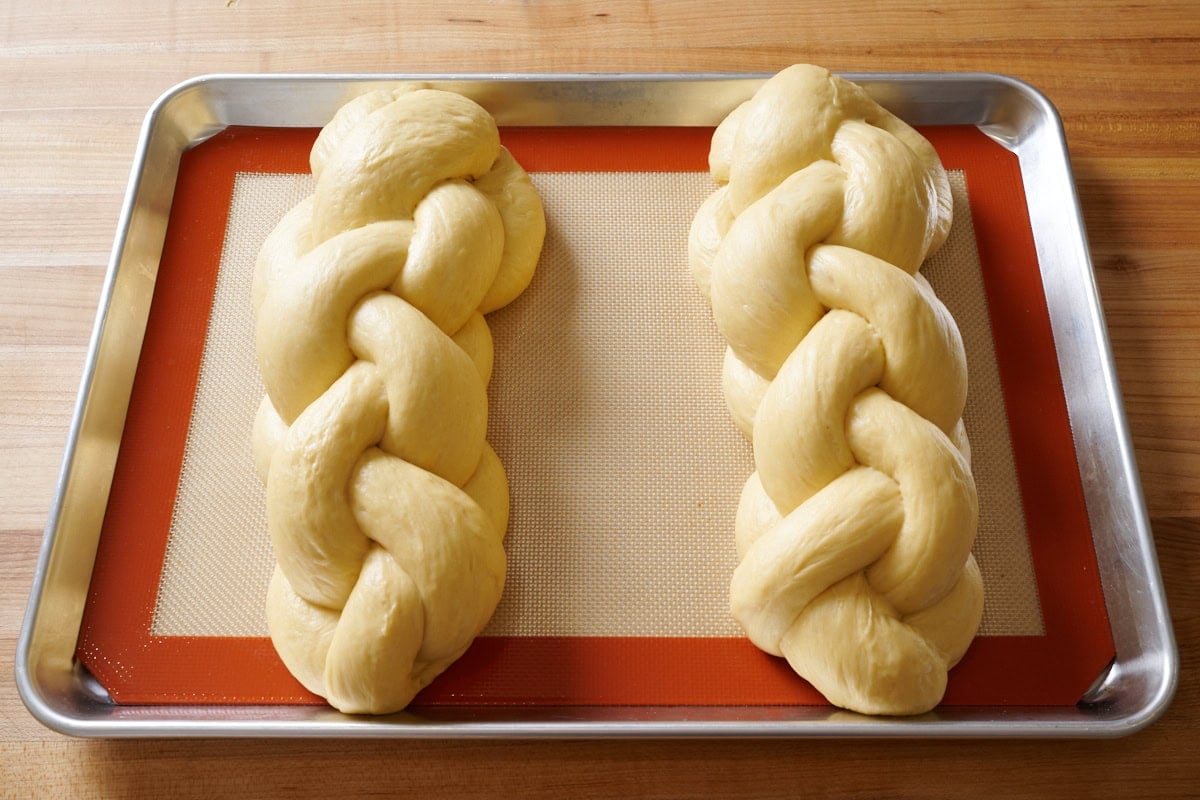
Transfer the braided dough to one side of the prepared baking sheet (it’s best to put it as far to one edge as possible) and repeat for the other four pieces of dough.
Braided 4-strand sourdough challah dough ready for proofing.
7. Proof – 3:30 p.m. to 7:30 p.m.
Cover the baking sheet with reusable plastic and let the dough proof for 4 hours at around 76°F (25°C). Again, since this dough is heavily enriched, keeping it warm is essential to stick to this schedule.
8. Bake – 7:30 p.m. (preheat oven at 7:00 p.m.)
After 4 hours, the dough should have puffed up and feel airy when poked. You can use the poke test to determine when the challah dough is ready for baking. A gentle poke to the dough should spring back slowly. The dough should feel very soft. If it feels tight or springs back quickly, give it another 30 minutes to proof at warm room temperature and check again.
(Be sure to read through the proofing section at the start of this post to look at the difference in proof levels with a dough like this sourdough challah.)
Preheat your oven to 425°F (220°C), with a rack in the middle.
Prepare the egg wash by whisking 1 whole egg (or the saved egg whites) and a small pinch of salt in a small bowl until smooth. (If using the saved egg white from earlier in mixing, your loaves will not have a crust as colorful as a whole egg.)
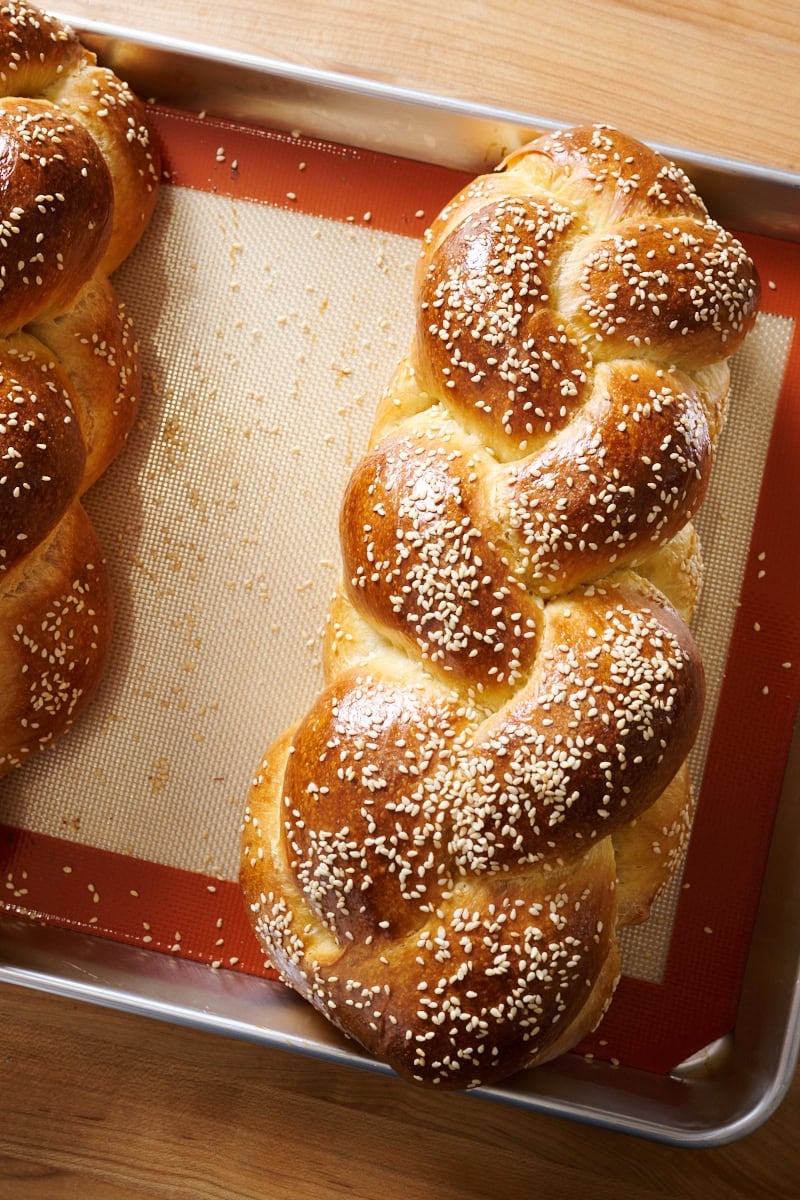
Uncover the baking sheet and, using a pastry brush, brush on an even, thin layer of the egg wash. Liberally sprinkle on sesame seeds, if using.
Place the baking sheet in the oven and bake for 15 minutes. After this time, if you want a deeply colored sourdough challah, apply a light second layer of egg wash to the dough, though this is optional. Rotate the pan back to front, then reduce the oven temperature to 375°F (190°C). Bake for 10 to 15 minutes until well-colored and the internal temperature is 200°F (93°C). Keep an eye on the dough in the last 10 minutes to avoid too much browning.
Transfer the baking sheet to a cooling rack for 5 minutes. Then, transfer the challah to a cooling rack and let them cool completely before slicing, about 30 minutes, or preferably overnight.
The sourdough challah keeps well for up to a week when covered completely to prevent drying out.
This fluffy and dairy-free braided sourdough challah is incredibly flavorful—with a touch of sweetness—thanks to the long fermentation time. Perfect for Jewish holidays or for anyone looking for a delicate and flavorful bread!
Levain
131g High-protein white bread flour
52g Superfine white sugar (or granulated sugar)
131g Water
52g Ripe sourdough starter, 100% hydration
Tangzhong
79g High-protein white bread flour
214g Water
Main Dough
397g Medium-protein white flour
187g High-protein white bread flour
159g Egg
34g Egg yolk
36g Oil 1: Vegetable oil
36g Oil 2: Vegetable oil
27g Superfine sugar (or granulated sugar)
48g Honey
17g Fine sea salt
All the ripe levain (about 367g)
All the tangzhong (about 293g)
Prepare the levain — 9:00 p.m. (the night before mixing) Mix the ingredients in the chart above in your favorite jar and leave them covered at a warm temperature, 74-76°F (23-24°C), to ripen for 14 hours. This is a sweet liquid levain and it will expand in volume significantly. Be sure to use a tall jar so it doesn’t overflow. Be sure to keep this warm.
Prepare the tangzhong – 9:00 a.m. (the day of mixing) In a medium saucepan over medium-low heat, cook, whisking continuously, until the mixture thickens and becomes a paste (it should look like mashed potatoes), 4 to 5 minutes. Remove the pan from the heat and spread the tangzhong on a small plate to expedite cooling. Set aside.
Mix – 9:30 a.m. Mix dough using a stand/spiral mixer with dough hook (hand mixing possible with slap-and-fold technique, but requires longer kneading; if mixing by hand, add oil later). Add Mix ingredients in mixer bowl. Mix on low (STIR) 1-2 minutes until combined. Mix on medium (speed 2) for 7 minutes until dough smooths and clings to hook. Rest 10 minutes. Mix again on medium 7-10 minutes until dough strengthens and passes windowpane test. Dough will be sticky but clean bowl sides. Stream in oil 2 on speed 1 until fully absorbed and dough is smooth and elastic. Transfer the dough to your work surface and slap and fold it a few times to get it into a taut ball. Transfer to a bulk fermentation container and cover.
Bulk Fermentation – 10:00 a.m. to 2:30 p.m. (4 1/2 hours) At a warm room temperature, 74-76°F (23-24°C), bulk fermentation should take about 4 ½ hours with no sets of stretches and folds (the dough has already been sufficiently strengthened during mixing).
Divide and preshape – 2:30 p.m. Line a half baking sheet with parchment/silicone mat. Scrape dough onto work surface and divide into 8 pieces (190g each), aiming for rectangular shapes. Preshape each piece into tubes by rolling and cinching. Roll like baguettes to 4-5 inches (partial length). Cover with reusable plastic and rest 30 minutes.
Roll and braid – 3:00 p.m. Roll out four pieces of preshaped dough evenly to 12 to 14 inches long with tapered ends. Next, braid the 4 pieces into a 4-braid challah. When finished braiding, turn the braided dough 90° and place your hands at the end of each side of the dough. Then, roll the dough slightly to seal the ends and tuck the points underneath the loaf. Transfer to one side of the prepared baking sheet and repeat for the other pieces of dough.
Proof – 3:30 p.m. to 7:30 p.m. Cover the baking sheet with reusable plastic and let the dough proof for 4 hours at around 76°F (25°C).
Bake – 7:30 p.m. (preheat oven at 7:00 p.m.) After 4 hours, check the dough using the poke test—a gentle poke should spring back slowly and the dough should feel soft and airy. If it springs back quickly or feels tight, proof for another 30 minutes. Preheat oven to 425°F (220°C). Brush dough with egg wash (whole egg or saved egg whites + pinch of salt) and sprinkle with sesame seeds if desired. Bake for 15 minutes, then optionally apply a second egg wash for deeper color. Rotate pan, reduce temperature to 375°F (190°C), and bake 10-15 minutes more until internal temperature reaches 200°F (93°C). Keep an eye on the dough during the last 10 minutes of baking to avoid over-baking. Cool on baking sheet for 5 minutes, then transfer to cooling rack for at least 30 minutes.
Notes
If this is your first time making sourdough challah, I highly recommend you read the entire post before this recipe card. It’ll ensure you make the best-looking and tasting sourdough challah!
The vegetable oil can be substituted for a mild-flavored olive oil
Sourdough Challah FAQs
Can I proof this sourdough challah in the refrigerator?
I would not recommend this unless proofing is going very slowly and you must push it to the second day. Proofing this dough in the refrigerator for any period will increase the sour flavor.
Why does my challah tear or burst open?
This usually indicates the dough is underproofed. Give the challah dough another 30 minutes to 1 hour to proof before baking.
Why did the braids on my challah merge together?
This can happen for two reasons: 1) the dough was overproofed, or 2) the dough was over-hydrated and not strengthened enough. If you think the challah overproofed (when poking it, the dough was too soft and never sprang back), reduce the proofing time by 1 hour. If the dough was tough to braid because it was too sticky or slack, reduce the oil added to the dough or mix it longer in your stand mixer.
Can I freeze sourdough challah?
Yes, but it’s best to freeze after baking. Wrap the cooled bread several times in plastic wrap, then put it into a freezer bag. Defrost in the fridge overnight and toast slices the next day. Or, warm an entire loaf in a low oven for a few minutes until soft.
Can I use olive oil instead of vegetable oil in challah?
Yes, but be sure to use a mild flavored olive oil. If your oil is too fruity or peppery, this flavor can present itself in the final challah.
Can I make a 2, 3, or 5-strand challah with this dough?
Yes. In this case, I would make one 5-strand and one 3-strand challah out of the eight 190-gram pieces. Or, since the total dough weight is 1,600 grams, you can divide the dough into ten 160-gram pieces and make two smaller 5-strand challahs.
What’s Next?
Once you make this sourdough challah, slice it thick and use it for French toast. It’s incredible! If you’re in the mood for slightly sweet bread, my sourdough Pain de Mie makes the perfect toast.
Thank you, Baker’s Corner members (Simo, Karen, champgt1, and others) for helping me test this recipe and Ailine for our chats about all things challah!