
Instead of the usual candy and treats for your Halloween party, you can bake an impressive Halloween sourdough bread that your guests will love. Many home bakers find it intimidating to use food coloring or create spooky designs. But it’s easier than you think – with basic ingredients and a few simple techniques, you can make stunning black, orange, or white Halloween bread that tastes as good as it looks. Let’s create your own Halloween sourdough masterpiece.

Table of Contents
Ingredients List
The Basic Foundation
For your Halloween sourdough bread, you’ll need these essential ingredients:
- 500g bread flour
- 350g filtered water (room temperature)
- 100g active sourdough starter (fed 8-12 hours before use)
- 10g fine sea salt
- Extra bread flour for dusting (about 1/2 cup)
The Spooky Add-ins
Choose one or two of these Halloween-themed ingredients to add to your basic dough:
- 2-3 tablespoons food-grade activated charcoal powder (for black bread)
- 1/2 cup pure pumpkin purée (make sure it’s not pie filling)
- If using pumpkin, add these spices:
- 1 teaspoon ground cinnamon
- 1 teaspoon ground nutmeg
- 1 teaspoon ground ginger
- 2 tablespoons squid ink (for black bread with a slight ocean taste)
Optional Decorative Elements
These ingredients are for decorating your bread before baking:
- Black sesame seeds (for creating patterns)
- Pumpkin seeds (for making faces)
- Dried cranberries (for red spots)
- Natural food coloring options:
- Beetroot powder (for red color)
- Spirulina powder (for green color)
Important Notes:
- Only choose one coloring agent (charcoal, squid ink, or natural powders)
- Start with small amounts of coloring ingredients
- Add-ins can make your bread denser, so use them carefully
- All measurements are in US standard units
- Store extra flour separately for working with the dough
- Make sure your starter is active and bubbling before use
Remember: Using too many additional ingredients can prevent your bread from rising properly. Pick your favorite Halloween element and stick with it for the best results.
Preparing the Sourdough Starter
Basic Starter Instructions
Your starter needs to be active and ready 8-12 hours before making the Halloween bread. Feed it using a 1:1:1 ratio – this means equal parts existing starter, flour, and water. For example, mix 50g starter with 50g flour and 50g water.
How to Know It’s Ready
Your starter is ready to use when:
- It doubles in size in 4-6 hours
- You can see lots of bubbles throughout
- It smells slightly sour and fruity
- A small spoonful floats when dropped in the water
Quick Fixes for Weak Starters
If your starter isn’t very active:
- Feed it twice a day at room temperature (75°F)
- Add a small spoonful of rye flour during feeding
- Keep it in a warmer spot in your kitchen
- Make sure you’re using filtered water
Since we’re adding special Halloween ingredients like charcoal or pumpkin later, your starter needs to be strong and active. A weak starter will still make bread, but it might take longer to rise and won’t hold its shape as well.
Keep feeding your starter at the same times each day for at least three days before making your Halloween bread. This helps build up its strength and ensures your bread will rise properly, even with the added ingredients.
Related: How to Make Stiff Sourdough Starter
Mixing the Dough
Pour the filtered water into your large mixing bowl first, then add your active starter. Mix these together until your starter is completely dissolved in the water.
Add the bread flour and salt to your water-starter mixture. Mix everything with clean hands or a wooden spoon until you’ve got a unified dough with no dry spots.
To build dough strength, use the stretch and fold method: take one side of the dough, pull it up and over to the center. Turn your bowl and repeat this action three more times. The dough should start feeling more elastic with each fold.
For Halloween variations, add your chosen coloring agent (charcoal powder, squid ink, or natural food coloring) during your first stretch and fold. For pumpkin bread, mix in the puree and spices at this stage too. The add-ins might look streaky initially but will blend in as you continue working the dough.
Since this is a wetter dough, it might stick to your hands. Instead of adding extra flour, just wet your hands with a little water. The dough needs this moisture level to develop properly.
Perform these stretches and folds every 30 minutes for 2 hours, keeping your dough covered between sessions with a clean kitchen towel to prevent drying.
Adding Natural Colors
Using Black Charcoal
When using activated charcoal, mix it with a small amount of your recipe’s water first. This helps prevent black spots in your bread. Add this mixture during your first fold. Remember that a little goes a long way – start with 1 tablespoon and add more if needed for a darker color. The charcoal won’t change the taste of your bread, but it will create a deep black color that’s perfect for Halloween.
Adding Pumpkin Color
If you’re using pumpkin puree for orange bread, you’ll need to adjust your recipe. Reduce your water by 50g since pumpkin adds moisture to the dough. Fresh pumpkin puree gives a brighter orange color than canned pumpkin. Make sure to mix it in well during your first fold to get an even color throughout the dough.
Using Other Natural Colors
For red bread, beetroot powder works great. Start with 2 tablespoons per loaf. You can add more if you want a deeper red color. If you want green bread, use spirulina powder. Start with 1 tablespoon – it’s very strong and a little bit is enough. Both these natural colors are safe and won’t affect how long your bread takes to rise.
Always wear gloves when mixing in any colors. While they’re safe to eat, they can stain your hands. The colors will get slightly darker after baking, so make your dough a bit lighter than your target shade. Natural colors might not be as bright as artificial ones, but they’re completely safe and add unique character to your Halloween sourdough.
Shaping the Dough
Basic Halloween Shapes
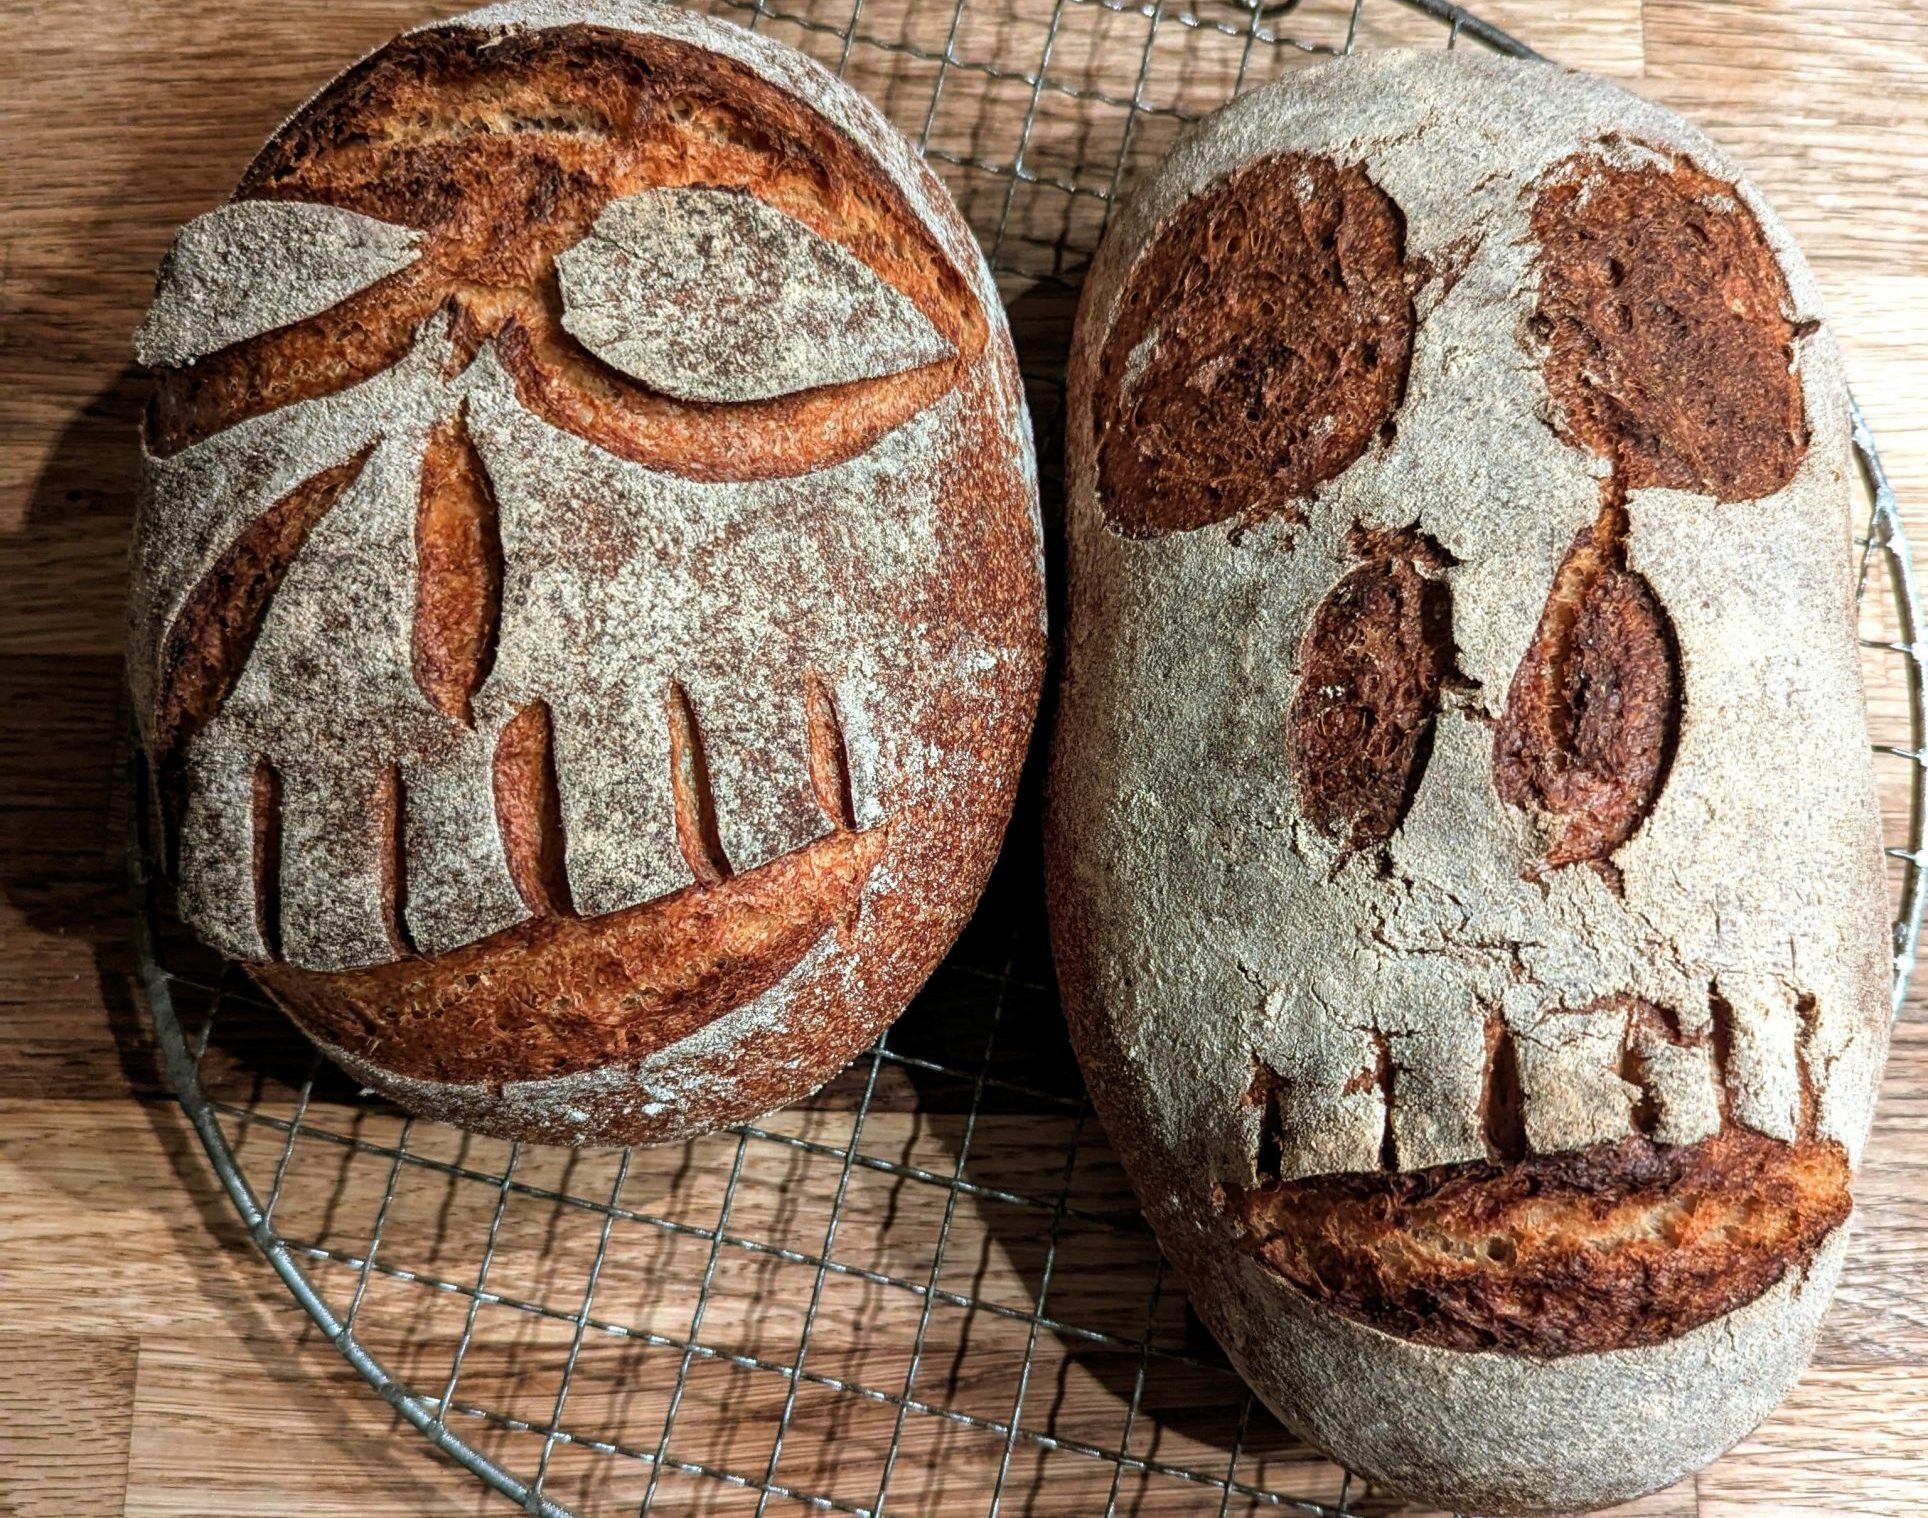
Start by turning your dough onto a floured surface. For a pumpkin shape, cut your dough into 6-8 equal pieces and roll each into a smooth ball. Place the balls in a circle, touching each other. Use kitchen twine to make lines between each section – this creates the pumpkin’s segments. Leave the twine on during proofing but remove before baking.
Making Ghosts and Webs
For ghost shapes, pull your dough into an oval shape and make the bottom narrower than the top. Use your bench scraper to cut gentle waves at the bottom edge. If you’re making a spider web, flatten your dough into a circle. Use a pizza wheel to cut straight lines from the center out. Then make curved lines between these straight lines to complete the web pattern.
Adding the Decorations
Now’s the time to add your decorative ingredients. For ghost faces, gently press black sesame seeds into the dough for eyes and mouth. When making spider webs, create spiders using pumpkin seeds – press them firmly but carefully into the dough’s surface. If your dough gets sticky while you work, don’t add more flour. Instead, wet your hands lightly with water or let the dough rest for 10 minutes. Keep your movements gentle and quick to maintain the dough’s strength.
Remember: press decorations in firmly enough to stick during baking, but not so hard that you tear the dough. Each shape should take about 5-10 minutes to form. If you’re new to shaping, start with simple designs and work your way up to more complex ones as you get comfortable handling the dough.
Proofing and Scoring the Dough
After shaping, let your Halloween dough proof in a banneton or bowl lined with a floured cloth. Keep it at room temperature for 3-4 hours, or overnight in the fridge. Test if it’s ready by gently poking with your finger – it should slowly spring back and leave a small dent.
For clean cuts in your Halloween designs, place your dough in the freezer for 15 minutes before scoring – this makes the surface easier to cut. When making face designs, follow this order:
- Eyes: make two curved cuts
- Nose: score a small triangle
- Mouth: create one long curved line
Different scoring depths create different effects during baking:
- Shallow cuts (1/4 inch): create subtle lines
- Deep cuts (1/2 inch): make dramatic openings
Keep your scoring blade at a 45-degree angle for clean cuts. If the dough feels dry while you’re scoring, lightly spray it with water to prevent tearing. Remember, it’s okay if your first few designs aren’t perfect – Halloween sourdough bread should look a bit spooky anyway!
A quick tip: If you’re making multiple Halloween designs on one loaf, score the larger patterns first, then add smaller details. This helps maintain the dough’s shape and prevents deflating while you work.
Baking the Halloween Sourdough
Setting Up Your Oven
Fire up your oven to 450°F with a Dutch oven inside – you want that baby scorching hot for at least 45 minutes before your dough goes in. Pop a small oven-safe dish of water on the bottom rack too. That steam is going to work magic on your crust.
The Main Bake
Once your oven’s blazing hot, carefully transfer your spooky creation into the preheated Dutch oven. If you’ve used charcoal powder or other dark colorings, you’ll need to watch the bake extra carefully – those deep colors can make it tricky to spot when your crust is done just right.
For the perfect Halloween loaf, start with the lid on for 25 minutes. This traps steam and helps your bread rise into those ghostly shapes you’ve carved. Then comes the fun part – take that lid off and let it bake another 20-25 minutes until you’ve got a crust that’s darker than a moonless night.
Getting That Perfect Spooky Finish
Here’s a pro tip that’ll make your Halloween sourdough absolutely shine: about 5 minutes before it’s done, brush the crust with a beaten egg white. It’ll give your bread an eerie glisten that’s perfect for the season. Just remember that if you’ve used charcoal powder, your bread won’t brown like usual – instead, look for a firm, matte finish that sounds hollow when tapped.
Your bread’s done when it hits an internal temperature of 208°F – that’s the sweet spot for a perfectly baked loaf. Let it cool on a wire rack for at least an hour before slicing. I know it’s tempting to dive right in, but trust me, cutting too soon will give you a gummy crumb that’s scarier than any Halloween decoration!
Serving Suggestions and Final Touches
Place your Halloween sourdough on a dark board or platter as the centerpiece of your table. Black slate or dark wooden boards work great for showing off both light and dark breads. Arrange small battery-operated lights around the bread to highlight your spooky designs.
Mix up these quick Halloween-themed spreads that pair perfectly with your bread:
- Red pepper hummus (bright red color)
- Herb and garlic butter with green food coloring
- Classic pumpkin butter
- Black olive tapenade for dark contrast
Turn a medium pumpkin into a bread bowl by cutting off the top and scooping out the inside. Fill it with your favorite dip and arrange bread slices around it. Keep your bread warm by covering it with a clean kitchen towel until serving time.
For the best taste and texture, serve your bread slightly warm. If it’s cooled completely, pop it in a 350°F oven for 5-10 minutes before serving. This brings back that nice crispy crust and makes the inside perfectly soft.
You can bake your bread early in the day and reheat it just before guests arrive. Most dips can be made up to two days ahead – just keep them covered in the fridge and bring to room temperature before serving.
Remember: Fresh bread tastes best within the first 24 hours of baking, so plan your baking schedule around your serving time. Keep extra bread sliced and frozen if you need it for later!
Transform Your Sourdough into Halloween Magic
Making Halloween sourdough bread is straightforward once you understand the basics. Start with quality flour, water, salt, and an active starter – these simple ingredients will give you excellent results. You can make your bread black with charcoal, orange with pumpkin, or add natural colors for different effects. So fire up that oven to 450°F, grab your favorite add-ins, and let your imagination run wild!


