
If you have ever been intimidated by the process who of poaching eggs, this foolproof recipe for oven poached eggs will change that! Using a muffin tin and carefully tested timing, poaching eggs in the oven delivers perfect results with ease.

Why Poach Eggs in the Oven?

Poached Eggs are not hard to make, but preparing them on the stove can be a bit finicky. The water has to be at just the right temperature. The water must be actively swirled as you gently lower the eggs into the water. It can easily turn into a frustrating event.
Using the oven changes that! It is a hands-off process that delivers poached eggs with a perfectly set white and runny yolk.
And this simple method for oven poached eggs works using one egg or twelve–perfect for entertaining.
Happy Cooking! xo Kristen
How To Poach Eggs in the Oven
Making poached eggs in the oven is exceptionally easy and you will find the full recipe in the recipe card, but this step-by-step walkthrough is provided to help ensure success.
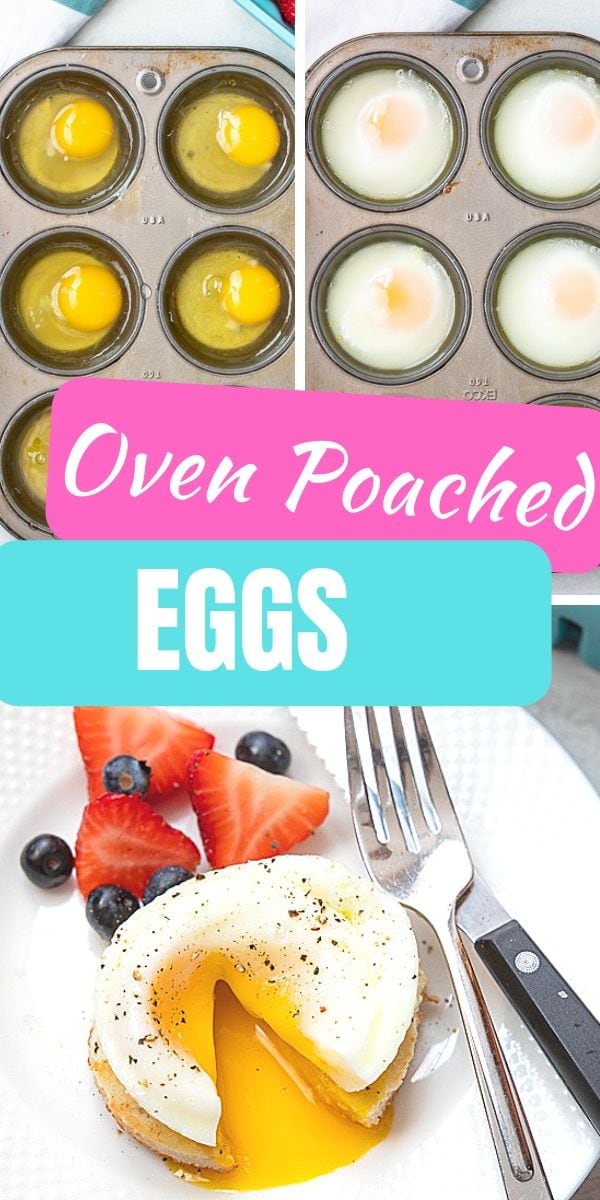
- Prepare Muffin Tin. Lightly grease a muffin tin or line with silicone muffin liners for easier clean-up. Add one tablespoon of water to each muffin cup, regardless of how many eggs you are poaching.
The water is necessary!
Adding water to each muffin cup helps create the steam needed to perfectly poach the eggs. But even if you’re not adding an egg to every cup, it’s still best to add water to prevent the pan from scorching.
- Add Eggs. Crack one egg into each muffin cup, using as many or few eggs as you like. You can opt to season with salt and pepper now or after poaching the eggs.

- Bake. Transfer the pan to the oven and bake for 11-13 minutes. Keep in mind that the time will vary based on how runny you like your yolk and MAY vary based on your oven.
- At 11 minutes, the yolk is very runny and egg whites are just about set.
- At 13 minutes, the yolk is runny, but beginning to set around the edges and the eggs whites are completely set.

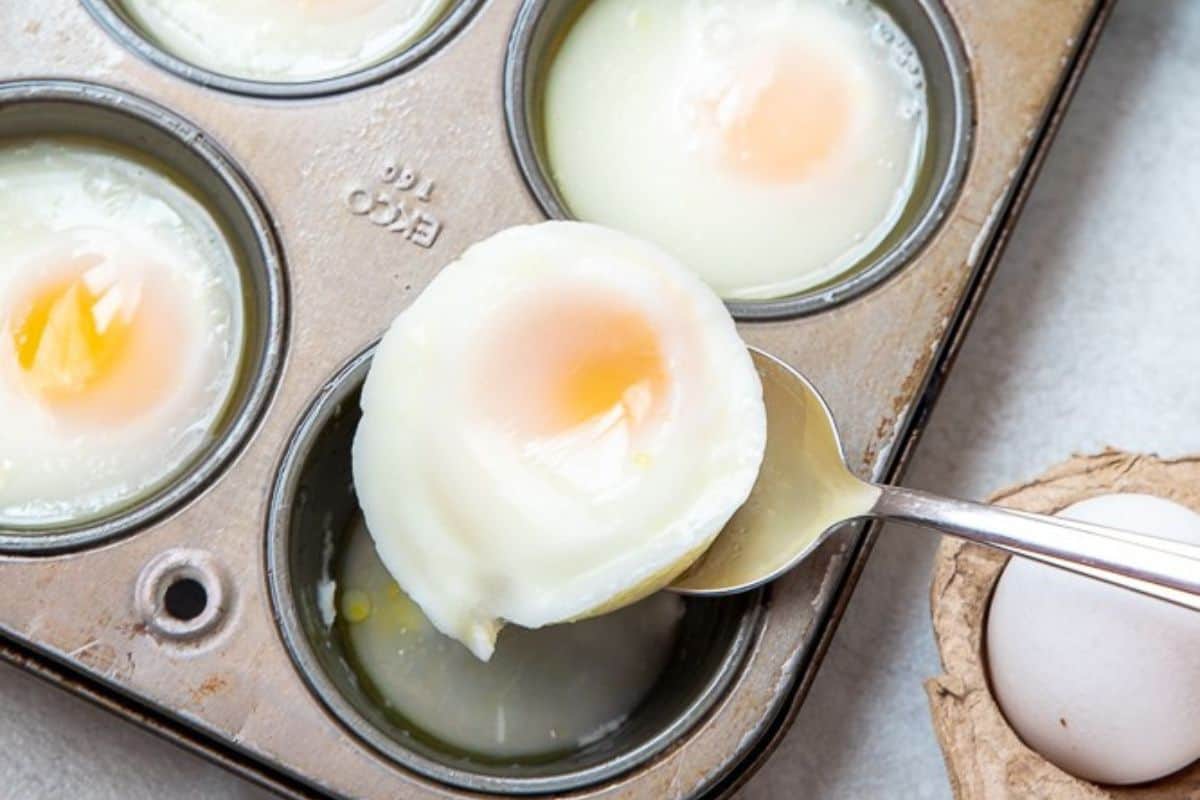
- Remove Poached Eggs From Pan. Using a spoon, gently scoop out the poached eggs at an angle, allowing the water to drain off the poached egg. Serve immediately.

Tips for Poaching Eggs in the Oven
- Every oven is different, therefore your oven may take a bit longer or less time for cooking eggs. Start with 11 minutes. Remove eggs from the oven, and gently spoon one egg out of the muffin tin to test see if the whites and yolks are set. If not, cook for 1-2 minutes longer. Make notes for the next time you poach eggs to get the timing correct for your oven.
- The water will rise as the eggs poach, making it appear that the eggs are not set. DO NOT be fooled by that! Gently spoon egg out of muffin tin to assess if eggs are poached correctly.
- These poached eggs have the same consistency as traditional poached eggs but do not LOOK identical. They are a bit flatter but taste just as good.
- Only prepare what you intend to eat. You can make 1 or 12 poached eggs using this method, but poached eggs are best served immediately, so it is best to only prepare what you need.
Serving Suggestions
From Eggs Benedict to a stand-alone low-carb breakfast to one of the suggestions below, poached eggs can be enjoyed in countless ways and a simple way to elevate and add richness to your meal.
- As a Ramen Topping: A poached egg adds the perfect rich, creamy finish to a warm bowl of ramen. The runny yolk adds depth and richness to the broth.
- The Ultimate Toast Topper: Whether it’s avocado toast, a toasted English muffin, a warm buttermilk biscuit, or even a sweet potato biscuit, you can’t go wrong adding a poached egg. The combination of textures and flavors is always a win.
- Over Asparagus: Top roasted or air-fried asparagus with a poached egg for a side dish or light entree that’s both elegant and satisfying. It is even amazing over an asparagus salad.
- Top Rice or Grain Bowls: A poached egg adds a luxurious touch to rice or grain bowls, creating a velvety sauce from the yolk. I personally love it over rice pilaf or Instant Pot risotto.
- Over Pasta: Add a poached egg to a bowl of pesto pasta, pasta and peas, or pasta dressed with olive oil and garlic for a rich, creamy finish, much like pasta carbonara.
- In a Breakfast Sandwich: Make an Egg McMuffin using a poached egg for a rich, decadent spin on a classic. Note you need to enjoy immediately versus freezing for later.
- On a Salad: Replace hard boiled egg with a poached egg on a warm spinach salad. Or add to a Caesar salad, lemon quinoa salad, or farro salad for a rich finish.
- Over Potatoes or Sauteed/Roasted Vegetables: A poached egg over Potatoes O’Brien, roasted red potatoes, sauteed spinach, or leftover roasted veggies is an easy way to turn odds and ends into a complete meal.
Did you make this recipe?
If you enjoyed this recipe, please leave a comment with a 5-star review at the bottom of the post. Thank you!
Prevent your screen from going dark
-
Preheat oven to 350℉ (175℃). For easier clean-up, grease each muffin cup. Then add 1 tablespoon water to each muffin cup–even if you are NOT making a full batch. Adding water to the empty muffins cups will help the pan not scorch in the oven.
-
Crack one egg into each muffin cup, for as many eggs as you would like to poach.
-
Bake for 11-13 minutes. 11 minutes, the yolk is very runny and egg whites are just about set; 13 minutes, the yolk is runny, but beginning to set around edges and egg whites are completely set.
-
Using a spoon, gently scoop out the poached eggs at an angle, allowing the water to drain off the poached egg.
-
Serve immediately.
Note on Water: The water will rise as the eggs poach, making it appear that the eggs are not set, so do not be fooled by that! Gently spoon egg out of muffin tin to assess if eggs are poached correctly.
Storage/Yield Note: It is best to only prepare as many eggs as needed, as leftovers do not store or reheat well.
Calories: 63kcalCarbohydrates: 1gProtein: 6gFat: 4gSaturated Fat: 1gCholesterol: 164mgSodium: 63mgPotassium: 61mgSugar: 1gVitamin A: 240IUCalcium: 25mgIron: 0.8mg
Nutrition information is automatically calculated, so should only be used as an approximation.
This post was originally published in 2019 and updated in 2025.


