Most oil painters have heard of the ‘fat over lean’ rule, although the reasons behind it may not always be fully understood. Working fat over lean – by layering successively fatter, more flexible layers of oil paint over leaner, less flexible ones – helps contribute to the longevity and stability of an oil painting. In this article I describe the consequences of not abiding by the technique, with demonstrations for applying the method correctly both with and without using medium. Articles in the Techniques Series define the meaning and context of art making processes and give practical tutorials on how to work with them.

Definition: Fat in oil paint describes a high oil content, and lean a low oil content. In terms of mediums, a ‘fat’ one has a higher ratio of oil to solvent, than a ‘lean’ medium, which has a higher ratio of solvent to oil. The rule ‘fat over lean’ states that lean layers of paint should be applied first to an oil painting, followed by successively fatter ones on top. This is done by increasing the oil content of each additional layer with medium, or by working with successively ‘fatter’ colours. This ensures that oil paintings will have longevity through proper curing, by maintaining the flexibility of the surface layers of paint, as those below begin to dry and become inflexible.
The Effect of Fat Over Lean
The result of working fat over lean in oil, is a stable painting with sheen and rich colour that is equipped to stand the test of time. When each additional layer of paint contains more oil than the one before, cracking and flaking are prevented since the top layer is always the most flexible. Oil paint dries through a process called oxidation, where the paint reacts with the air to harden over a long time. This is unlike water based paints, which dry very quickly through evaporation, leaving the pigment behind. As oxidation is happening, the oil paint expands and contracts on the surface. If a lean – faster drying and less flexible – layer is painted on top of a fat – slow drying and more flexible – layer, the fat paint below can continue to move and pull the brittle lean layer apart, creating cracks.

Another consideration is that fat layers tend to dry to a glossy finish, whereas lean ones appear drier and more matt. Properly adhering more colour to fat glossy paint is more challenging than lean dry paint – so this rule is also important for proper layering, and completing a painting with consistent sheen.
The History of Fat Over Lean
The term ‘fat over lean’ isn’t attributed to a single artist or movement, but is instead a general rule for oil painting that has been shared amongst artists for generations. Through observing the history of painting and years of study by artwork conservators, it’s widely understood to be the best practice for stable oil painting. The effect of fat over lean applied successfully can be seen in paintings that are hundreds of years old and have maintained a stable surface with sheen. Those with areas of ‘lean over fat’ are more likely to deteriorate as they age. Although painting lean over fat isn’t the only factor that can affect a painting’s stability – the ground, quality of the support, humidity, pigments, and exposure to light, can all contribute to how an artwork ages.

Corneille de Lyon
Oil on wood, 21.3 x 16.5 cm | 8.4 x 6.5 in
The Metropolitan Museum of Art
The artists of the Northern Renaissance refined oil painting techniques by developing their works in layers of glazes, to the degree that Jan van Eyck was once wrongly attributed with inventing the medium. By layering successive layers of oil paint in glazes, he created masterful oil paintings on wood that have retained their brilliance to this day – over 500 years later.

Jan Van Eyck
Oil on canvas transferred from wood, 56.5 x 19.7 cm | 22.2 x 7.8 in
The Metropolitan Museum of Art
The artists of the Renaissance were aware of the fat over lean principal – their works typically began with a lean underpainting, before being built up in fattier layers. We can see this in the underpaintings that remain incomplete from the period, such as Doge Alvise Mocenigo Presented to the Redeemer, by Tintoretto, where the lean sketch of figures never to be realised hover in the background, surrounded by the fully rendered figures in the palatial room painted with fatter layers.

Jacopo Tintoretto
Oil on canvas, 97.2 x 198.1 cm | 38.3 x 78 in
The Metropolitan Museum of Art
On the other hand, paintings with more irregular, experimental surfaces are difficult to conserve, where the oil content between layers varies more spontaneously. This can sometimes give oil paintings a mottled sheen, where some areas of the paint appear ‘drier’ because there is lean paint applied to the surface, next to shinier ‘fat’ paint. In the future, the dry lean areas are likely to crack because of the fat paint beneath them.
Demonstrations of Fat Over Lean
Painting Fat Over Lean Without Medium
Oil paints have individual oil contents which aren’t always detailed on their product descriptions or packaging. The brands I could find who have published them online are Williamsburg, Michael Harding, and Old Holland – though there may be more available, so it’s worth researching the brands that you have in your kit. Some oil colours are naturally fatter than others, because a higher oil content is required to make the specific pigment they contain into a stable paint. Since some oil paints are oilier than others straight from the tube, an intuitive technique for working fat over lean is to intentionally avoid applying a paint that you know is oily in the first layer of a painting, and save it for later.

For my first demonstration I painted example colours for a fat over lean oil painting without using any medium, by placing paints with successively higher oil content next to each other. I worked with paints from the Michael Harding oil range on a sheet from a Jackson’s Oil Paper Block. Their chart lists oil by volume on a scale from very low to high, so I’ve chosen paints from each step of the chart.

To apply my leanest layer on the left, I used Naples Yellow which has low oil content, followed by Olive Green in the middle which has average oil content, and then Permanent Brown on the right, that has high oil content. When layered on top of each other, these colours would form a stable fat over lean painting. I wouldn’t apply Naples Yellow over Permanent Brown without adding a fat medium, because this would mean painting lean over fat.
Painting Fat Over Lean with Medium

When you add medium to a paint, you change its oil content. Depending on your preferred combination of solvent and oil, different ratios will work better for your particular painting process, so it’s important to experiment to find out what suits you best. As long as the oil ratio increases with each layer, you don’t necessarily have to start a painting with a very lean layer. If you’d prefer to work thickly or with an oily medium to begin with, just ensure that the oil content is higher in any subsequent layers, and give the first layer enough time to dry down, to give it fat over lean stability.

As a general rule, it’s also important to avoid mixing too much medium into oil paints, since it can make them excessively thin, which results in dull colours, a brittle surface, and the potential of sinking into the ground. When painting fat over lean, it’s unnecessary to make an excessively lean first layer. Instead, the aim is to gradually increase the proportion of oil as the painting develops.

If you aren’t sure where to start, our articles Watching Paint Dry: Drying Oils and A Guide to Oil Painting Mediums are helpful for determining the qualities of different oils and mediums.
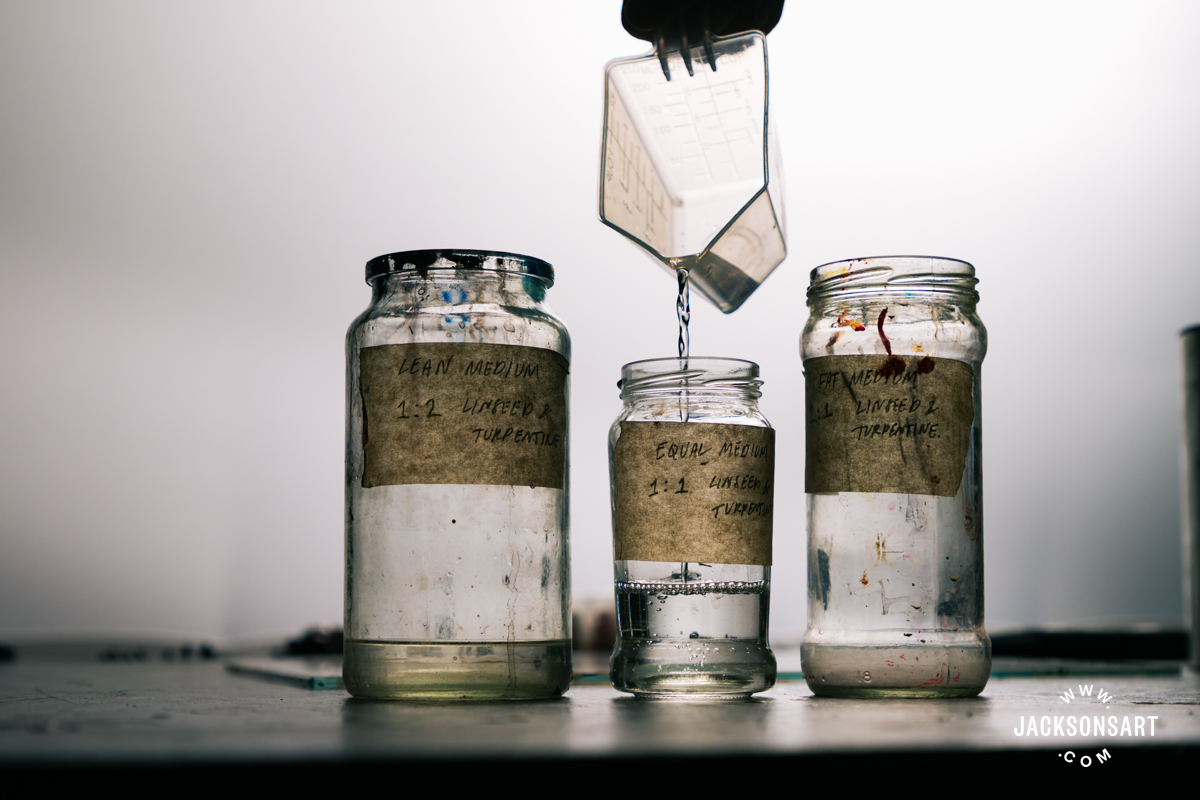
For the purpose of this example I worked with the classic combination of Refined Linseed Oil and Distilled Turpentine. If you’re a beginner, using the following three ratios, and preparing and labelling jars to store them in so they can be reused, will keep you on track.

To make the first layer of a painting, measure and mix a medium with a ratio of 1:2 – 1 part linseed oil, to 2 parts turpentine, using a small measuring jug. Then allow this layer to dry before moving to the next layer and medium. This first layer will be the quickest drying, with the lowest oil content.

For the second layer, mix a medium with a ratio of 1:1 – 1 part linseed oil, to 1 part turpentine. The amount of oil and solvent is equal in this layer. It will take longer than the first one to touch dry, since it contains more oil.

For the final layer, mix a medium with a ratio of 2:1 – 2 parts linseed oil, to 1 part turpentine. This is the oiliest layer, that will take the longest to dry, and have the greatest sheen. To add more layers to this painting in the future, make sure to maintain or increase this oil ratio, to keep the painting fat over lean.

To demonstrate the effect each medium has on the appearance and handling of oil paint, I swatched Michael Harding Forest Green oil paint with each one, on a sheet from a Jackson’s Oil Paper Block. As you can see, the gloss and body of each stroke increased, as the medium became progressively fatter.

When artists gain confidence in oil painting, they don’t necessarily measure out the oil to solvent ratio in medium jars. Many artists will intuitively add oil as they work, by noticing the changing sheen and flow of their paint when mixed with medium.

To bypass any worry about mixing mediums, Chelsea Classical Studio created pre-prepared mediums which are labelled Lean and Fat. By painting with both in order, you can ensure your oil paintings are layered with stability.
Further Reading
A Guide to Oil Painting Mediums
What is the Best Non-Toxic Oil Painting Solvent?
Experimenting with Jackson’s Oil Painting Mediums
Shop Art Supplies at jacksonsart.com