
OpenAI’s Agent SDK has taken things up a notch with the release of its Voice Agent feature, enabling you to create intelligent, real-time, speech-driven applications. Whether you’re building a language tutor, a virtual assistant, or a support bot, this new capability brings in a whole new level of interaction—natural, dynamic, and human-like. Let’s break it down and walk through what it is, how it works, and how you can build a Multilingual Voice Agent yourself.
What is a Voice Agent?
A Voice Agent is a system that listens to your voice, understands what you’re saying, thinks about a response, and then replies out loud. The magic is powered by a combination of speech-to-text, language models, and text-to-speech technologies.
The OpenAI Agent SDK makes this incredibly accessible through something called a VoicePipeline—a structured 3-step process:
- Speech-to-text (STT): Captures and converts your spoken words into text.
- Agentic logic: This is your code (or your agent), which figures out the appropriate response.
- Text-to-speech (TTS): Converts the agent’s text reply back into audio that is spoken aloud.
Choosing the Right Architecture
Depending on your use case, you’ll want to pick one of two core architectures supported by OpenAI:
1. Speech-to-Speech (Multimodal) Architecture
This is the real-time, all-audio approach using models like gpt-4o-realtime-preview. Instead of translating to text behind the scenes, the model processes and generates speech directly.
Why use this?
- Low-latency, real-time interaction
- Emotion and vocal tone understanding
- Smooth, natural conversational flow
Perfect for:
- Language Tutoring
- Live conversational agents
- Interactive storytelling or learning apps
| Strengths | Best For |
|---|---|
| Low latency | Interactive, unstructured dialogue |
| Multimodal understanding (voice, tone, pauses) | Real-time engagement |
| Emotion-aware replies | Customer support, virtual companions |
This approach makes conversations feel fluid and human but may need more attention in edge cases like logging or exact transcripts.
2. Chained Architecture
The chained method is more traditional: Speech gets turned into text, the LLM processes that text, and then the reply is turned back into speech. The recommended models here are:
- gpt-4o-transcribe (for STT)
- gpt-4o (for logic)
- gpt-4o-mini-tts (for TTS)
Why use this?
- Need transcripts for audit/logging
- Have structured workflows like customer service or lead qualification
- Want predictable, controllable behaviour
Perfect for:
- Support bots
- Sales agents
- Task-specific assistants
| Strengths | Best For |
|---|---|
| High control & transparency | Structured workflows |
| Reliable, text-based processing | Apps needing transcripts |
| Predictable outputs | Customer-facing scripted flows |
This is easier to debug and a great starting point if you’re new to voice agents.
How Does Voice Agent Work?
We set up a VoicePipeline with a custom workflow. This workflow runs an Agent, but it can also trigger special responses if you say a secret word.
Here’s what happens when you speak:
- Audio goes to the VoicePipeline as you talk.
- When you stop speaking, the pipeline kicks in.
- The pipeline then:
- Transcribes your speech to text.
- Sends the transcription to the workflow, which runs the Agent logic.
- Streams the Agent’s reply to a text-to-speech (TTS) model.
- Plays the generated audio back to you.
It’s real-time, interactive, and smart enough to react differently if you slip in a hidden phrase.
Configuring a Pipeline
When setting up a voice pipeline, there are a few key components you can customize:
- Workflow: This is the logic that runs every time new audio is transcribed. It defines how the agent processes and responds.
- STT and TTS Models: Choose which speech-to-text and text-to-speech models your pipeline will use.
- Config Settings: This is where you fine-tune how your pipeline behaves:
- Model Provider: A mapping system that links model names to actual model instances.
- Tracing Options: Control whether tracing is enabled, whether to upload audio files, assign workflow names, trace IDs, and more.
- Model-Specific Settings: Customize prompts, language preferences, and supported data types for both TTS and STT models.
Running a Voice Pipeline
To kick off a voice pipeline, you’ll use the run() method. It accepts audio input in one of two forms, depending on how you’re handling speech:
- AudioInput is ideal when you already have a full audio clip or transcript. It’s perfect for cases where you know when the speaker is done, like with pre-recorded audio or push-to-talk setups. No need for live activity detection here.
- StreamedAudioInput is designed for real-time, dynamic input. You feed in audio chunks as they’re captured, and the voice pipeline automatically figures out when to trigger the agent logic using something called activity detection. This is super handy when you’re dealing with open mics or hands-free interaction where it’s not obvious when the speaker finishes.
Understanding the Results
Once your pipeline is running, it returns a StreamedAudioResult, which lets you stream events in real time as the interaction unfolds. These events come in a few flavors:
- VoiceStreamEventAudio – Contains chunks of audio output (i.e., what the agent is saying).
- VoiceStreamEventLifecycle – Marks important lifecycle events, like the start or end of a conversation turn.
- VoiceStreamEventError – Signals that something went wrong.
Hands-on Voice Agent Using OpenAI Agent SDK
Here’s a cleaner, well-structured version of your guide for setting up a Hands-on Voice Agent using OpenAI Agent SDK, with detailed steps, grouping, and clarity improvements. It’s all still casual and practical, but more readable and actionable:
1. Set Up Your Project Directory
mkdir my_project
cd my_project
2. Create & Activate a Virtual Environment
Create the environment:
python -m venv .venvActivate it:
source .venv/bin/activate3. Install OpenAI Agent SDK
pip install openai-agent4. Set an OpenAI API key
export OPENAI_API_KEY=sk-...5. Clone the Example Repository
git clone https://github.com/openai/openai-agents-python.git6. Modify the Example Code for Hindi Agent & Audio Saving
Navigate to the example file:
cd openai-agents-python/examples/voice/staticNow, edit main.py:
You’ll do two key things:
- Add a Hindi agent
- Enable audio saving after playback
Replace the entire content in main.py. This is the final code here:
import asyncio
import random

from agents import Agent, function_tool
from agents.extensions.handoff_prompt import prompt_with_handoff_instructions
from agents.voice import (
    AudioInput,
    SingleAgentVoiceWorkflow,
    SingleAgentWorkflowCallbacks,
    VoicePipeline,
)

from .util import AudioPlayer, record_audio

@function_tool
def get_weather(city: str) -> str:
    print(f"[debug] get_weather called with city: {city}")
    choices = ["sunny", "cloudy", "rainy", "snowy"]
    return f"The weather in {city} is {random.choice(choices)}."

spanish_agent = Agent(
    name="Spanish",
    handoff_description="A spanish speaking agent.",
    instructions=prompt_with_handoff_instructions(
        "You're speaking to a human, so be polite and concise. Speak in Spanish.",
    ),
    model="gpt-4o-mini",
)

hindi_agent = Agent(
    name="Hindi",
    handoff_description="A hindi speaking agent.",
    instructions=prompt_with_handoff_instructions(
        "You're speaking to a human, so be polite and concise. Speak in Hindi.",
    ),
    model="gpt-4o-mini",
)

agent = Agent(
    name="Assistant",
    instructions=prompt_with_handoff_instructions(
        "You're speaking to a human, so be polite and concise. If the user speaks in Spanish, handoff to the spanish agent. If the user speaks in Hindi, handoff to the hindi agent.",
    ),
    model="gpt-4o-mini",
    handoffs=[spanish_agent, hindi_agent],
    tools=[get_weather],
)

class WorkflowCallbacks(SingleAgentWorkflowCallbacks):
    def on_run(self, workflow: SingleAgentVoiceWorkflow, transcription: str) -> None:
        print(f"[debug] on_run called with transcription: {transcription}")

async def main():
    pipeline = VoicePipeline(
        workflow=SingleAgentVoiceWorkflow(agent, callbacks=WorkflowCallbacks())
    )

    audio_input = AudioInput(buffer=record_audio())

    result = await pipeline.run(audio_input)

    # Create a list to store all audio chunks
    all_audio_chunks = []

    with AudioPlayer() as player:
        async for event in result.stream():
            if event.type == "voice_stream_event_audio":
                audio_data = event.data
                player.add_audio(audio_data)
                all_audio_chunks.append(audio_data)
                print("Received audio")
            elif event.type == "voice_stream_event_lifecycle":
                print(f"Received lifecycle event: {event.event}")

    # Save the combined audio to a file
    if all_audio_chunks:
        import wave
        import os
        import time

        os.makedirs("output", exist_ok=True)
        filename = f"output/response_{int(time.time())}.wav"

        with wave.open(filename, "wb") as wf:
            wf.setnchannels(1)
            wf.setsampwidth(2)
            wf.setframerate(16000)
            wf.writeframes(b''.join(all_audio_chunks))

        print(f"Audio saved to {filename}")

if __name__ == "__main__":
    asyncio.run(main())
6. Run the Voice Agent
Make sure you’re in the correct directory:
cd openai-agents-pythonThen, launch it:
python -m examples.voice.static.mainI asked the agent two things, one in English and one in Hindi:
- Voice Prompt: Hey, voice agent, what is a large language model?
- Voice Prompt: “मुझे दिल्ली के बारे में बताओ
Here’s the terminal:
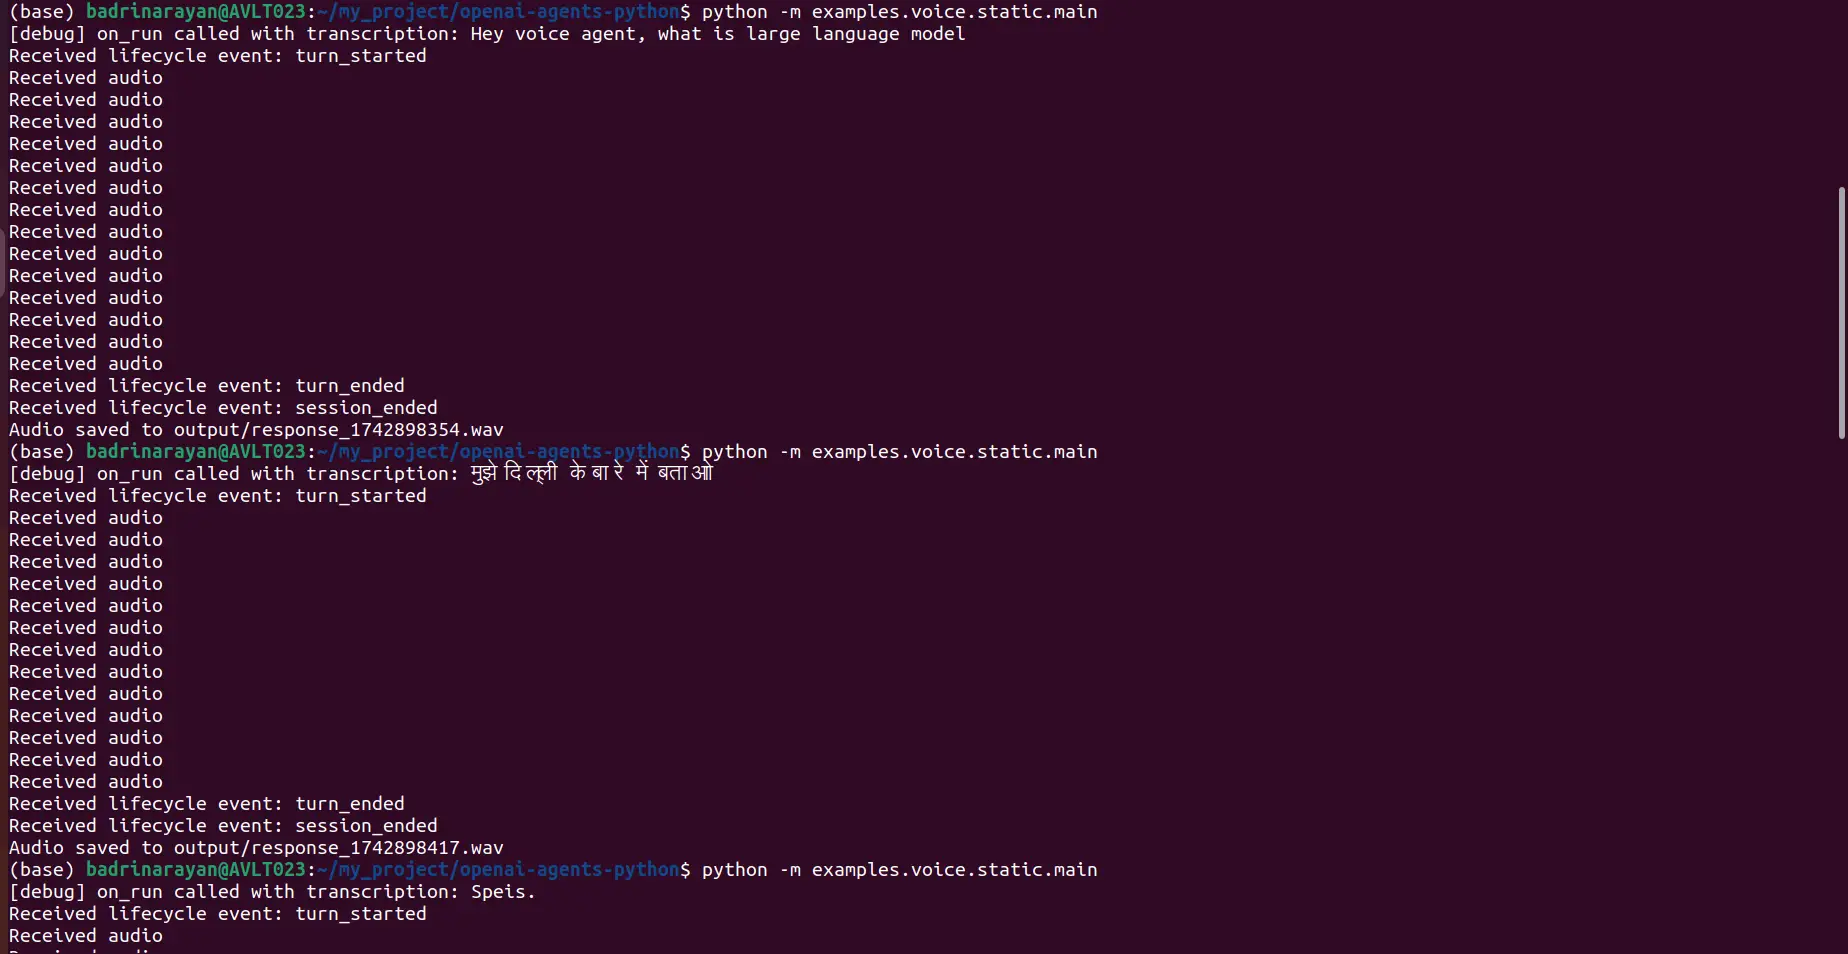
Output
English Response:
Hindi Response:
Additional Resources
Want to dig deeper? Check these out:
Also read: OpenAI’s Audio Models: How to Access, Features, Applications, and More
Conclusion
Building a voice agent with the OpenAI Agent SDK is way more accessible now—you don’t need to stitch together a ton of tools anymore. Just pick the right architecture, set up your VoicePipeline, and let the SDK do the heavy lifting.
If you’re going for high-quality conversational flow, go multimodal. If you want structure and control, go chained. Either way, this tech is powerful, and it’s only going to get better. If you are creating one, let me know in the comment section below.
Hi, I am Pankaj Singh Negi – Senior Content Editor | Passionate about storytelling and crafting compelling narratives that transform ideas into impactful content. I love reading about technology revolutionizing our lifestyle.
Login to continue reading and enjoy expert-curated content.


