


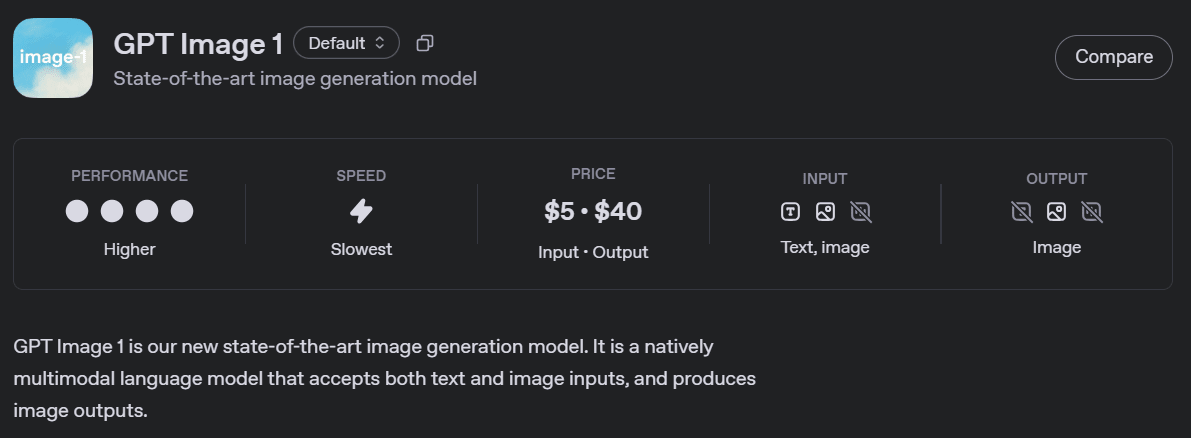
The last time OpenAI’s ChatGPT introduced an image generation model, it quickly went viral across the internet. People were captivated by the ability to create Ghibli-style portraits of themselves, turning personal memories into animated artwork. Now, ChatGPT is taking things a step further with a new natively multimodal model “gpt-image-1” which powers image generation directly within ChatGPT and is now available via API. In this article we will explore the key features of OpenAI’s gpt-image-1 model and how to use it for image generation and editing.
What is gpt-image-1?
gpt-image-1 is the latest and most advanced multimodal language model from OpenAI. It stands out for its ability to generate high-quality images while incorporating real-world knowledge into the visual content. While gpt-image-1 is recommended for its robust performance, the image API also supports other specialized models like DALL·E 2 and DALL·E 3.
The Image API offers three key endpoints, each designed for specific tasks:
- Generations: Create images from scratch using a text prompt.
- Edits: Modify existing images using a new prompt, either partially or entirely.
- Variations: Generate variations of an existing image (available with DALL·E 2 only).

Also Read: Imagen 3 vs DALL-E 3: Which is the Better Model for Images?
Key Features of gpt-image-1
gpt-image-1 offers several key features:
- High-fidelity images: Produces detailed and accurate visuals.
- Diverse visual styles: Supports a range of aesthetics, from photo realistic to abstract.
- Precise image editing: Enables targeted modifications to generated images.
- Rich world knowledge: Understands complex prompts with contextual accuracy.
- Consistent text rendering: Renders text within images reliably.
Availability
The OpenAI API enables users to generate and edit images from text prompts using the GPT Image or DALL·E models. At present, image generation is accessible exclusively through the Image API, though support for the Responses API is actively being developed.
To read more about gpt-image-1 click here.
gpt-image-1 Pricing
Before diving into how to use and deploy the model, it’s important to understand the pricing to ensure its effective and budget-conscious usage.
The gpt-image-1 model is priced per token, with different rates for text and image tokens:
- Text input tokens (prompts): $5 per 1M tokens
- Image input tokens (uploaded images): $10 per 1M tokens
- Image output tokens (generated images): $40 per 1M tokens
In practical terms, this roughly equates to:
- ~$0.02 for a low-quality square image
- ~$0.07 for a medium-quality square image
- ~$0.19 for a high-quality square image
For more detailed pricing by image quality and resolution, refer to the official pricing page here.
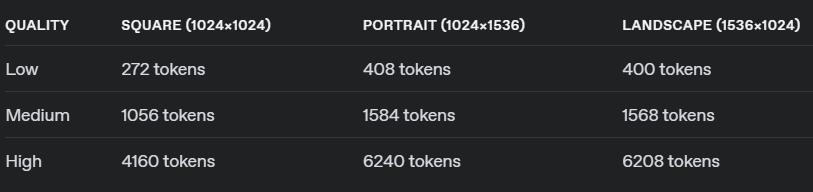
Note: This model generates images by first creating specialized image tokens. Therefore, both latency and overall cost depend on the number of tokens used. Larger image dimensions and higher quality settings require more tokens, increasing both time and cost.
How to Access gpt-image-1?
To generate the API key for gpt-image-1:
- Sign in to the OpenAI platform
- Go to Project > API Keys
- Verify your account
For this, first, visit: https://platform.openai.com/settings/organization/general. Then, click on “Verify Organization” to start the verification process. It is quire similar to any KYC verification, where depending on the country, you’ll be asked to upload a photo ID, and then verify it with a selfie.
You may follow this documentation provided by Open AI to better understand the verification process.
Also Read: How to Use DALL-E 3 API for Image Generation?
gpt-image-1: Hands-on Application
Finally it’s time to see how we can generate images using the gpt-image-1 API.
We will be using the image generation endpoint to create images based on text prompts. By default, the API returns a single image, but we can set the n parameter to generate multiple images at once in a single request.
Before running our main code, we need to first run the code for installation and setting up the environment.
!pip install openai
import os
os.environ['OPENAI_API_KEY'] = ""
Generating Images Using gpt-image-1
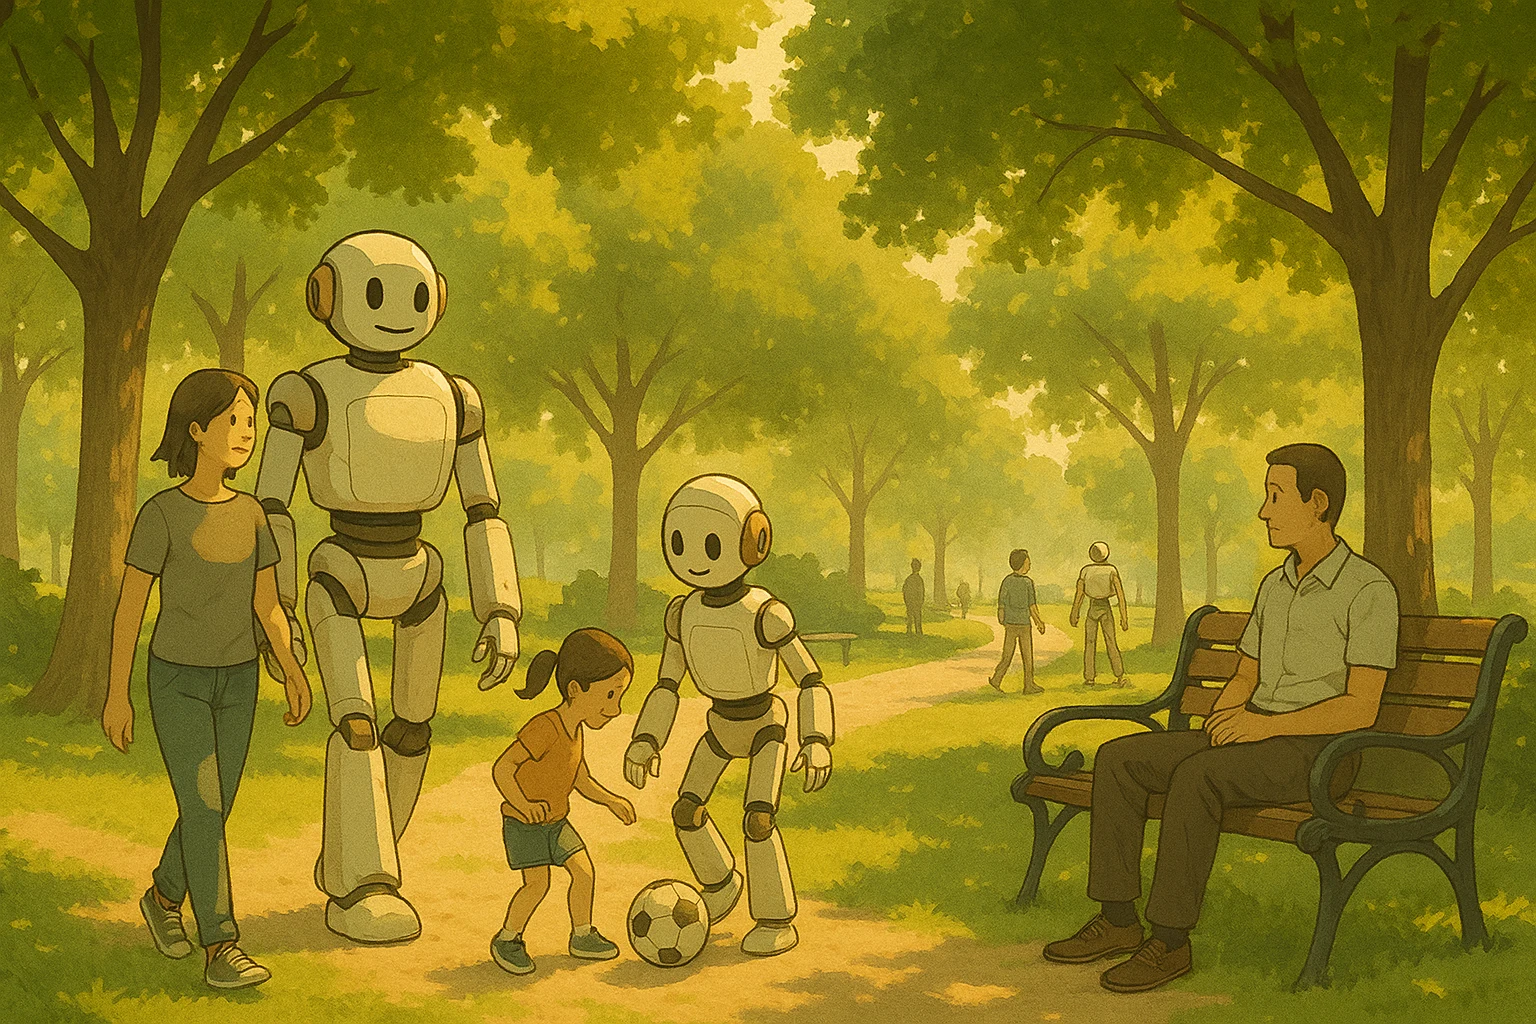
Now, let’s try generating an image using this new model.
Input Code:
from openai import OpenAI
import base64
client = OpenAI()


prompt = """
A serene, peaceful park scene where humans and friendly robots are enjoying the
day together - some are walking, others are playing games or sitting on benches
under trees. The atmosphere is warm and harmonious, with soft sunlight filtering
through the leaves.
"""


result = client.images.generate(
    model="gpt-image-1",
    prompt=prompt
)


image_base64 = result.data[0].b64_json
image_bytes = base64.b64decode(image_base64)


# Save the image to a file
with open("utter_bliss.png", "wb") as f:
    f.write(image_bytes)
Output:
Editing Images Using gpt-image-1
gpt-image-1 offers a number of image editing options. The image edits endpoint lets us:
- Edit existing images
- Generate new images using other images as a reference
- Edit parts of an image by uploading an image and mask indicating which areas should be replaced (a process known as inpainting)
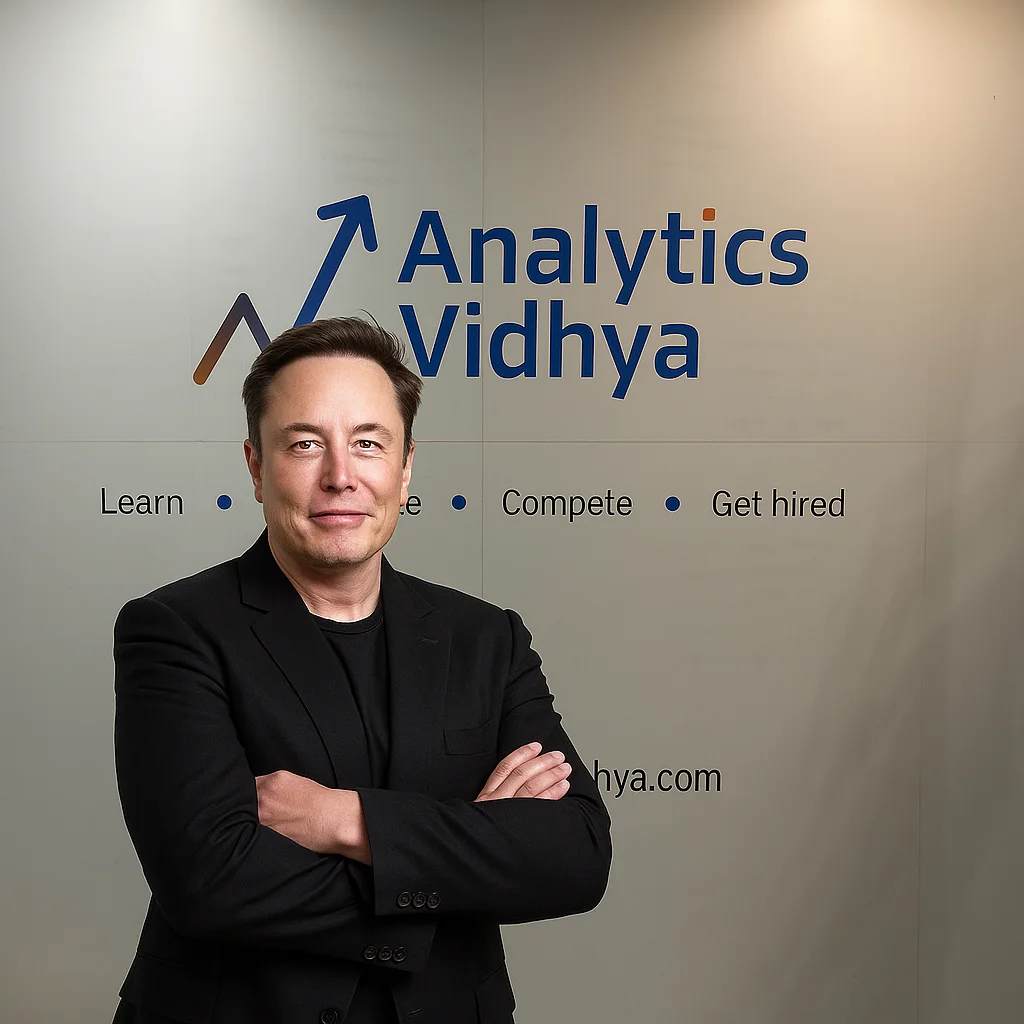
Editing an Image Using a Mask
Let’s try editing an image using a mask. We’ll upload an image and provide a mask to specify which parts of it should be edited.
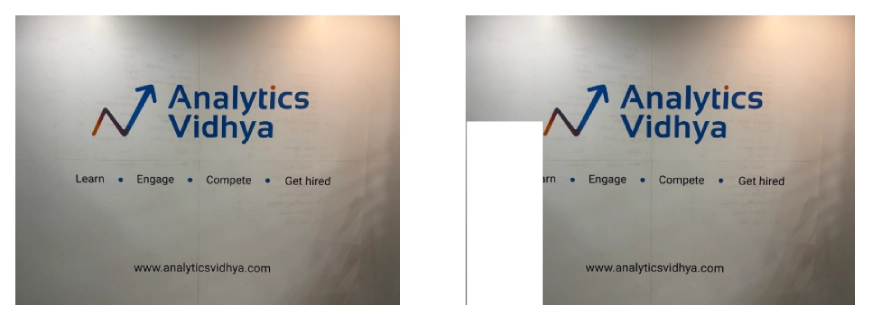
The transparent areas of the mask will be replaced based on the prompt, while the coloured areas will remain unchanged.
Now, let me ask the model to add Elon Musk to my uploaded image.
Input Code:
from openai import OpenAI
client = OpenAI()


result = client.images.edit(
    model="gpt-image-1",
    image=open("/content/analytics_vidhya_1024.png", "rb"),
    mask=open("/content/mask_alpha_1024.png", "rb"),
    prompt="Elon Musk standing in front of Company Logo"
)


image_base64 = result.data[0].b64_json
image_bytes = base64.b64decode(image_base64)


# Save the image to a file
with open("Elon_AV.png", "wb") as f:
    f.write(image_bytes)
Output:
Points to note while editing an image using gpt-image-1:
- The image you want to edit and the corresponding mask must be in the same format and dimensions, and each should be less than 25MB in size.
- The prompt you give can be used to describe the entire new image, not just the portion being edited.
- If you supply multiple input images, the mask will be applied only to the first image.
- The mask image must include an alpha channel. If you’re using an image editing tool to create the mask, ensure that it is saved with an alpha channel enabled.
- If you have a black-and-white image, you can use a program to add an alpha channel and convert it into a valid mask as provided below:
from PIL import Image
from io import BytesIO


# 1. Load your black & white mask as a grayscale image
mask = Image.open("/content/analytics_vidhya_masked.jpeg").convert("L")


# 2. Convert it to RGBA so it has space for an alpha channel
mask_rgba = mask.convert("RGBA")


# 3. Then use the mask itself to fill that alpha channel
mask_rgba.putalpha(mask)


# 4. Convert the mask into bytes
buf = BytesIO()
mask_rgba.save(buf, format="PNG")
mask_bytes = buf.getvalue()


# 5. Save the resulting file
img_path_mask_alpha = "mask_alpha.png"
with open(img_path_mask_alpha, "wb") as f:
    f.write(mask_bytes)
Best Practices for Using the Model
Here are some tips and best practices to follow while using gpt-image-1 for generating or editing images.
- You can customize how your image looks by setting options like size, quality, file format, compression level, and whether the background is transparent or not. These settings help you control the final output to match your specific needs.
- For faster results, go with square images (1024×1024) and standard quality. You can also choose portrait (1536×1024) or landscape (1024×1536) formats. Quality can be set to low, medium, or high, and both size and quality default to auto if not specified.
- Note that the Image API returns the base64-encoded image data. The default format is png, but we can also request it in jpeg or webp.
- If you are using jpeg or webp, then you can also specify the output_compression parameter to control the compression level (0-100%). For example, output_compression=50 will compress the image by 50%.
Applications of gpt-image-1
From creative designing and e-commerce to education, enterprise software, and gaming, gpt-image-1 has a wide range of applications.
- Gaming: content creation, sprite masks, dynamic backgrounds, character generation, concept art
- Creative Tools: artwork generation, style transfer, design prototyping, visual storytelling
- Education: visual aids, historical recreations, interactive learning content, concept visualization
- Enterprise Software: slide visuals, report illustrations, data-to-image generation, branding assets
- Advertising & Marketing: campaign visuals, social media graphics, localized content creation
- Healthcare: medical illustration, patient scan visuals, synthetic image data for model training
- Architecture & Real Estate: interior mockups, exterior renderings, layout previews, renovation ideas
- Entertainment & Media: scene concepts, promotional material, digital doubles
Limitations of gpt-image-1
The GPT-4o Image model is a powerful and versatile tool for image generation, but there are still a few limitations to keep in mind:
- Latency: More complex prompts can take up to 2 minutes to process.
- Text Rendering: While significantly better than the DALL·E models, the model may still face challenges with precise text alignment and clarity.
- Consistency: Although it can generate visually consistent images, the model may occasionally struggle to maintain uniformity for recurring characters or brand elements across multiple images.
- Composition Control: Even with improved instruction-following capabilities, the model may not always place elements accurately in structured or layout-sensitive designs.
Model Comparison
Here’s how OpenAI’s gpt-image-1 compares with the popular DALL·E models:
| Model | Endpoints | Features |
| DALL·E 2 | Generations, Edits, Variations | Lower cost, supports concurrent requests, includes inpainting capability |
| DALL·E 3 | Generations only | Higher resolution and better image quality than DALL·E 2 |
| gpt-image-1 | Generations, Edits (Responses API coming soon) | Excellent instruction-following, detailed edits, real-world awareness |
Conclusion
OpenAI’s gpt-image-1 showcases powerful image generation capabilities with support for creation, editing, and variations all coming from simple textual prompts. While the generation of images may take some time, the quality and control it offers make it highly practical and rewarding overall.
Image generation models like this facilitate faster content creation, personalization, and faster prototyping. With built-in customization options for size, quality, format, etc. and even inpainting capabilities, gpt-image-1 offers developers complete and transparent control over the desired output.
While some might worry that this technology could replace human creativity, it’s important to note that such tools aim to enhance human creativity and be helpful tools for artists. While we should definitely respect originality, we must also embrace the convenience that this technology brings. We must find the right balance where such tools help us innovate without taking away the value of authentic, human-made work.
GenAI Intern @ Analytics Vidhya | Final Year @ VIT Chennai
Passionate about AI and machine learning, I’m eager to dive into roles as an AI/ML Engineer or Data Scientist where I can make a real impact. With a knack for quick learning and a love for teamwork, I’m excited to bring innovative solutions and cutting-edge advancements to the table. My curiosity drives me to explore AI across various fields and take the initiative to delve into data engineering, ensuring I stay ahead and deliver impactful projects.
Login to continue reading and enjoy expert-curated content.


