Shirt Pocket’s SuperDuper has been one of the Mac world’s go-to backup apps for decades, winning Macworld’s Eddy Awards in 2005 and 2006. Throughout that time, developer Bruce Lacey maintained a laser focus on simplicity, speed, and reliability, while Shirt Pocket founder Dave Nanian contributed the interface. That interface hasn’t changed in I don’t know how long, and as a result, it looks a little dated.

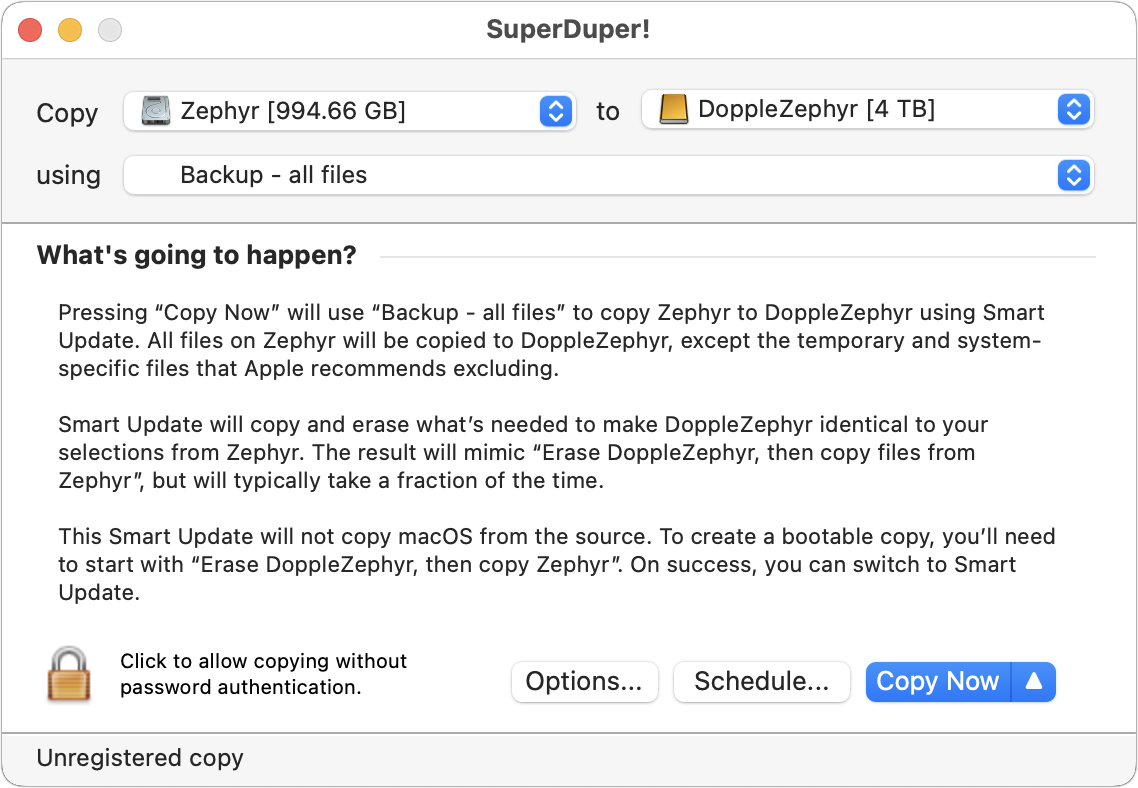
Bruce Lacey is now enjoying a well-earned retirement, so Dave Nanian has taken over all development on SuperDuper, using the transition as an excuse to rethink SuperDuper’s interface from the ground up and create the interface he has been dreaming about for years. There are a few other features that I’ll describe shortly, but I’m intrigued by the new interface. The screenshot below shows the equivalent of the old setup above.

SuperDuper’s New Interface
But let’s start at the beginning. In interface design, we often talk about the tension between form and function: is it attractive, and does making it more so make it easier or harder to use? SuperDuper 4 is a good-looking app, but what makes it easier to use is its integration of context-specific documentation into the interface. It’s constantly telling you what it’s going to do or what it has done, in plain English. (It’s English-only; Nanian doesn’t want a localized interface to imply he could provide support in other languages.)
The cumulative effect of all of SuperDuper’s text is that the user constantly feels grounded—there are no surprises because everything has been explained up front. It’s highly effective, at least for people who aren’t intimidated by text. Let’s walk through it so you can see what I mean.
To create a “copy job,” as SuperDuper calls it, you select the source in the sidebar. SuperDuper displays an introductory tile explaining what you can do with it. What may not be obvious is that the buttons in the text are live—clicking Add Copy Job in the middle of the text is equivalent to clicking the same button at the top of the window, and clicking one of the example Add This Copy Job buttons gives you a configured copy job. Clever.

If you click Add This Copy Job for the Nightly Backup example, SuperDuper replaces the intro tile with a copy job tile that talks you through the rest of the configuration. It tells you to click “your selected destination” below and even displays animated stars to encourage you to click. (It’s the only place you’ll see the stars; they’re delightful once, but would get old quickly if they were scattered throughout the interface.) When you click, a popover lets you pick a destination drive.

And… that could be it, because you started from the example that specified using the “Backup – all files” copy rule and the Smart Update comparison. It’s set to run at 11 PM every weeknight, and not do anything on success.

Where the interface really shines is when it comes time to change those defaults, or set them from scratch if you started by clicking Add Copy Job instead of working from the example. In each case, you click the bold, blue, underlined text and choose from a popover or dialog. There are five more options:
- What to Copy: Here’s where you choose between backing up all files, backing up user files, and restoring. If you click Add Rule, SuperDuper presents a sophisticated interface for building complex rules about what gets copied where.

- How Files Are Compared: In this popover, you can choose among Smart Update (which syncs the destination with the source), Copy Newer, Copy Different, and “Erase, then copy” (which is intentionally capitalized differently—I checked). The middle two don’t remove anything from the destination; the first and last make the destination identical to the source.

- Bootability: If you use “Backup – all files” with “Erase, then copy,” you can set your backup to be bootable. I strongly recommend testing the bootability before you might need it, since booting Apple silicon Macs from external drives can be fraught, but there’s no harm other than slower backups in making a backup bootable—it’s at least as useful as a non-bootable duplicate. For opinions on the issue, see “It’s Time to Move On from Bootable Backups” (23 December 2024).

- Schedule: Adding a schedule relies on a dialog rather than a popover because of the number of controls and to leave room for future expansion. Its controls are self-explanatory, but in keeping with the interface narration, it translates the selections into a plain-text summary at the bottom.

- On Completion: The final popover in the sentence lets you specify what happens when SuperDuper finishes: Do nothing, Sleep, Restart, or Shut Down. You can also eject the destination, send a notification, or trigger a shortcut.

Once you’re done configuring, you can click Preview to see what will happen or Copy Now to execute immediately, or you can just wait for the next scheduled run.

Clicking Preview opens an interactive report that shows your drive hierarchy and what will be added, updated, removed, or kept at each level.

When you’re satisfied that the right things are going to happen, click Copy Now. After a manual run, SuperDuper replaces its “what will happen” tile with a “what happened” tile, summarizing the details in a narrative interface. The only brief moment of confusion I had in SuperDuper 4 was before I realized I had to click OK to dismiss the post-run report tile.

When you dismiss the post-run report, SuperDuper reverts to its default “ready to run” tile, but in another clever bit of interface, it integrates logging into the display. In the Recent section, green checkmark icons indicate successful runs (failures show red alert icons), and clicking the hot-linked date and time provides more details.

In fact, there are two levels of detail: a quick summary and (when you click View Details), the full run log if you want to see precisely what occurred.

I’m extremely taken with SuperDuper’s new interface because I’m a word person who wants to know precisely what’s going to happen and what did happen. Its explanations are clear and concise, and nearly everything the user can do is visible—you don’t have to search through menus and settings windows to figure out what it can do. This interface approach wouldn’t work for many types of apps, but for anything that’s setting up batch jobs, it’s worth consideration.
New Features: Folders, Shortcuts, and Apple Intelligence
Along with the new interface, Dave Nanian added a few welcome new features. Foremost among them is support for folder-level sources and destinations, which is still evolving. By default, SuperDuper shows only volumes (including mounted disk images) in its sidebar, but if you drag a folder in, it becomes available as a source. Then, when you’re configuring a copy job, you can drag another folder into the tile to add it as the destination. On the other side of the equation, the only way to remove a folder from the sidebar is to delete all its jobs, after which SuperDuper cleans it up automatically.

As much as this approach is easy once you know it, it’s not very discoverable—a + button at the bottom of the sidebar and an Other option in the destination popover would make the feature more obvious. Or perhaps there’s a more narrative way to highlight the feature in the copy job tile.
Also new is support for Shortcuts. I’ve never warmed to Shortcuts, but you can get a sense of the possibilities from the available commands.

Finally, SuperDuper now supports Apple Intelligence for summarizing a run’s results (and it may localize in your preferred language, if that’s not English). I didn’t see much evidence of Apple Intelligence working in my testing—SuperDuper regularly told me, “Apple Intelligence isn’t available on this Mac, or didn’t return a result.” It is available, but perhaps the fact that I’m testing on a Mac running macOS 15.7.7 Sequoia is related. Like everything else associated with Apple Intelligence so far, I didn’t miss it.
Upgrading from a Previous Version
If you’re upgrading from SuperDuper 3.x, SuperDuper 4 will automatically import any copy scripts and rules you had created. However, it won’t import copy jobs or schedules from the previous version because it’s essential that the right thing happens, and it’s only a couple of clicks for the user to reconfigure them while learning the new interface.
SuperDuper 4 costs $43.95—the same as the original price plus inflation. It’s a per-user license, so you can use it on your iMac and MacBook Air, but family members should get their own copies. In office settings, it’s per-seat. It’s a one-time purchase—no subscriptions.
Anyone who bought SuperDuper 3 in the last year is eligible for a free upgrade. If you bought it more than a year ago, you get up to a 30% discount on an upgrade, depending on how long ago you purchased. Those who buy SuperDuper 3, now renamed SuperDuper Classic, after SuperDuper 4 is released can get a 30% discount on a subsequent upgrade. The new version requires macOS 14 Sonoma or later; SuperDuper Classic remains available for those still running macOS 13 Ventura. Shirt Pocket continues to distribute versions of SuperDuper that work all the way back to Mac OS X 10.2 Jaguar.
Everyone can get a feel for what it’s like to use SuperDuper 4 because, as with previous versions, unregistered copies merely have reduced functionality. They don’t expire and even come with support.