Creating your easy sourdough starter shouldn’t feel like rocket science, yet many home bakers give up before they even begin. The conflicting advice, mysterious terminology, and fear of failure can transform what should be simple into something overwhelming. Wondering why your previous attempts failed? Tired of wasting ingredients on starters that never rise? Fear not. Whether you’re a first-timer or returning after past disappointments, you’ll discover the straightforward approach that professional bakers don’t want you to know about.

Table of Contents
What is a Sourdough Starter?
A sourdough starter is simply flour and water that captures wild yeast from the air around us. This mixture becomes alive as the wild yeast feeds on the flour’s natural sugars, producing carbon dioxide bubbles and acids that create sourdough’s distinctive tang.
Through fermentation, this simple combination transforms into a natural leavening agent that makes bread rise without commercial yeast. The process is straightforward—mix equal parts flour and water, then feed it daily by discarding some and adding fresh ingredients. Within a week or two, your bubbly starter will be ready to help you create delicious homemade sourdough bread.
Why You Should Make One
Not only does easy sourdough starter free you from relying on commercial yeast, but it also creates bread with complex flavors that store-bought loaves simply can’t match.
The natural fermentation process does something magical to bread. As wild yeasts and beneficial bacteria get to work, they break down gluten proteins and produce probiotics that support gut health. Many people with mild gluten sensitivities find sourdough easier to digest than regular bread, and its lower glycemic index makes it a smarter carb choice.
Your starter becomes a living kitchen companion that responds to your care and environment. On warm days, it bubbles eagerly; in cooler weather, it takes its time. This relationship creates a satisfying rhythm in your kitchen.
The self-sufficiency of maintaining a starter is deeply rewarding. With just flour and water, you’re tapping into an ancient tradition that connects you to generations of bakers. Plus, there’s nothing quite like the pride of pulling a perfectly crusty, tangy loaf from the oven knowing you created it entirely from scratch – right down to the leavening agent.
What You Need – Only Two Ingredients!
Making a sourdough starter is refreshingly simple – you only need flour and water. This ancient bread-making method requires no special equipment or additives, just two pantry staples.
Whole wheat flour works exceptionally well for starting your culture because it contains more microorganisms and nutrients that wild yeast thrives on. Many bakers begin with whole wheat for the first few days, then switch to unbleached all-purpose flour for ongoing maintenance. While organic flour isn’t essential, it often harbors more wild yeasts and beneficial bacteria due to the absence of pesticides and chemical treatments.
For water, avoid heavily chlorinated tap water as it can inhibit fermentation. Either let tap water sit overnight to allow chlorine to evaporate or use filtered water instead. The hydration ratio – the proportion of water to flour – typically remains at 100% (equal weights), creating a consistency between pancake batter and thick yogurt.
Despite the simplicity of ingredients, you’re creating a complex living ecosystem in your jar. The beauty of sourdough is that while you provide just two ingredients, nature contributes the invisible elements that transform flour and water into a bubbling, active starter capable of creating incredible bread.
Related: How to Keep Sourdough Starter Warm
Step-by-Step: How to Make Your Starter
Day 1: Creating Your Starter Base
Mix 50 grams of whole wheat flour with 50 grams of room-temperature water in a clean glass jar. Stir vigorously until no dry flour remains—you’re looking for a thick, pancake-like batter. The stirring isn’t just for mixing; you’re incorporating oxygen that helps kickstart fermentation. Cover with a breathable lid (a coffee filter secured with a rubber band works perfectly) and place in a warm spot in your kitchen—around 70-75°F is ideal.
Daily Feeding Routine
After that first 24 hours, you’ll begin the feeding schedule that turns this simple mixture into a living powerhouse. Discard all but 50 grams of your starter (yes, throwing it away feels wrong, but it’s necessary until it’s mature). Add 50 grams of fresh flour and 50 grams of water to what remains. Stir vigorously again, and return to its warm spot.
Repeat this feeding process at roughly the same time each day. By day three or four, you might notice small bubbles forming—that’s the wild yeast coming to life! Don’t worry if your starter smells a bit funky at this stage; it might give off aromas ranging from acetone to overripe fruit. This is completely normal as the bacterial balance establishes itself.
Signs of Success
Your starter will be ready for baking when it reliably doubles in size within 4-8 hours after feeding. This usually happens between days 7-14, depending on your kitchen environment. You’ll know it’s active when it’s bubbly throughout (not just on the surface), has a pleasantly sour aroma, and follows a predictable rise and fall pattern after feeding.
If your starter isn’t showing much activity after five days, don’t give up! Try moving it to a warmer location or adding a tiny pinch of rye flour to your next feeding—rye is particularly rich in microorganisms that can jumpstart fermentation.
Troubleshooting Common Issues
If you see a layer of liquid forming on top (bakers call this “hooch”), it’s just a sign your starter is hungry. Simply stir it back in before feeding. No bubbles after several days? Your kitchen might be too cool, or your water might contain too much chlorine. Try using bottled water and finding a warmer spot.
Remember, creating a sourdough starter is less like following a rigid recipe and more like developing a relationship. Your starter responds to your care, your environment, and even the seasons. It’s this beautiful variability that makes each baker’s sourdough unique—your very own signature loaf that can’t be replicated by anyone else.
Related: 4 Types Of Sourdough Starter
How to Feed It – No Stress Approach
Keeping your sourdough starter alive is simple once you understand the basics. At room temperature, feed your starter once a day: discard all but 50 grams, then add 50g each of flour and water, and stir vigorously. That’s it! Don’t toss that discard – it’s perfect for pancakes, waffles, and crackers.
For busy bakers, the refrigerator is a game-changer. Cold temperatures slow fermentation dramatically, reducing feeding to just once a week. After feeding, let it sit at room temperature for an hour before refrigerating with a loose lid.
Notice a dark liquid on top? That’s “hooch” – just alcohol from fermentation. It means your starter is hungry, not ruined. Pour it off or stir it back in before feeding.
Even neglected starters can bounce back. Remove from the fridge, discard most, and resume daily feedings. In 2-3 days, you’ll see signs of life returning.
The best maintenance schedule is the one that fits your lifestyle. Your starter is remarkably resilient and will adapt to your baking rhythm, whether you’re a daily baker or weekend warrior.
When Is It Ready to Use?
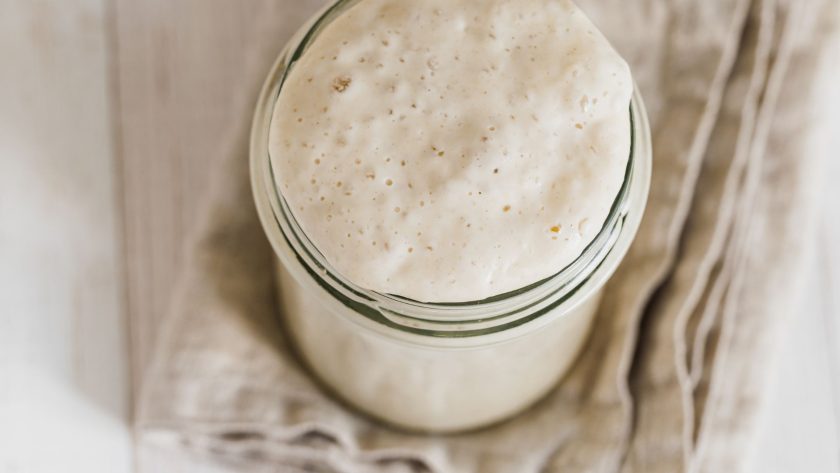
Your easy sourdough starter is ready for baking when it shows clear signs of strong fermentation activity. Look for consistent bubbling throughout the mixture – not just on the surface – which indicates the wild yeasts are actively producing carbon dioxide.
A mature starter reliably doubles in size within 4-6 hours after feeding, then gradually deflates as the yeasts consume available food. This predictable rise and fall cycle becomes your starter’s signature rhythm when it’s ready to use.
Try the float test to check its readiness: drop a teaspoon of recently-fed, bubbly starter into a glass of room-temperature water. If it floats, you’ve got enough gas bubbles and gluten development to leaven bread!
Your nose provides clues too. A ready starter should smell pleasantly tangy with yogurt-like or fruity notes – not like vinegar or nail polish remover.
When these signs align – consistent bubbling, predictable rising, successful float tests, and that perfect aroma – your starter is typically ready between days 7-14. Kitchen temperature and flour type may influence this timeline.
Common Problems and Easy Fixes
When Your Starter Refuses to Bubble
No bubbles in your starter? Check your kitchen temperature first—wild yeast thrives between 70-75°F. Place your jar in a warmer spot or add a tablespoon of rye or whole wheat flour to your next feeding. These nutrient-rich flours contain microorganisms that accelerate fermentation. Some starters naturally take up to two weeks to become active, especially in cooler environments.
Dealing with That Funky Smell
Acetone or alcohol odors indicate your starter is hungry—increase feeding frequency for several days. For overly sour, vinegary aromas, use cooler water and keep your starter in a slightly cooler location to balance the acid-producing bacteria.
Spotting and Handling Mold
Healthy starters resist contamination through natural acidity. If you see colored fuzzy patches (pink, orange, blue, green), transfer the unaffected starter to a clean container if contamination is minimal. For widespread mold, start fresh. Prevent issues by transferring to clean jars weekly.
Reviving a Neglected Starter
For forgotten starters with thick hooch layers, discard most but save a tablespoon from the bottom. Feed twice daily with fresh flour and water. Bubbles typically return within 3-4 days as beneficial cultures reestablish dominance. Most starters recover surprisingly well with consistent care.
Using Discard – No Waste!
That pile of sourdough discard you’ve been tossing? It’s liquid gold waiting to happen! Each time you feed your starter, you remove perfectly good fermented flour and water that’s already developing flavor.
There is the risk of turning countless cups of discard into pancakes that make store-bought mixes taste like cardboard. The natural tang creates remarkable depth. Mix it with minimal ingredients and watch breakfast guests wonder about your secret ingredient.
Discard isn’t just for mornings. Those fermentation byproducts create incredible flavors in crackers (roll thin, add olive oil and salt), waffles (overnight batter develops a malt-like quality), pizza crust, and even chocolate cake where the acidity tenderizes the crumb beautifully.
Not ready for a full bread loaf? Discard recipes are perfect training wheels. The beauty is that it doesn’t need peak activity—even a sleepy starter from the fridge works perfectly. Keep a container and add to it throughout the week for weekend baking projects.
Your Sourdough Success Starts Here!
Creating your sourdough starter is easy with just flour and water. No commercial yeast needed—just two simple ingredients that develop amazing flavors and potential health benefits. Even if you miss a feeding, your starter will bounce back with minimal effort. Keep it at room temperature for daily baking or refrigerate it for weekly use—it works with your schedule. With these simple techniques, you’ll soon be baking incredible homemade bread that you made completely from scratch.
FAQs – Easy Sourdough Starter Recipe
What is the secret to a good sourdough starter?
The secret to a good sourdough starter is consistency. Feed it with equal parts flour and water at regular intervals, keep it at a warm temperature (70-75°F), and be patient. Vigorous stirring to incorporate oxygen, using filtered water to avoid chlorine, and occasionally adding a bit of whole wheat or rye flour can help jumpstart activity when needed.
What is the shortest time for sourdough starter?
While a fully mature sourdough starter typically takes 7-14 days to develop, you can sometimes get a usable starter in as little as 5 days if conditions are optimal. The key factors are warm temperature, quality flour (especially whole wheat or rye to start), and consistent twice-daily feedings. Watch for reliable doubling in size after feeding as you sign it’s ready.
Can you make a sourdough starter with just all-purpose flour?
Yes, you can make a sourdough starter with just all-purpose flour, though it may take longer to become active compared to whole wheat or rye flour. All-purpose flour has fewer wild yeasts and nutrients, but will still capture enough wild microorganisms to create a healthy starter. For best results, use unbleached all-purpose flour and be patient with the development process.