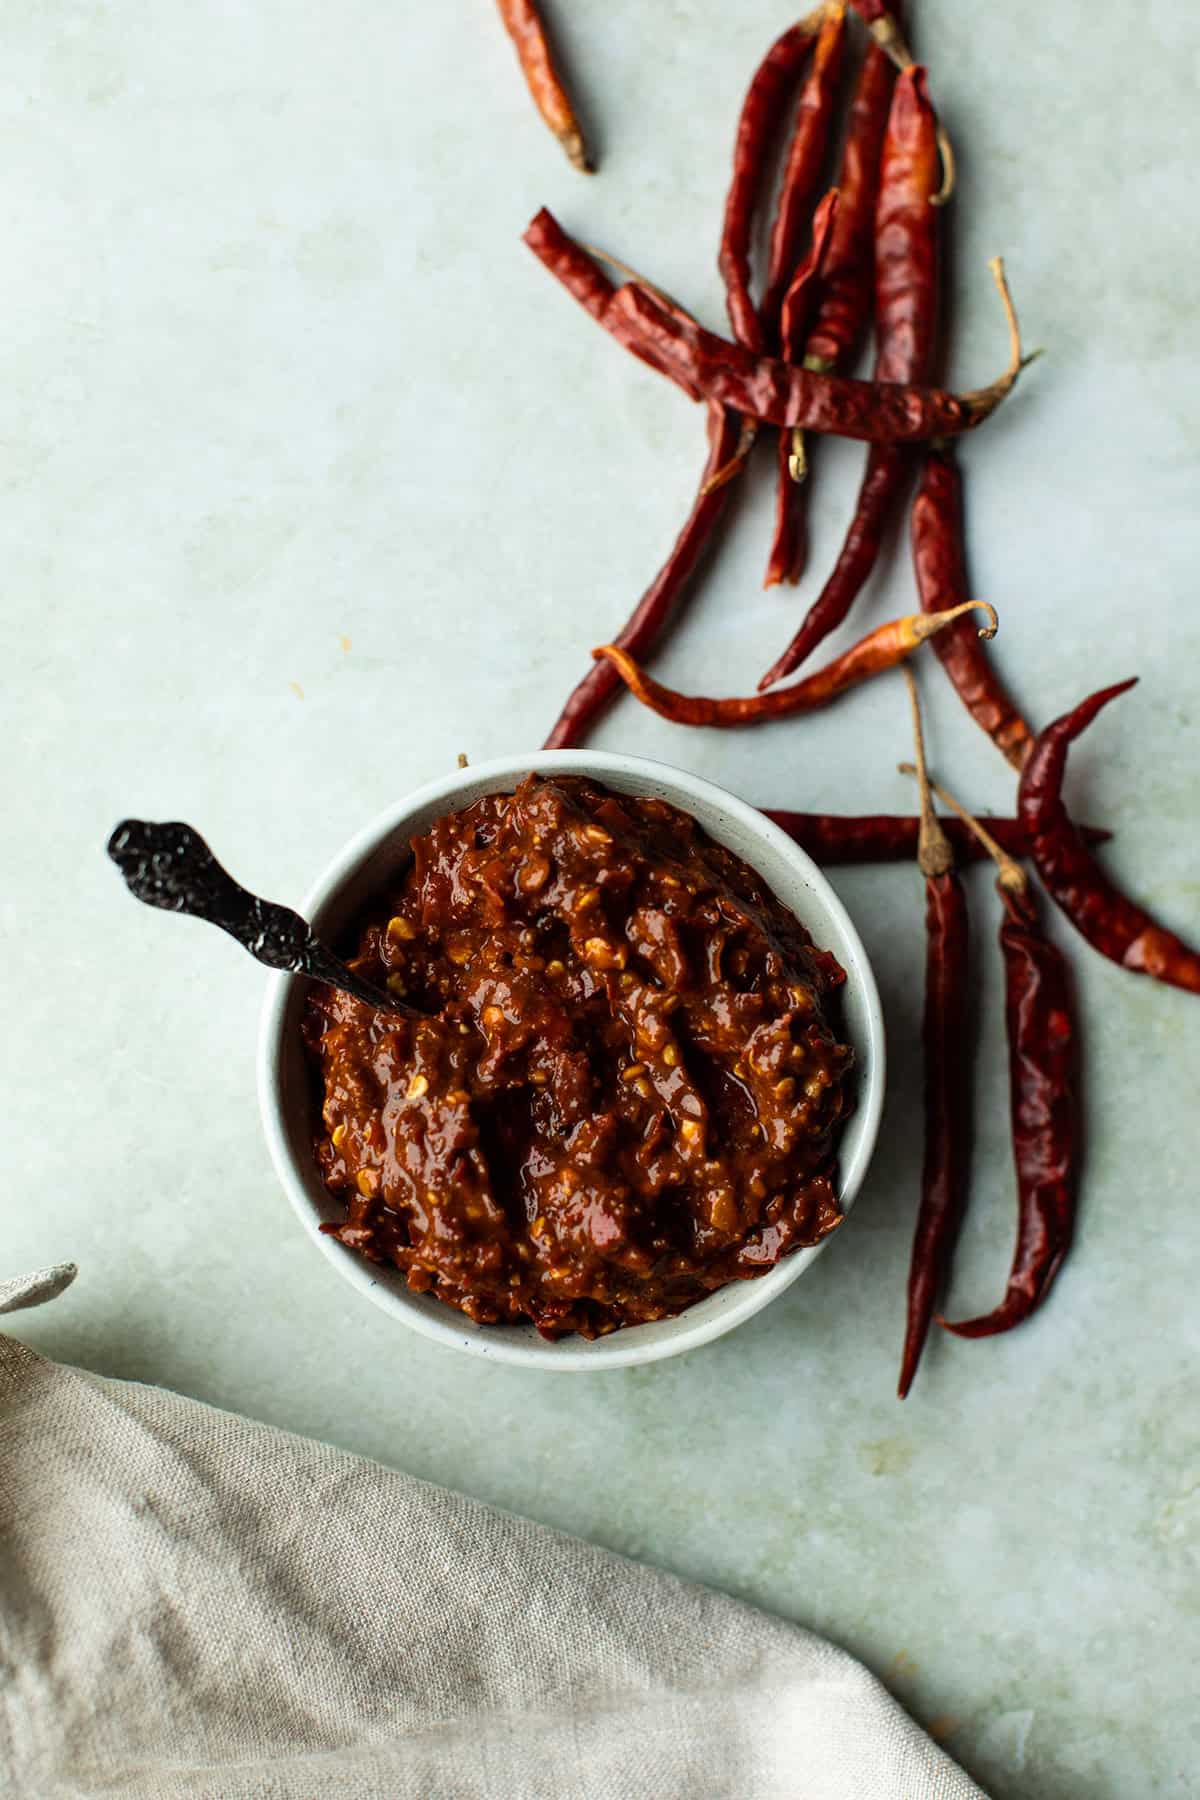
If you love bold, spicy flavors, homemade harissa paste is one of those condiments that deserves a permanent spot in your fridge. This homemade spicy harissa is smoky, earthy, slightly sweet and packed with chili flavor, with enough heat to make things interesting without completely overpowering the rest of your meal.
Harissa is a spicy chili paste associated particularly with North African cuisine, especially Tunisia. There are many different versions, and the exact ingredients and level of heat can vary considerably from one recipe to another.
At its heart, harissa is all about dried chiles combined with aromatic spices, garlic and oil. Some versions are fiery hot, while others focus more on smoky, fruity or earthy flavors. That’s one of the reasons homemade harissa is so useful: you can create a blend that suits your own taste.
Making harissa at home is surprisingly easy. Dried chiles are softened in boiling water, toasted whole spices are ground until fragrant, and everything is blended together with garlic and olive oil until you have a thick, intensely flavored paste.
The best part is that you can completely customize the heat. For this version, I used a combination of guajillo, Thai chiles, árbol chile and pasilla peppers. The guajillo and pasilla bring depth and a mild fruity sweetness, while the Thai chiles provide most of the heat.
It is so versatile. Use it as a marinade, stir it into soups and stews, spread it onto sandwiches, or simply spoon a little over roasted vegetables. Once you have a jar of homemade harissa in the fridge, you’ll probably start finding excuses to add it to everything.
Ingredients
To make your own harissa paste you will need
Dried chiles: The dried chiles are the foundation of the harissa, and the type you choose will have a huge effect on the finished paste. Baklouti peppers are authentic to Tunisia (read more under Recipe FAQs), but it’s not readily available everywhere. I used a mixture of guajillo, Thai chiles, árbol chile and pasilla peppers. Guajillo chiles provide fruity, slightly sweet flavor without a huge amount of heat. Pasilla brings a darker, earthy character, while the smaller Thai chiles and árbol chile add the heat. You don’t have to use exactly the same combination. In fact, mixing mild and hot chiles is a great way to create a harissa that has both flavor and heat.
Caraway seeds: A key spice in Tunisian-style harissa, adding a warm, earthy flavor with subtle anise-like notes and a distinctive depth.
Cumin seeds: Cumin gives harissa its warm, earthy backbone. Whole cumin seeds are especially flavorful when lightly toasted before being ground.
Coriander seeds: Coriander adds citrusy, floral notes that help balance the deeper flavors of the cumin and dried chiles.
Fennel seeds: Optional. Fennel adds a subtle sweetness and aromatic quality. Toasting the seeds before grinding brings out their flavor and makes the finished harissa taste much more complex.
Salt: Salt brings all the flavors together.
Cinnamon: Cinnamon is optional, but a small amount adds warmth and complexity. You shouldn’t be able to clearly identify cinnamon in the finished paste – it simply gives the background flavors a little more depth. I love this hack for Middle Eastern and North African cuisine.
Garlic: Fresh garlic adds pungency and savory depth. It works particularly well with the earthy spices and fruity dried chiles.
Extra virgin olive oil: Olive oil brings the ingredients together into a thick paste and gives the harissa a smooth, spreadable consistency. You’ll also use additional olive oil if storing the harissa. A layer of oil on the surface helps protect the paste from exposure to air.
Lime and lemon juice: Citrus juice is optional, but then again highly recommended. Lime or lemon can brighten the intense flavors and add a little acidity to balance the richness of the oil and sweetness of the chiles.
Instructions
Toast the spices: While the chiles are soaking, place the caraway, coriander, fennel and cumin seeds in a dry non-stick pan over medium heat (1). Toast them for a couple of minutes, shaking or stirring the pan regularly, until they become fragrant.
Be careful not to burn them, as burnt spices can make the entire paste taste bitter.
Transfer the toasted spices to a mortar and pestle or spice grinder (2) and grind them into a fine powder (3).
If you’re using ground spices, simply skip this step and add them directly when blending.
Soak the dried chiles: Place the dried chiles in a heatproof bowl and cover them with boiling water (4). Cover the bowl and let the chiles soak for around 30 minutes, or until they have softened. This makes the dried peppers soft enough to blend into a smooth paste while also making it easier to remove the stems and seeds.
Prepare the chiles: Drain the softened chiles well. Remove the stems and deseed them according to your preferred level of heat (5).
Wear disposable gloves when handling the chiles. The capsaicin from hot peppers can remain on your hands and cause a painful burning sensation, especially if you accidentally touch your eyes or face afterward.
I leave the seeds and inner membranes in the guajillo chiles but remove most of the seeds from the bird’s eye or Thai chiles. This gives the harissa plenty of heat while keeping the fruity flavor of the milder peppers.
For a milder harissa, remove more of the seeds and inner membranes. For a hotter version, leave more of the hot chiles intact.
Blend the harissa: Add the softened chiles, toasted and ground spices, salt, cinnamon if using, garlic and olive oil to a food processor (6). Blend until you have a thick, smooth paste (7). You may need to stop and scrape down the sides of the food processor once or twice.
Don’t add too much oil at once. You want a thick paste rather than a loose sauce.
Adjust the flavor: Taste the harissa and adjust the seasoning as needed. Add more salt if the flavors seem flat, or add a little lemon or lime juice if you want a brighter, more acidic finish. If the paste is too thick to blend smoothly, add a little more olive oil until you reach the consistency you want.
Store the harissa: Transfer the finished harissa to a clean jar. Smooth the surface and pour a thin layer of olive oil over the top. Keep the jar refrigerated and use the harissa within about one month.
Substitutions
There’s rarely one size fits all, so here are my substitution suggestions
Guajillo chiles: Ancho chiles are a good alternative if you want a mild, fruity and slightly smoky flavor.
Pasilla chiles: Ancho or other mild dried chiles can be used instead.
Thai chiles: Use bird’s eye chiles, árbol chiles or another hot dried chile.
Árbol chiles: Cayenne or another hot dried chile can be used, although the flavor will be slightly different.
Caraway, fennel, cumin and coriander seeds: Use ground if you don’t have whole seeds. No need to toast them first.
Olive oil: Use another neutral-flavored oil if necessary, like canola oil or sunflower oil, although olive oil adds a pleasant flavor to the finished paste.
Lemon and lime juice: You can use either or, or freshly squeezed orange juice for a sweeter flavor.
Fresh garlic: Garlic powder can technically be used in a pinch, but fresh garlic gives a much better flavor and texture.
Variations
Make it extra spicy: Use more Thai, bird’s eye or árbol chiles, and leave some of the seeds and membranes intact. Remember that it’s much easier to make harissa hotter than it is to make it milder, so add the hottest chiles gradually.
Make it milder: Use mostly mild, fruity chiles such as guajillo and pasilla, and remove the seeds and membranes from the hot peppers. You can also reduce the amount of hot chiles without changing the rest of the recipe.
Make it smoky: Add a small amount (try ⅓ teaspoon) of smoked paprika for a deeper, smokier flavor. You can also include more dried chiles with naturally smoky characteristics.
Make it extra citrusy: Add a little more lemon or lime juice at the end. This is especially good if you’re planning to use the harissa as a dressing, dip or marinade.
Make it richer: Use a little extra olive oil for a looser, richer paste. This version works particularly well drizzled over roasted vegetables, grilled meats or hummus.
Make a quick harissa sauce: Mix the finished paste with Greek yogurt for a creamy spicy sauce. It’s excellent with grilled chicken, lamb, roasted potatoes or as a dip for flatbread.
Equipment needed
You don’t need much equipment to make homemade harissa, but a good food processor makes the job considerably easier. So what you’ll need is:
Heatproof bowl for soaking the chiles
Small non-stick skillet for toasting the spices
Mortar and pestle or spice grinder
Food processor
Rubber spatula
Clean glass jar with a lid
A food processor will give you a relatively smooth paste. If you prefer a more rustic texture, pulse the mixture fewer times and leave some small pieces of chile and spice intact.
If you don’t have a food processor, a powerful blender can work. You may need to add a little extra olive oil to help everything move around the blades.
A mortar and pestle can also be used for a more traditional approach, although it will take considerably more effort to achieve a completely smooth paste.
Storage
Transfer the harissa to a clean, airtight jar and smooth the surface. Cover the top with a thin layer of olive oil before sealing the jar. Store the harissa in the refrigerator and use it within about one month.
Always use a clean spoon when taking harissa from the jar, rather than dipping used utensils into it. Refill the top with oil to keep it from going bad. If you notice mold, an unusual smell or any other sign of spoilage, discard it.
For longer-term storage, freezing is a convenient option. Freeze the harissa in small portions, such as in an ice cube tray, so you can thaw only what you need.
Homemade harissa is also very make-ahead friendly. The flavors can become even more rounded after sitting for a day or two, making it a useful condiment to prepare before a dinner party or weekend cooking session.
Expert tips
Choose your chiles carefully. The chile combination determines both the heat and the character of your harissa. Don’t simply use the hottest peppers you can find – combining mild, fruity chiles with hotter varieties gives you much more flavor.
Wear gloves. This is particularly important when working with Thai chiles, bird’s eye chiles or other hot peppers.
Don’t burn the spices. Toast them just until fragrant. If they become very dark or smell bitter, start again with fresh spices.
Remove seeds according to heat preference. You don’t necessarily have to deseed every chile. Keeping some seeds and membranes from the milder peppers while removing most from the hotter ones is a useful way to control the heat. Just remember that the seeds can be a little bitter if you add too many of them.
Don’t drown the paste in oil. Add enough olive oil to create a smooth, thick paste. You can always add more later.
Taste after blending. The flavor can change considerably once all the ingredients are combined. Adjust salt and citrus at the end rather than adding too much at the beginning.
Let it rest. If you have time, allow the harissa to sit for a few hours before using it. The spices and chiles have more time to come together.
Keep the surface covered with oil. When storing the harissa, a thin layer of olive oil on top helps limit its exposure to air. Remember to refill whenever you take some paste.
Recipe FAQs
Harissa is generally made from dried chiles, spices, garlic and oil. Recipes vary considerably, and some include additional ingredients such as citrus, vinegar, tomatoes or roasted peppers.
In Tunisia, Baklouti peppers are the chili most closely associated with traditional harissa. They are known for their fruity flavor, vibrant red color, and moderate heat, giving Tunisian harissa its characteristic balance of warmth and depth.
Since Baklouti peppers can be difficult to find outside Tunisia, a blend of guajillo, pasilla, árbol, and Thai chilies makes a great substitute. The guajillo and pasilla provide fruity sweetness, rich color, and body, while the árbol and Thai chilies add a sharper heat.
Together, they create a layered chili flavor that balances sweetness, depth, and heat, making the blend a flavorful alternative when authentic Tunisian Baklouti peppers are not available.
Keep in mind that a harissa is a chili paste, so if you’re very sensitive to spicy, it isn’t for you. However, the good news is that you can to some degree choose the level of spicy.
It depends on the chiles used. Harissa can range from relatively mild (for a chili paste) and fruity to intensely hot. Using a combination of mild chiles and a smaller amount of hot chiles gives you much better control over the final heat level. Read the previous question for chili options. or under Variations above.
Do I have to remove the seeds from dried chiles?
No, but also yes.
Removing the seeds and membranes is mainly a way to reduce the heat and bitterness and create a smoother paste. For this recipe, I leave the guajillo seeds but remove most of the seeds from the hot Thai or bird’s eye chiles so it won’t get scorchingly spicy.
Can I use fresh chiles instead of dried chiles?
You can make a chili paste with fresh peppers, but it won’t have the same concentrated, deep flavor as harissa made with dried chiles. Dried peppers are an important part of the characteristic flavor and texture.
Yes. Whole spices are toasted and ground in this recipe because they provide particularly good flavor – but ground caraway, fennel, cumin and coriander can be added directly to the food processor.
How long does homemade harissa last?
Store it in an airtight jar in the refrigerator and use it within about one month. Keep the surface covered with a thin layer of olive oil and always use a clean utensil when serving.
Can I freeze homemade harissa paste?
Yes. Freezing it in small portions is a convenient way to preserve it for longer. An ice cube tray works particularly well because you can thaw small amounts whenever you need them. Keeps for 3-4 months in the freezer.
What can I use harissa paste for?
There are almost endless possibilities. Use it as
Why is my harissa too bitter?
The spices or chiles may have been overheated or burnt. Toast spices only until fragrant. The seeds in the chiles can also be bitter when processed, which is also one reason to remove as much of it as possible.
A little extra olive oil and citrus juice can sometimes help balance a slightly bitter paste, but heavily burnt ingredients are difficult to rescue.
Enjoy!
Did you like this recipe? Here are more recipes to spice up your dinner:
I’d love to hear your thoughts. Comment below or tag me @thegingerwithspice on Instagram. And don’t forget to Pin it for later! To make sure you’re never missing another recipe, please feel free to subscribe to my newsletter.
As thanks, you will receive a free e-cookbook Travels Through the Seasons, with many delicious recipes from around the world that suit different seasons of the year.
To keep the blog up and running this post may contain affiliate links, it will be at no extra cost to you, please read the disclosure for more information.
Homemade spicy harissa paste with dried chiles, toasted spices and garlic is easy to customize and perfect for marinades, dips and more.
2 oounces dried chiles* (50 grams)
1 teaspoon caraway seeds (or ½ teaspoon ground)
1 teaspoon fennel seeds (or ½ teaspoon ground)
1 teaspoon cumin seeds (or ¾ teaspoon ground)
1 teaspoon coriander seeds (or ¾ teaspoon ground)
1 teaspoon salt (to taste, start with half)
¼ teaspoon ground cinnamon (optional)
2 cloves garlic
2 tablespoon olive oil (plus more for storing)
1 lime, juice only (optional, start with half)
1 lemon, juice only (optional, start with half)
Toast the spices: While the chiles are soaking, place the seeds (caraway, fennel, cumin, and coriander) in a dry non-stick pan over medium heat. Toast them for a couple of minutes, shaking or stirring the pan regularly, until they become fragrant.
Grind the spices: Transfer the toasted spices to a mortar and pestle or spice grinder and grind them into a fine powder. If you’re using ground spices, simply skip this step and add them directly when blending.
Soak the dried chiles: Place the dried chiles in a heatproof bowl and cover them with boiling water. Cover the bowl and let the chiles soak for around 30 minutes, or until they have softened. This makes the dried peppers soft enough to blend into a smooth paste while also making it easier to remove the stems and seeds.
Prepare the chiles: Drain the softened chiles well. Remove the stems and deseed them according to your preferred level of heat.** I leave the seeds and inner membranes in the guajillo chiles but remove most of the seeds from the bird’s eye or Thai chiles. For a milder harissa, remove more of the seeds and inner membranes. For a hotter version, leave more of the hot chiles intact.
Blend the harissa: Add the softened chiles, toasted and ground spices, salt, cinnamon if using, garlic and olive oil to a food processor. Blend until you have a thick, smooth paste. You may need to stop and scrape down the sides of the food processor once or twice. Don’t add too much oil at once. You want a thick paste rather than a loose sauce.
Adjust the flavor: Taste the harissa and adjust the seasoning as needed. Add more salt if the flavors seem flat, or add a little lemon or lime juice if you want a brighter, more acidic finish. If the paste is too thick to blend smoothly, add a little more olive oil until you reach the consistency you want.
Store the harissa: Transfer the finished harissa to a clean jar. Smooth the surface and pour a thin layer of olive oil over the top. Keep the jar refrigerated and use the harissa within about one month.
Notes
* Harissa is traditionally made with Tunisian baklouti peppers, however this is not always readily available. To get the same complex flavor profile, I used two guajilos, a handful Thai bird’s eye chilies, one arbol chile and the rest was pasilla. This gives the harissa plenty of heat while keeping the fruity flavor of the milder peppers. Any combination you like can work, see tips in the blog post.
** Word of caution: Wear disposable gloves when handling the chiles. The capsaicin from hot peppers can remain on your hands and cause a painful burning sensation, especially if you accidentally touch your eyes or face afterward.