It’s frustrating to work hard on an oil painting, only to realise that the colours have dulled or sunk as they dried. But this doesn’t have to be the final appearance of your painting – oiling out is a simple solution to restore colours to their true tone and luminosity, without piling on more paint. In the following article, I describe and demonstrate this simple technique, which has the power to revive dulled colours in oil paintings.
Articles in the Techniques Series define the meaning and context of art making processes and give practical tutorials on how to work with them.

Definition: ‘Oiling out’ is an oil painting technique where the surface of a dried oil painting is rubbed with medium to restore the true value and colour of sunken or dull paint. Once the painting has been successfully oiled out, a new layer of paint can be added, or the painting can be varnished.
Why Does Oil Paint Dull as it Dries?
Oil paint can sink or dull whilst drying for a number of reasons. These include:
When the support hasn’t been properly sealed or primed, oil paint may sink into inconsistent patches, thin, or overly absorbent areas of ground. Refer to the articles, How to Paint on Wooden Surfaces, Size, Primer, Gesso and Ground Explained and Rabbit Skin Glue: Preparation, Uses and Alternatives for proper priming advice.

When paint is diluted with too much solvent, it creates a weak, brittle film that makes the layer ‘thirsty’. This dry layer will draw oil from subsequent ‘fatter’ layers down within the painting, leaving the surface layers dull.
When the fat-over-lean rule isn’t properly followed, areas of paint that are lean over fat will appear dull when painted on top of fatter, shiny paint.

Certain pigments in oil paints are more prone to sinking than others. For example, this often occurs with umber or black colours. Whilst working, you can help to prevent them sinking by noting which colours naturally dry more matt, even on a properly prepared ground. When using these colours in your next painting, make sure to add more oil to them.

In many cases, oiling out is a useful method for correcting these factors. However, if the sheen or colour of a painting isn’t improved by oiling out, the work may have fundamental issues within the paint layers that make it too unstable for this technique to visually correct at the surface.
The Effect of Oiling Out

When an oil painting is ‘oiled out’, it refreshes the colours and allows artists to see the true value of the work. After restoring the intended appearance of their painting, artists can better judge how to proceed with it – or decide if it’s now complete. Oil paintings that have dark or rich colours suffer the most from dull paint, since changes in sheen stand out more on them visually. When artists use the oiling out technique, they give their viewers the best experience of their work by improving the surface quality and colour, and allowing them to experience the work as the artist intended.
Despite the technique’s benefits, it’s important to note that it’s not necessary to oil out every painting. Some works will be completed with perfectly layered fat over lean paint, with a balanced oil content, giving the work saturated colour and even sheen. In these instances – oiling out isn’t required.

If you don’t varnish your oil paintings, oiling out is useful for unifying the surface of a painting with an inconsistent finish, making it ready for presentation. If you varnish your paintings, oiling them out first is best practice. This is because varnish doesn’t have the power to completely unify a painting’s surface on its own. If an oil painting has dry or sunken areas next to shiny, fat areas, when a gloss varnish is applied on top, the dry areas will be duller, next to the high gloss of the fat areas. By oiling out a painting like this first, your varnish layer will be more unified too. It’s a common mistake to layer more varnish on a painting with an inconsistent finish to try to make it more even. This can also be detrimental to the longevity and appearance of the work if the varnish application becomes too thick.

If you’d like to continue working on your painting, oiling out is considered more stable than applying a layer of retouching varnish to a painting. This is because an oiled-out layer creates a permanent bond with the surface, whereas a retouching varnish is easily resoluble. In terms of longevity, it’s more archival to make oil paintings that don’t have any resoluble layers.
The History of Oiling Out
The history of oiling out is tied to innovations in oil painting, through the process of working fat-over-lean. In the 15th Century, oil painting techniques were developed by the artists of the Northern Renaissance, who layered their paintings in successively fatter glazes. This gave their works rich colour, complex tone, sheen, and stability. Although these artists didn’t ‘oil out’ as we know it today, they were aware of the importance of the ratio of oil to paint to make the best of their colours. You can read more about the history of oil paint in our article, Oil Paint Through the Ages: Tradition and Innovation.

Hans Holbein the Younger
Oil and gold on oak, 42.2 x 32.4 cm | 16.6 x 12.8 in
The Metropolitan Museum of Art
By the 18th Century, oiling out appeared in detailed descriptions in artists’ manuals and was taught as a technique. Painters who successfully oiled out their works achieved unified paint surfaces, with even sheen and rich colour. Through study by conservators, it’s known that some artists ‘oiled out’ too much, to the detriment of their paintings. For example, Jean-Antoine Watteau had a rapid painting technique, where he regularly coated the entire surface of his paintings with thick oil, and then painted into this wet layer. These inconsistencies in fat and lean layers, paired with a thick application of oil prone to yellowing and cracking, have made many of his works age poorly. We can see this effect in The Love Lesson, which has dulled and cracked over the years.

Antoine Watteau
Oil on wood, 44 x 61 cm | 17.3 x 24 in
Nationalmuseum
In his attempts to replicate the finish of works by the Old Masters, Joshua Reynolds also made a series of woeful experiments in layering in his paintings. Reynolds’ paintings are now exceptionally difficult for conservators to preserve, because he constantly reworked his paintings with experimental materials. This included applying layers of oiling out to dry paint to bring back sunken colour, continuing to paint over resin varnishes, and adding wax and bitumen to the work. By combining disorderly flexible and inflexible layers in his works, and disregarding the fat-over-lean principle, several of his works today are discoloured, cracked, and faded.

Joshua Reynolds
Oil on canvas, 73.7 x 61 cm | 29 x 24 in
Art Institute of Chicago
Demonstration of Oiling Out
You will need:
A completely dry oil painting
A jar of clean painting medium that matches the medium you have painted the work in, mixed with a ratio of oil following the fat-over-lean rule.
A lint-free cloth
Plastic gloves

1. Make sure your painting is completely dry to the touch, so you don’t accidentally shift any paint.
2. Prepare a clean jar of the medium you’ve painted the rest of the work in, by following the fat-over-lean rule. The medium you use to oil out should be ‘fatter’ in oil content than the previous layer of paint. Make sure that the components of your medium are completely combined to prevent inconsistent application.

Some examples of oil painting mediums are: Stand Oil with Pure-Sol, Galkyd with Gamsol, and Linseed Oil with Turpentine.
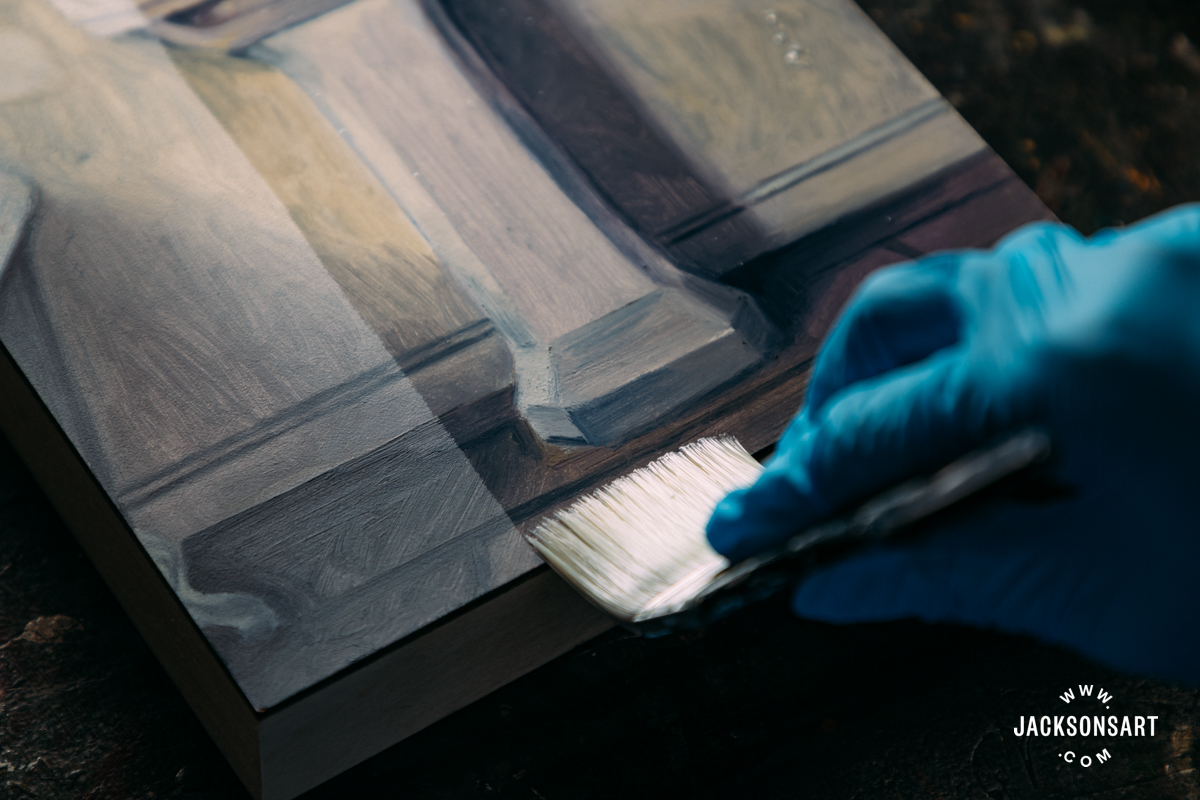
3. Use a soft flat brush to evenly apply the medium to the painting. The dull, dry areas of the painting will absorb the medium quickly, and any excess medium on already fat areas of paint will sit on the surface.

4. Leave the medium to sit for a couple of minutes before lightly and evenly wiping it off with a lint-free cloth. It’s important to use a lint-free cloth, so hairs and fibres aren’t adhered to your painting. Make sure to wear plastic gloves to protect your hands from the solvent in your medium.

5. Now that your painting is oiled out, you can continue painting on top of it, with the benefit of seeing the refreshed colours, or it is ready to be varnished once dry.

Tips: Oiling out doesn’t necessarily have to be applied to an entire oil painting – you can easily oil out specific areas of a painting that may be drier than others. This method may work best for painters who work methodically around a painting in sections, rather than painting in complete layers. As long as you continue to follow the fat-over-lean rule, your work should be stable.
It isn’t advisable to leave behind a thick layer of medium, or allow it to dry, before wiping it down. This is because the excess layer of oil will yellow your work over time, even if the shine it gives initially looks appealing.
Once you’ve oiled out a painting, it’s a good idea to elevate it in a flat position whilst it dries, at least above floor-level, but preferably on top of a shelf. This will help to prevent dust from getting stuck to this wet layer.
Further Reading
Creating Oil Paintings that Stand the Test of Time
Oil Painting Guide: Paints and Mediums
How To Varnish a Painting in Oil, Water-Mixable Oil or Acrylic
Shop Art Supplies at jacksonsart.com